
#clashon #clashofclans @Irfan_Gaming_
This Queen Charge Lavaloon Guide was written by Irfan Gaming Academy. Follow him on social media here: YouTube, Twitter, Facebook and Instagram.
Introduction
In this guide I will be going through Queen Charge Lavaloon TH9 (QC Lalo). QC Lalo is one of the strongest attack strategies across all levels. Aside from TH13 currently due to the amount of splash. This attack strategy is a MUST know how for every clasher. Learning how to do Queen Charges (QC) is very important. This is because most of the attacking strategies at higher levels involves QC. This attack is more of a skilled base attack rather than spamming and praying you get a triple. You will need to practice in farming or Friendly Challenges before you go into wars. QC Lalo can hit probably 90% of bases on TH9 for 3 stars. In my experience, the bases that are designed to specifically counter Lavaloon, can easily be taken down by GoHoBo.
In this guide I will be covering the army composition, base identification (key structures to take down), Queen charge deployment (funneling, charging, pathing and so on), Lalo pathing, spell deployment also common mistakes made. So without further ado let’s get right into it.
Queen Charge Lavaloon Composition

This is the army composition I like to run. Thisguide is balanced in terms of giving adequate spells/troops to both the Queen Charge and Lavaloon portions of the attack. The DPS at TH9 is not insanely high to have to take 5 healers. Therefore, two rages are sufficient to carry the queen through the attack. Eight wall breakers are for opening 2 layers of walls for queen charges. In most cases this should allow your queen to take down all the key structures that are needed.
One Lavahound is taken in army and another one in the clan castle (CC). This is sufficient enough to provide the tanking for the loons. Five haste spells to carry loons through Wizard towers, tesla farms, x-bow compartments, etc. Likewise are 4 healers enough to keep your queen alive. On TH9, unlike Th11, Th12, or Th13, bases very rarely have seeking air mines (SAM’S) outside the base. You hardly ever run the risk of loosing your healers early in raid due to SAMs.
I recommend taking poison in cc and save it for enemy clan castle troops. Also, do not use poison on the enemy queen!! More on that below.
QC Lalo for War or Farm?
This is the best army comp in my opinion. I also like to run this strategy for farming attacks. Many of the bases in multi-player battles are not well designed. Consequently, I end up not using my clan castle hound or spell in many instances. Another advantage is that Most of them are internet bases, even maxed ones. So, if you are in a clan that is unable to donate (max) troops, this is your go-to strategy for farming.
For war attacks you may switch your troops as needed and plan it even more perfectly.
I would recommend at least having a level 20 queen for using this strategy in wars against max bases. For farming you should start with at least a level 10 – 15 queen to start practicing and get the hang of it.
Loons MUST be level 6 and haste spell level 2. For wars rather take a max Lavahound in your CC. You can start farming with level 1 haste and Lavahound tohelp build your confidence.
Why wall breakers and not Earthquake (EQ) or Jump Spells?
At Th9 the we get only 9 spell spaces + 1 in your CC. Adding jump spells (2 space) will limit the spells allocated to either the QC or Lalo portion of the raid. Earthquakes (4 space) are likewise a no-no. EQ are good at higher TH level such 11, 12 and 13, because you have more spell slots. The value we get from EQ is more on higher th levels,damaging and lowering the hit points of buildings like EA, Infernos, and Xbows. The amount of access given by eq on higher TH levels is also high. At Th9 the same job can be done by using 8 wall breakers (in some case even less). The only significant high HP structures on town hall 9 are X-bows.
Base Identification
In this section I point out the key objectives that you should definitely take out with the queen charge. If you can accomplish the objectives set out in this guide, then you are good to hit the base with Queen Charge Lavaloon.
To run a successful Lalo of any kind you must take out enemy archer queen (AQ) as well as the enemy Clan Castle troops (CC) before you start the Lalo. Taking out enemy queen is your TOP priority before the enemy CC.
Dealing with the enemy queen
A level 30 queen’s DPS is 327, which is higher than the DPS of a level 8 Air Defense. While max air defense on Th9 is only level 7. The queen also has a higher rate of fire, she is mobile and the loons do not target her. So DO NOT rely on loon drops or raged pups to take her down. In reality, the probability of that happening is extremely low. The chances of your attack probably failing is very high if you do not take the enemy queen down.
Enemy Clan Castle troops
Taking out enemy CC is obvious, because the loons can’t target it. If you know from scouts that the cc are not a threat to loons you should avoid pulling it altogether. Troops that are not a threat to loons include ice golem, hound, loons, valkyries, pekka, golem, barbarians and giants.
Taking out Air defenses (AD)
Another big threat to loons, after cc and queen, would be air defenses. You must aim to take down at least 1 air defense with the queen charge. If you are able to take down 2 ADS it would be great! Even if you take down only 1 AD along with the enemy AQ and CC and you create a good pathing for your Lalo you should be fine.
Create a Path for the Lalo
While doing the Queen charge you should create a path for the lavaloon portion of the raid, as shown in this guide. This is done to get full spell value, but it also ensures that your loons do not split up.
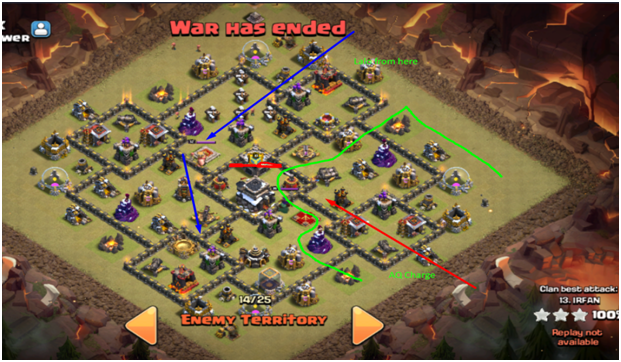
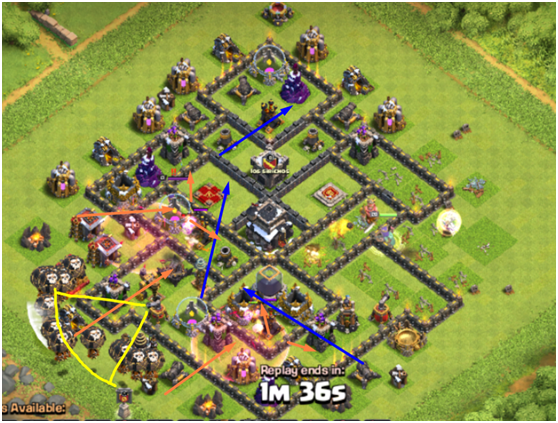
As shown in the above picture the QC starts from around 4 o’clock direction. She pushes into the base with wall breakers and gets the enemy queen and CC including an air defense. She also clears out an entire compartment defense (shown in green). This makes the Lalo, which starts from the 12 o’clock area, to path along very nicely. Getting the triple on the base with 3 Air Defenses still standing. The haste spell should always be placed near wiz towers and tesla farms. In this case it was quite obvious it would be near builder huts.
Queen Charge Deployment
Entry Point
Choose an entry point which will give you access to all the objectives stated above by only opening max 2 layers of wall. Also choose the area which is not under fire from both x-bows at same time as their DPS and rate of fire melts down queen charges quite fast.
Air Sweeper
You should also aim to take out sweepers that are pointing towards the area where your Lalo is coming from. It will significantly help your attack and have a huge impact on it. What I am saying is explained below.
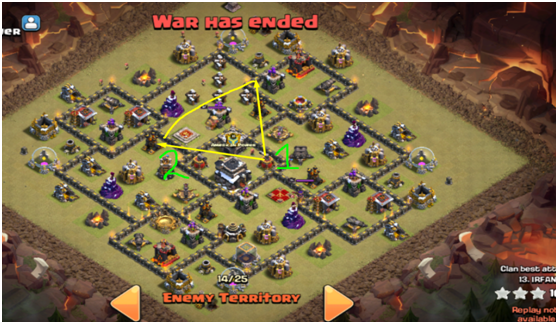
In the above screenshot I plan to start QC from 4 o’clock and Lalo from around 12. So the Sweeper (marked as 1) will be pushing my loons of my Lalo back. Taking that one out will be key. Sweeper 2 will not have any effect on the Lalo portion and therefore can be ignored.
Funneling the Queen
For funneling I use Barbarian King (BK) on one side and a baby dragon on the other. Make sure your queen is taking damage when you drop her, so that the healers do not switch to the BK. To avoid this drop the BK before dropping the AQ. Finally, drop the queen after the BK has set up the funnel. Do not hesitate to use the king’s ability early when it is at 50% health to set the funnel tighter. I usually also support the BK with 1-2 wizards.
Continuing with charge
After you have established the funnel and dropped the queen, drop the wall breakers (WB’s) to make the queen enter the base.Always drop 1 TEST wb to scout for small bombs and spring traps. Then drop 3 more to break the wall (max level at th9). Keep the charge going by dropping 1 rage if your queen is taking damage from multiple defenses or even to push faster through the base. Drop another rage when you engage the enemy queen. Your queen can easily take care of the enemy queen and live healthy with a rage on her.
Archer Queen Ability
I like to save my queen’s ability for later in the raid. Use Rages early to heal the queen up in the beginning of raid if she has multiple defense targeting her. When I start the lalo, my attention is diverted towards supporting the lalo with spells. I might miss my queen’s health, so if I keep the ability for later, she can AUTO ability to try and save herself.
How to use your poison
I am against poisoning the enemy AQ. Your poison should be used on enemy cc troops like witches, E-drag , lava pups and so on. A level 4 Electro dragon does 1,155 damage per hit and a level 30 AQ has 1,324 HP. It gets risky. Your queen might die immediately without using her ability. Even if she is hit only once and not near full health. If she is under Level 21 she will die at full health with only one shot from a maxed E-drag.
That is why I poison the E-drag to slow it down. In MOST cases the E-drag is not able to hit the queen even once. Likewise, the same applies to any other HIGH DPS unit like multiple valks (320 DPH per valk with faster hit speed) or PEKKA (1098 DPH), Wizard (345 DPH), etc. The stats are in DPH (damage per hit) instead of DPS (damage per second) which we see in clash.
Double witches are also a pain, as they spawn a millions of skeletons. Poison helps clear them out nice and easy, as well as with Lavapups.
So in short one rage for fighting enemy queen other wherever needed, poison for CC.
Pro Tip:
Try dropping the 1 WB’s (wall breakers) when the AQ is under rage you might be able to open another layer of wall with just 1 WB’s and gain access to even more of base.
Lavaloon Deployment
General Plan
Once you have gotten the key objectives with the Queen Charge (cc, enemy queen and at least 1 AD as previously stated in this guide) you can proceed with the Lavaloon phase.
You should deploy your Lalo so they go either clockwise or counter-clockwise direction through the path created with the AQ charge.
An example is shown below.
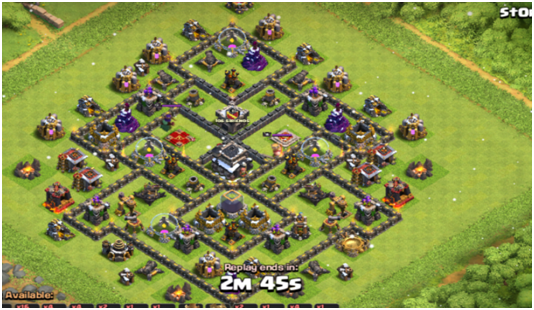
This was the base that had to be hit with QC Lalo.
Here is how I hit the base.
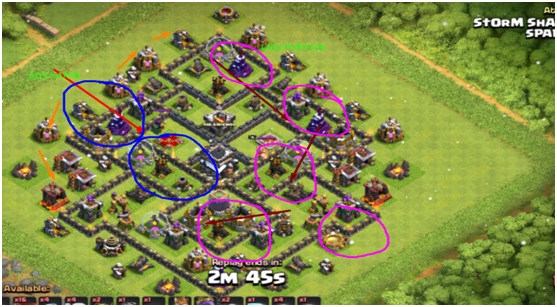
AQ charge to take out queen and 1 AD, orange path is funneling (BK goes top and Baby drag (BBD) goes down as there are no AD towards bottom to kill BBD while funneling).
Blue circles are RAGE spells. Notice that they are also covering the next layer of walls for wall breakers.
The Lalo portion starts from 12 o’clock and goes clockwise. Pink circles are roughly placed where I would drop my haste spells, in reality they may vary slightly as the raid progresses.
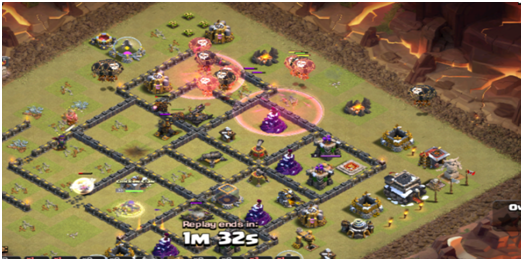
Here is an example of how an attacker approached this base.
There were few things that could have been improved:
Firstly: The Queen charged from wrong direction (should have gone for AQ). As a result, the enemy AQ ended up staying alive and killed 10-12 loons.
Secondly: Even though the queen charged from the other direction the lalo path was created. The Lalo portion should have been deployed following the BLUE lines (counter clockwise coming from 6 o clock). Instead it was deployed in a “Wall” formation (orange lines) and the loons ended up splitting up to sides.
Thirdly: The Haste spells, should have been dropped towards edge, because we need to haste Loons and not Lavahounds in these attacks. More on that below.
Loons and Lava deployment
This should be pretty easy drop your Lava first and then loons. Drop both Lavahounds at a distance from each other so they can cover more area and soak up red air mines. Red mines are generally near wiz towers. So if your Lava flies over them it would be a good thing. Sometimes you need to drop 1 lava on 1 ad or 2 on 1 AD, you might even need to wait before dropping the second lava. It all depends on the base and you will quickly learn what to do if you practice your attacks.
Surgical loon deployment
Loons should be deployed “Surgically” which means they should directly target each defense on approach. You need 3 balloons for wizard towers and AD, 5 for X-bows and 2 for most other point defenses such as cannons, Archer towers (AT), etc.
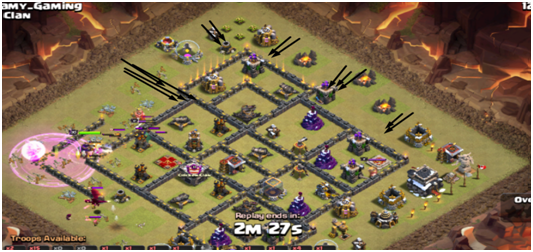
The number of black arrows correspond to the number of loons dropped.
Here is how it goes…
You should also save 1 loon per wizard tower if there are any back-end wizard towers to distract them when your main force reach it. So your clumped up loons don’t get hit by splash. I also save 1 Loon for cleanup in case I need it somewhere.
Spell Deployment
Spell deployment is one of the most crucial parts to any successful attack and is also true to Lalo. As mentioned earlier Rages are allotted for Queen Charge, poisoning the CC, saving 1 rage for fighting enemy queen.
Always drop haste spells covering the approach to the first defenses. After loons pass through the spell they still are “hastened” for a small amount of time.Ffor this reason covering the approach is preferred.
The reason I do not prefer rages for the Lalo portion is that the loons already have very high DPH (480’s). You really only need to speed them up not “power” them. Hastes give more speed than a Rage does. Also Rage costs 2 spell space and haste 1 space. If you a calculate the area covered by haste and rage spells you will find 2 haste cover more are than 1 rage does. Rage has 5 tiles radius and haste has 4 tiles: ( 2X∏42˃∏52).
Cleaning Up
Another important point to remember is to start cleaning up as soon as possible. Therefore you should start dropping your cleanup troops very soon after you have dropped your Lalo. Drop most of them on the side you started the Lalo, they also have to be behind the Lalo.
I usually bring 4 archers for corner builder huts. I also save 1 loon for cleanup if needed for a corner tesla. To avoid time failing start the Lalo when you hit the 1 min 30s mark during an attack. In farming I have ended up many times with high percentage 2 stars, because time ran out.. Therefore I start my lalo around the 1min 40s mark to be safe. The worst thing that could probably happen to you is a time-fail. Especially after you have CRUSHED the base and have 10+ loons left.
Base Identification:
In this section I will discuss bases that can be hit with Lalo and ones that should be avoided.
You should hit bases that are not very compact to avoid your queen taking damage from multiple defenses at once. If she is hit by three of more defenses she will die and run out of value quickly. Compact bases can be hit by Kill Squad (KS) attacks as the it will get huge value for example GoHoBo.
Bases which don’t have good AD placements as “anchor points” for lavahounds should also be avoided. Anchor points I mean bases in which Lava won’t be in position so that it is tanking for loons.
Overall there are very few bases that can effectively hold against Lalo attacks at TH9 the Queen Charge really give you a lot of versatility and creativity in attacks.
Common Mistakes and how to avoid them
These are the common mistakes that people make while using this strategy. I also made these mistakes when I first started to use this strategy. These are the things you should always guard against.
BK stealing away your healers
If your queen is not taking any damage from defenses, the healers will then rather heal the BK if he is close enough and taking damage. This is extremely frustrating and can also happen if he goes into a base. Avoid this scenario by starting your BK away from your queen while making sure that your queen is taking hits from defenses.
Wall break fail
This might happen if you don’t drop a test WBs and all are taken out by a small bomb, or hit by x-bows as a result. Your queen also might have cleared all the structures in the compartment you wanted to break into. In this case wb’s will target another wall, because they go after buildings not walls. YES! You read right, they go after buildings.
Queen dying early
This happens if she is under fire from multiple defenses or if her healers got shot down, because she pathed in a weird angle. Map out the path your queen will take before attacking. Ask yourself if she will get targeted by lots of defenses or will her healers get dragged in range of ADs.
Queen walking
It happens to the best players when queen does queen things and walks on you rather than going into the base. This might happen due to poor funneling, sometimes a enemy BK or CC troops or skeleton traps pull her out. Even if that happens try to get the best value out of your queen walk as you can. Always try to proceed with your attack.
Not studying replays
This is what I think most players do not always do. They do not watch replays. Most of the above mistakes can be avoided in your next attack if you just watch your own replays. It gives a lot of room for improvement. It would even be better to share it with your clan mates and ask for advice. I personally watch my war replays every time I am unable to land a triple. Sometimes I watch even 3 star attack just to see where I could improve myself.
Conclusion
Queen Charge Lalo is one of the strongest attack strategy across all TH levels. This is something you MUST have in your arsenal. Queen Charging is also something that you must know if you want to be a good clasher. It is vital part of most attacking strategies on higher town hall levels. This guide might sound like a lot of work, but once you start practicing Queen Charge lavaloon it will seem natural doing it. Wrecking bases at TH9 will be a piece of cake for you.
Here are few videos that you can check out related to the queen charge lavaloon guide.
In this clip we were preparing for the Th9 ESL 5v5. I tried to include replays which covered points discussed in the queen charge lavaloon guide.
In the above video Nemo demonstrates 3 types of Lalo attacks, the second one is Queen Charge Lavaloon relevant to this guide. You should check this one out! He does an excellent job at explaining pathing and why it is necessary.
Thank you for reading this far. By now you should know the basics about Queen Charge Lavaloon. All that is left now is to go out and practice, practice, and practice some more!
Happy Clashing!
Looking for members, a clan or a base layout? We got you covered! Join in our fun tournaments to earn Champ Bucks to ultimately spend in the Rewards Store!
Love what we do? Support us by using creator code CLASH CHAMPS while making any in-game purchases.

Other Clash Champ Articles You May Like:
Attack Strategy Guides
◊ Siege Barracks: 3-Star Guide ◊
Base Building Guides
◊ Bradder’s Th10 BB Guide ◊ Bradder’s Th12 BB Guide ◊ Derpy & Scott TH10 BB Guide ◊ Derpy & Scott TH10 BB Guide – German ◊
Buildings
◊ Scattershot ◊ Giga Inferno ◊
Clan Features
◊ The Bilderbergs ◊
Clash Champ Tools
◊ Never be Clanless Again ◊ Base Finder Tool ◊ I need a base update ◊ Never miss war attacks again ◊
E-Sports
◊ Katowice, Poland ◊Tribe Gaming Disbanding ◊
General
◊ Becoming a Pro-Gamer ◊ How to be a Great Leader ◊ Staying Motivated ◊
Hero’s
◊ Royal Champion ◊
Troops
◊ Yeti ◊ Siege Barracks ◊
Update/Event News
◊ Global Gone◊ CoC Creator Boost ◊ Creator Boost Expires ◊ Jolly Barbarian Skin ◊
Upgrade Priorities / Guides
◊ Any New Town Hall ◊ Town hall 5 ◊ Town hall 6 ◊


Really well written and an in-depth guide.
@Admin it would be great if you guys would create a separate tab for guide on clash champs it will be easier for users to find it then and will increase the overall traffic on your channel.
Thank you
We’ll definitely add that! Thanks Rishi for the feedback 🙂