
Ever wanted to learn TH9 base building? Wanted to be the BEST TH9 base builder in your clan? Stop those annoying Zap Dragons and Mass witches attacks on your base? Well, then this guide is exactly for YOU.
In this blog we will take a deep dive into all the aspects of Base Building at TH9. The builders who wrote this guide have been credited at the bottom along with their discord ID. We have also shared a Discord server link to join the Base Building Server. It’s the best place to learn Base Building.
So let’s jump right into it.
Table of contents
1- Basics of TH9 Base Building
1.1 Compartments
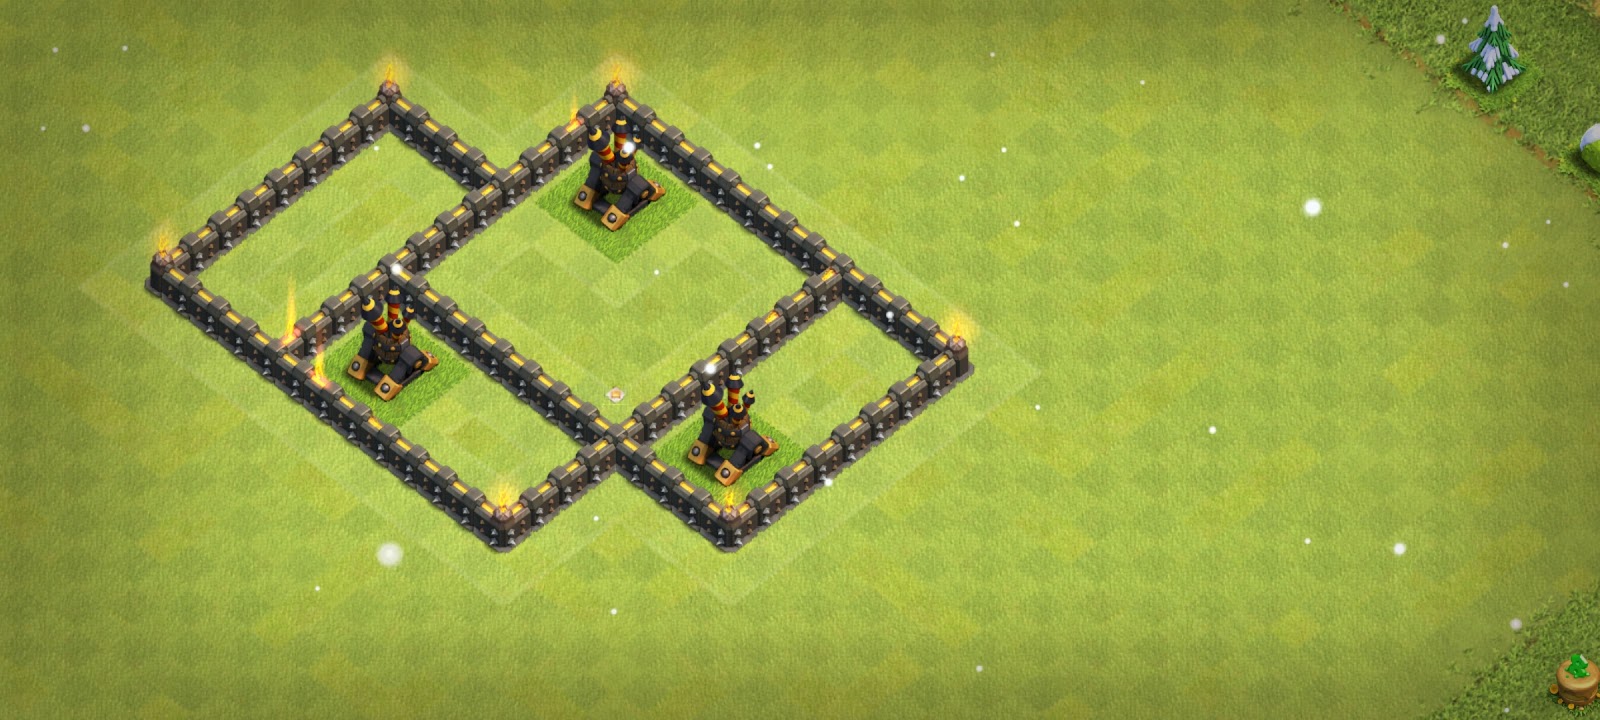
Regular compartments (“comps” in short) are very important, since they allow you to make buildings unwalkable for the queen, without wasting too much walls. The most common and useful comps are the ones below.
10×5 / 9×5

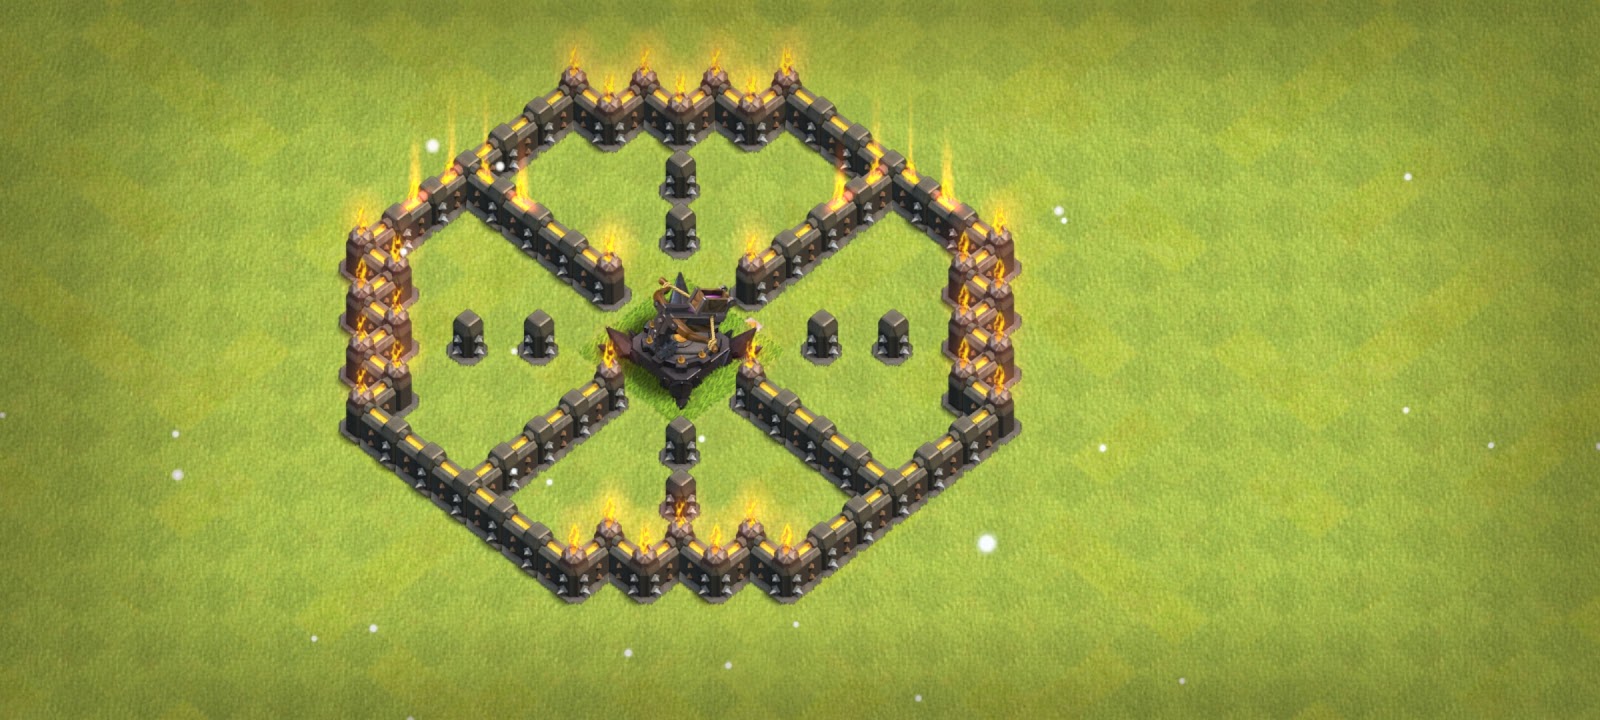
9×9/10×10


10×10 are used to minimize QQ (QuadQuake) value in aTH9 Base, since it’s quite hard to open them with a QQ. 9×9 are easier to open up because you need a less precise QQ placement.
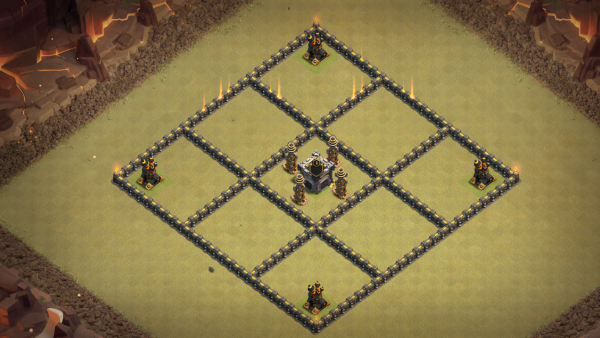
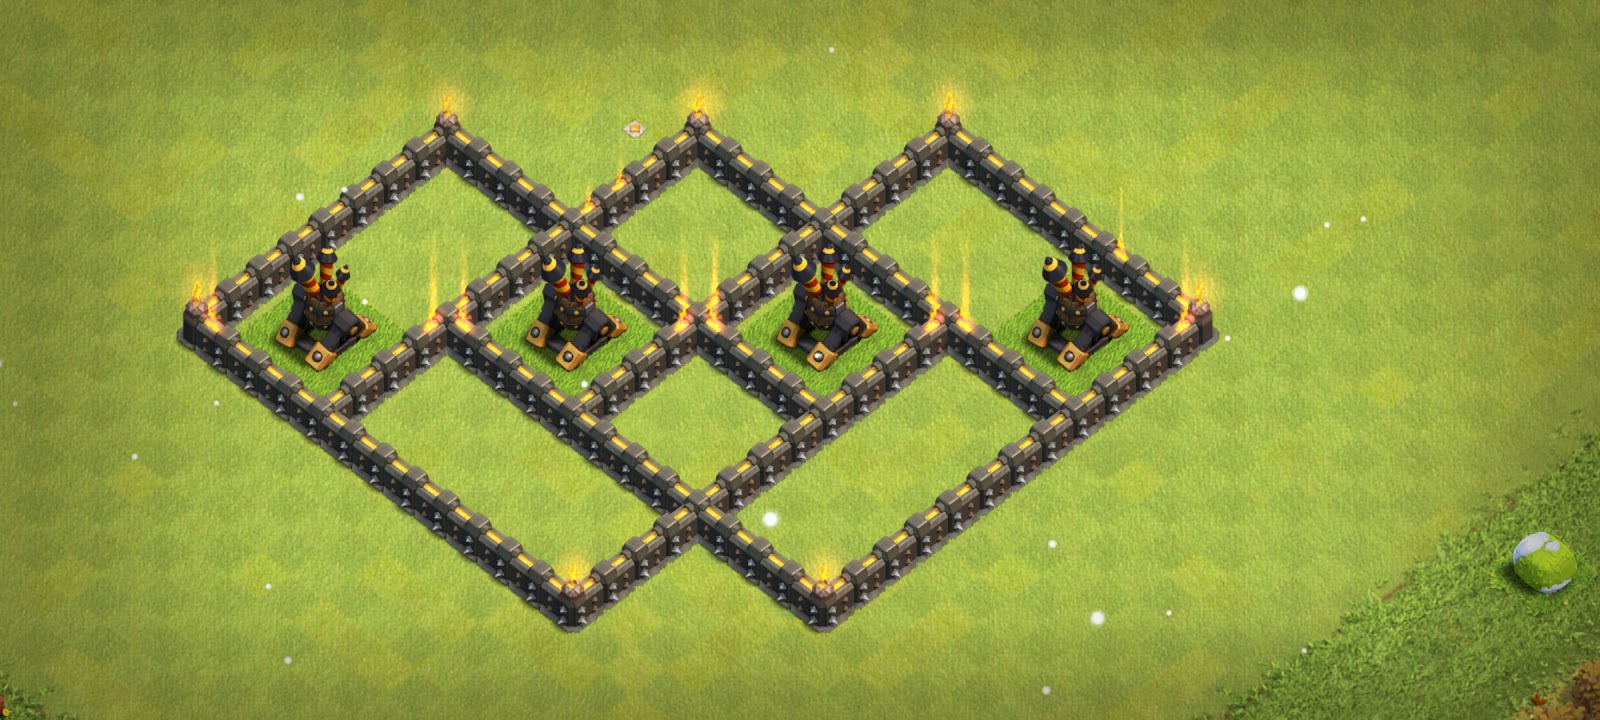
I used colors in the following examples to show you how classic 9×9 comps make buildings unwalkable:
- The two buildings marked with a red X cannot be reached from the red marked area.

- These two blue marked defenses can’t be reached from the blue marked area.

- The yellow X-Bow cannot be reached from the entire yellow area.

Always keep in mind that the Queen can shoot 5 tiles in a straight line. So keep important defenses unwalkable for her with a good usage of 9×9 / 10×10 / 9×5 / 10×5 comps.
All of them also provide walkability from inside of the comps, so this CC comp gives access to all the surrounding buildings.

This red marked 9×5 comp gives access to all the red X marked buildings.

Always pay attention to the value which can be reached from inside of the comps!
Walkability
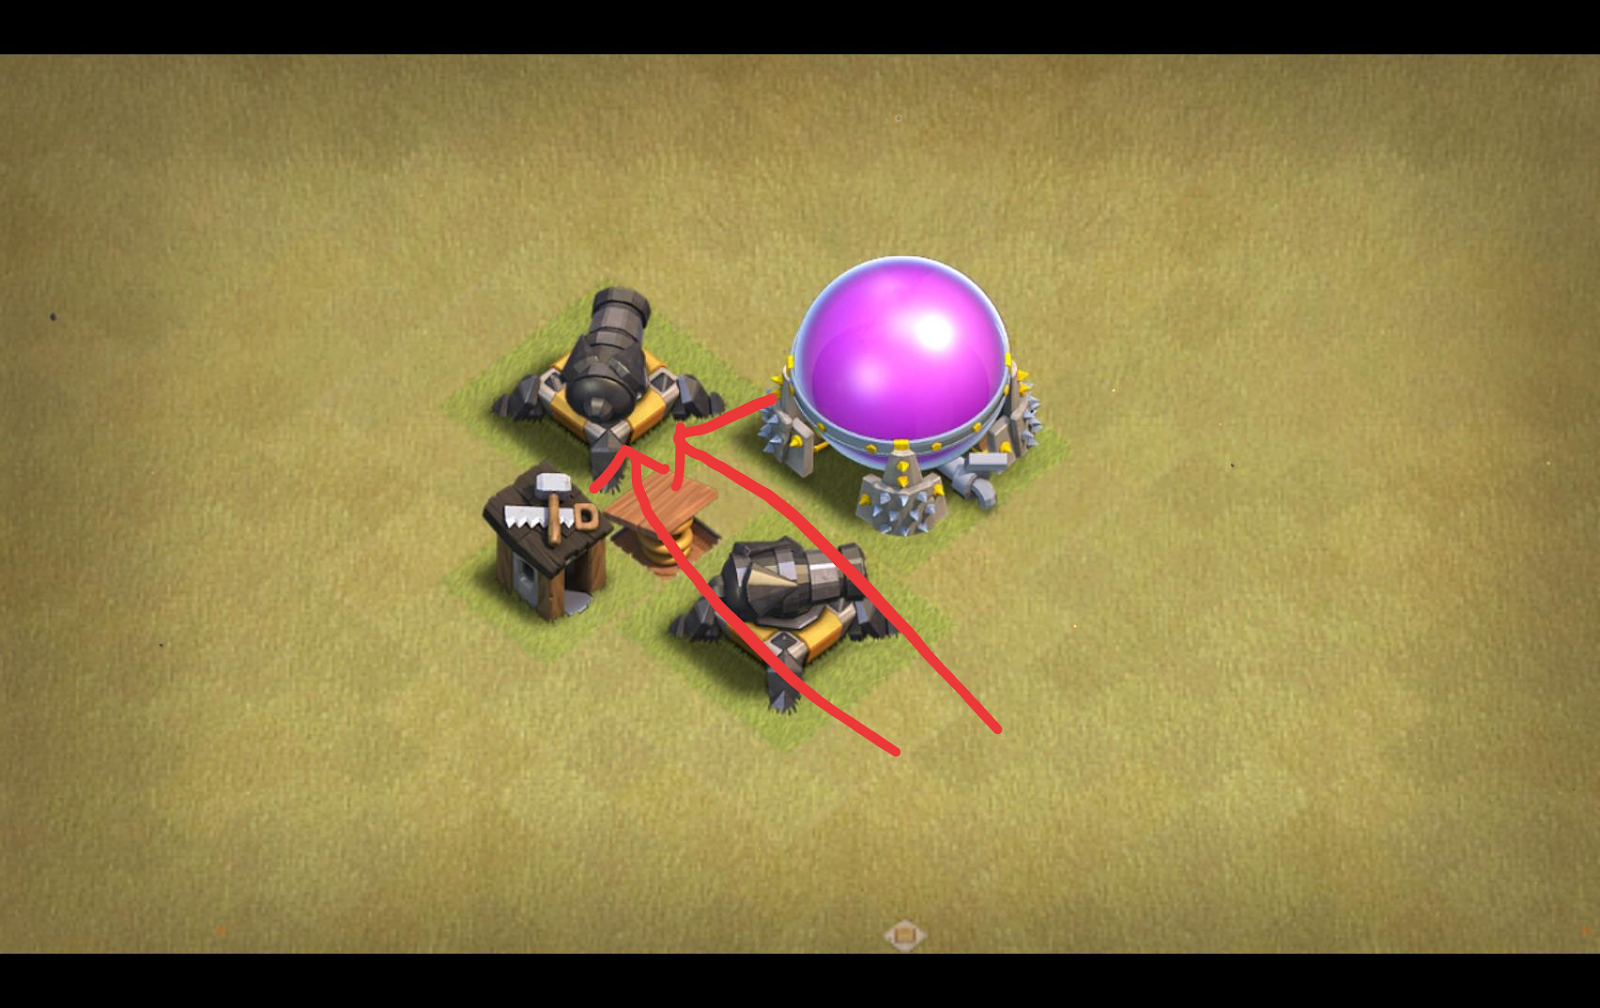
Do you have problems with walkability? Here is a picture of the complete comp necessary to make a 3×3 defense unwalkable:
Of course, this doesn’t seem very practical while building, but there is one easy tricks to make sure that something is unwalkable:
The X-Bow should be unwalkable, so we place any kind of 3×3 building with a 1 tile gap in front of the X-Bow. Then we draw a line of walls.

Now we place 3 diagonal walls beginning from the corner of the X-Bow.

We move the next wall away from the X-Bow, this is very important because otherwise the X-Bow would be walkable.

We wiggle the remaining walls until it connects with the other walls.

Do this on both sides and you get a comp which makes the X-Bow unwalkable from the bottom.

Keep in mind that wiggles are usually not as efficient at Th9 as classic boxes, this was just an example to show you to check if a building is walkable. But you can use this technique for box comps too, just remove the wiggles after it.
Using 5x5s in a TH9 Base
For example, you can use this trick to create good 5×5 usage. This concept makes the X-Bow unwalkable from the bottom outside but also from the inside of the 5×5 comp:

Since I already started talking about 5×5 comps, I will now explain the main usage in detail. 5×5 comps are a great way to split values, make wallbreaking harder or both; they also are very expensive, so don’t use too many of them. You will run out of walls and have a base which is too compact.
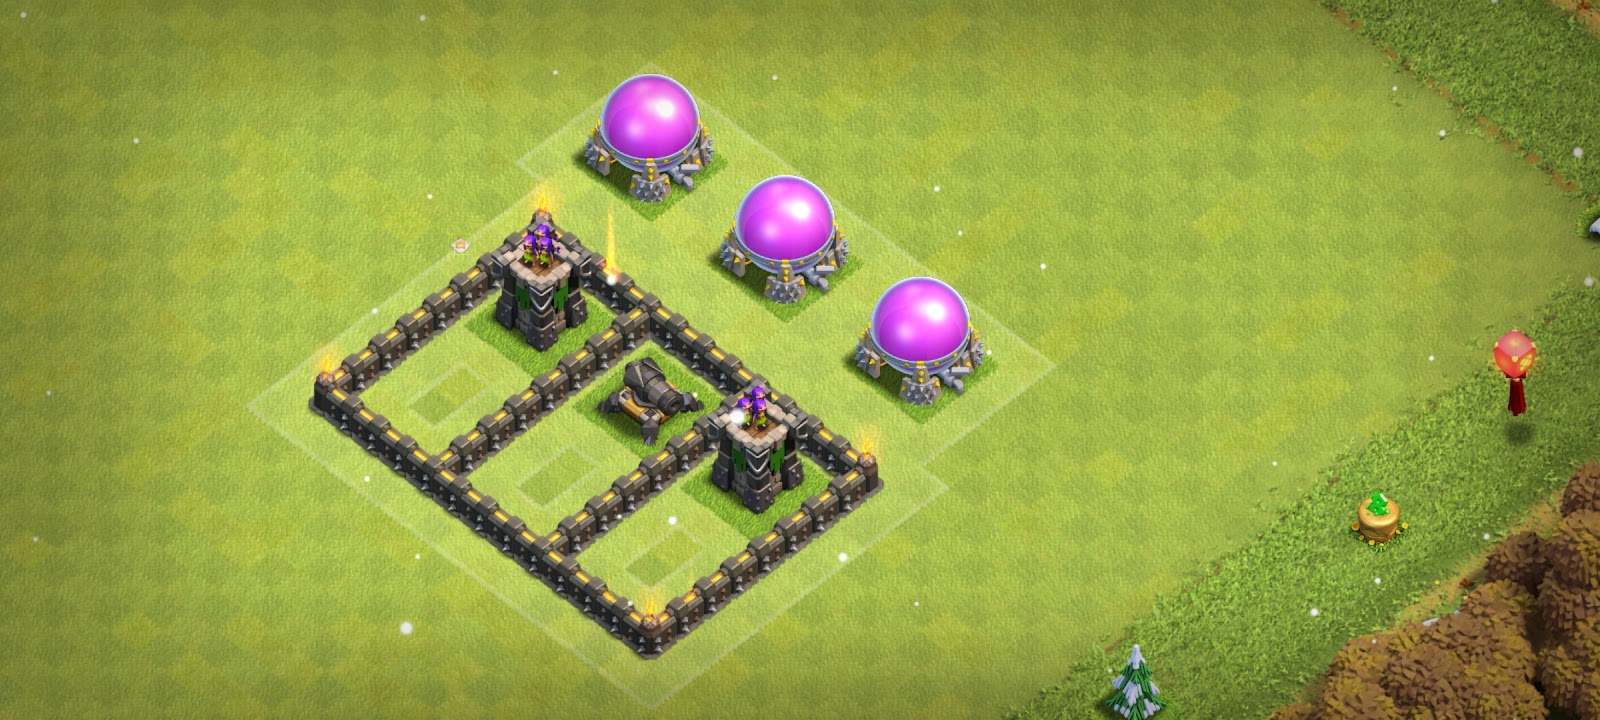
This setup below gives so much value for a Qc / Sui / Ks. As you can reach 2 ADs + 1 X-Bow from one comp.

But now the 5×5 comp makes the AD unwalkable. As a result it provides a natural value spread and forces at a double layer wall break for the same value.

As I already said, 5×5 comps are a great way to make wallbreaking harder.
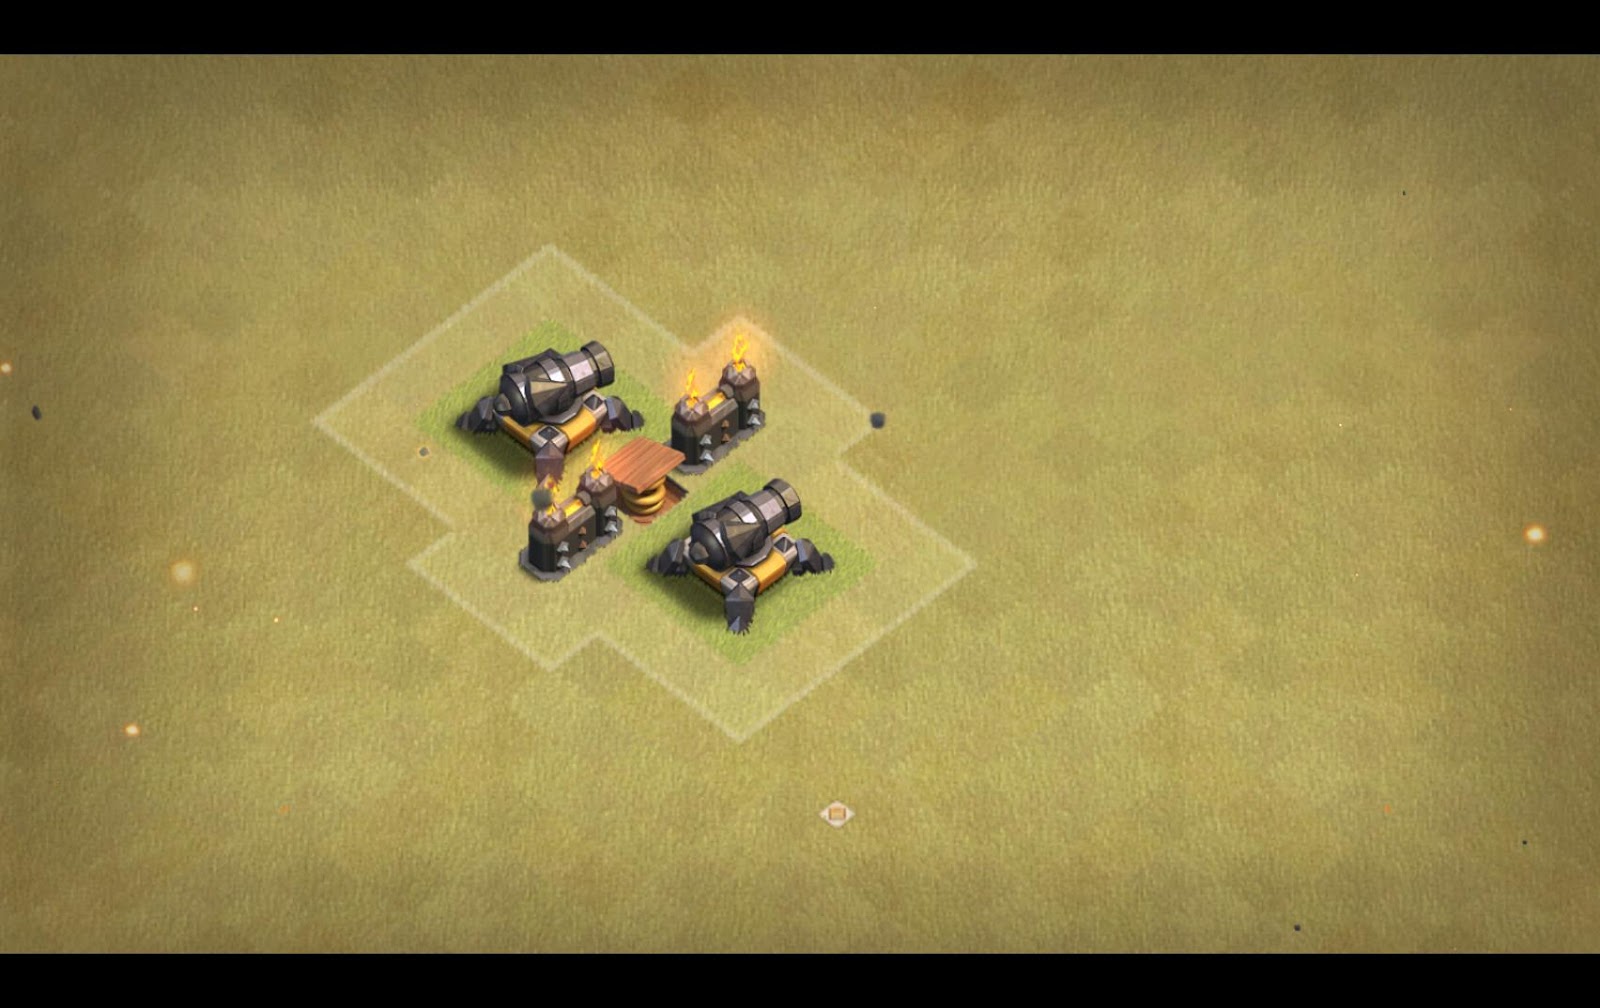
Usually people can wallbreak directly like this (arrow below), which would give access to both X-Bows.
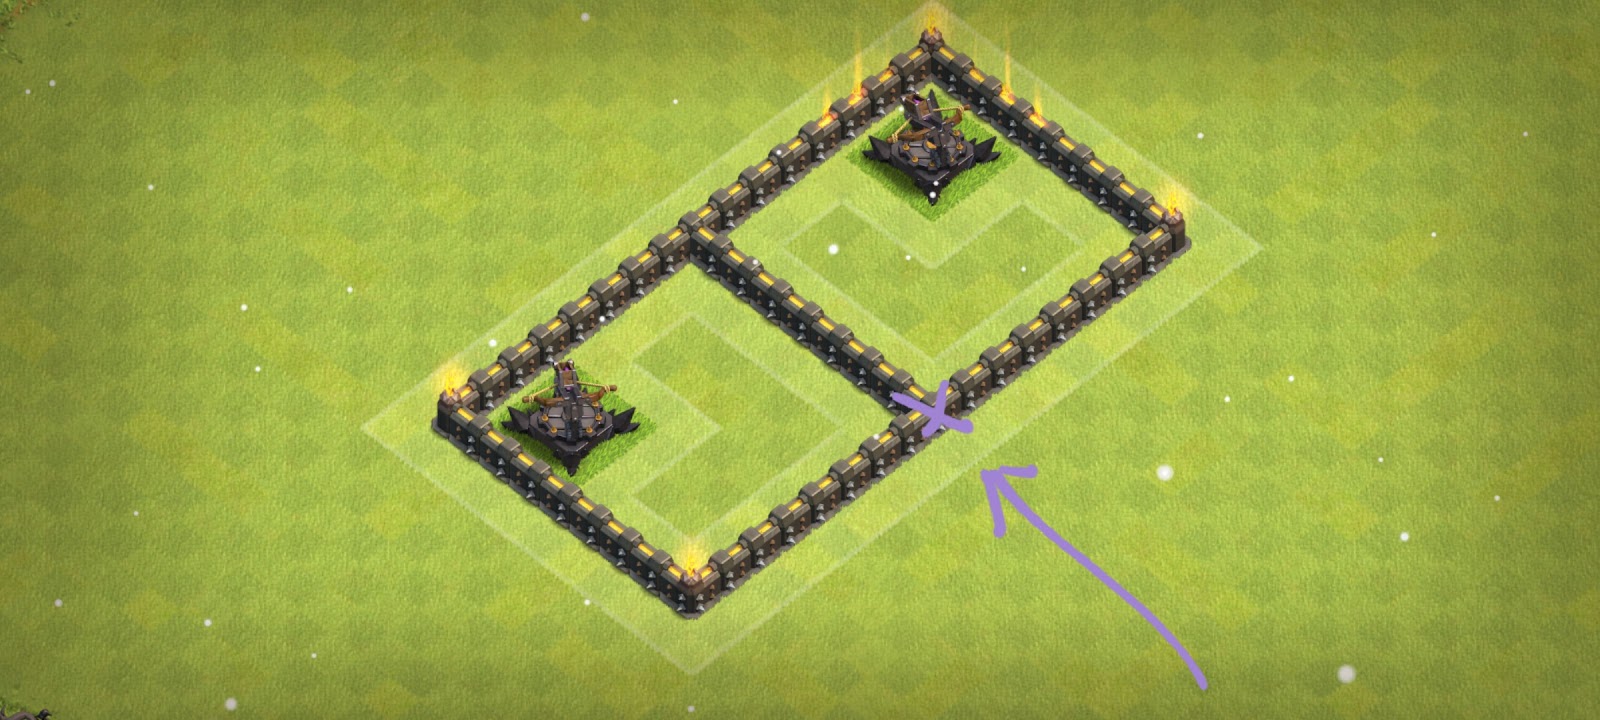
If you place a 5×5 comp directly in this position. It will prevent the attacker from getting easy value with a WB.

Now the attacker needs a 3 layer wallbreak to get both X-Bows. Since they are unwalkable from inside of the 5×5.
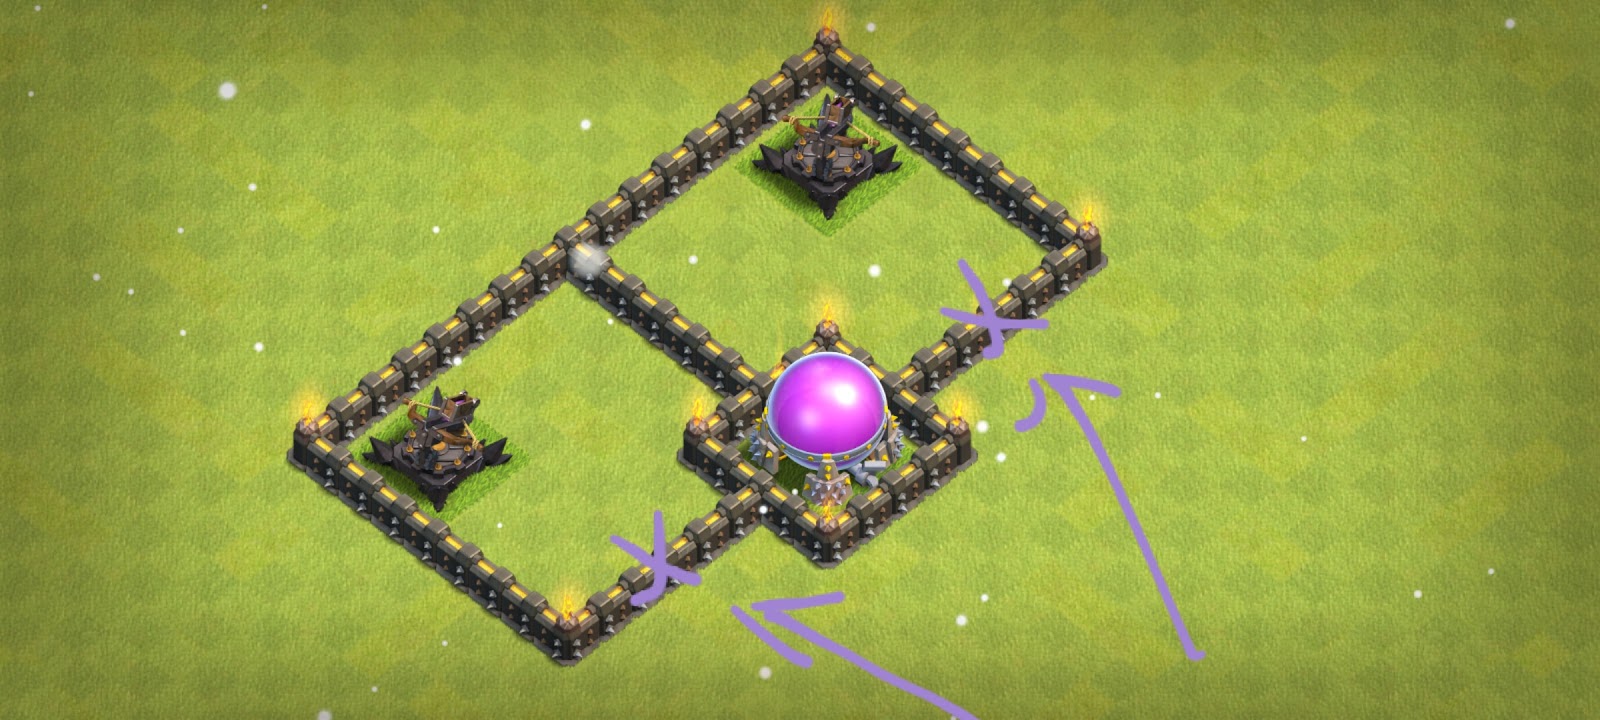
The attacker can also WB near the 5×5 after destroying the storage. This requires one less WB but also means you won’t get the other X-Bow.
1.2 Moats
Apart from comps, moats are useful to make it harder to use specific entries for the attacker. Moats usually should be unbreakable, so the attacker has to go around it. But this always depends on the base. Some people have for example breakable moats, but they bait this with small bombs/springs to kill WBs which makes it a bit harder. WBs are a bit weird so I always recommend testing if a moat can be WBroken.
As a general rule 14 tiles in a linear and 17 in a curved moat are the minimum lengths which can be WBroken. However, it depends on numerous factors (next closed comp, the place of the buildings, the length of walls, etc.). Be aware that these numbers can change due to these factors.
Here are a few examples:

The basic moat can vary in length, but it is always 3 tiles away from the walls. This makes the buildings inside (cannon, AD, WT) unwalkable from outside the moat.


The 2 most common moats for corner ADs. It makes the AD very hard to charge; the AD can possibly cover QC entries. Keep in mind that the cannons etc. are only filler, so you can vary this setup of course.

There aren’t many good ways to use a 2 tile Deadzone (Dz). But this is one of them, you basically have both of the cannons walkable, but not the AD. The AD may will snipe healers if someone charges there. You could also use a X-Bow instead.
1.3 Using Dead zones (Dz) in a TH9 Base
Deadzones are comps without buildings in it, which makes them a very nice way to separate value. It is also true that Dz cannot be targeted by a WB (most of the time). Which makes it a wonderful tool for many builds.
There are 3 different types of useful Dz.
- The 1 tile deadzone can make buildings behind it unwalkable if you have a 2 tiles gap between the walls and the building. A 1 tile Dz is also enough to protect your buildings from Wiz. This example show how the AD/X-Bow are not reachable from the other comp by using a 1tile Dz:

- The 2 tile Dz can be used for tesla inside or as fake tesla spots. You need a 1 tile gap between the wall and the building to make it unwalkable like in this example:

- The 3 tile Dz is more expensive, but can be very useful, since it allows you to use regular comps more easily. It also allows teslas to fit, which makes it less predictable for the attacker.
It spreads the value without any kind of gap necessary, and is therefore the setup that occupies less space:

Deadzones are used inside of the base to create and improve value spread. Outside Dz should be used to make something very important unwalkable, like an X-Bow, since otherwise it’s just wasting walls.
Advanced Dz
Adapted from Skittle#1153
I want to present two types of Dz I commonly use.
Primary functions
- Control pathing
- Predict pathing
- Give more time to ADs & X-Bows to deal damage
Note: this concept will influence pathing in No Zap wars, but could of course be all zapped if it’s allowed. I will assume that Zap is not allowed. Otherwise you’d have to follow Bait & Reverse bait which you can find in Th12 core ITs.
Outside Dz – DE Drills
DE Drills are used on the outside due to their low HP compared to storages. You can swap them out for any other trash buildings if you’d like, except storages.
The idea is that the attacker sends WBs to target the DE Drills compartments. But because the Drills are low HP the Queen has already moved on after destroying them. This way, you’re effectively creating a Dz while also letting the attacker waste WBs.
A smart attacker could send WBs beforehand. But it’s not guaranteed that they will make their way into the compartment. Due to no tanking provided by the Queen (since they’re sent earlier than usual); other issues include the AQ potentially walking away due to her AI or a failed funnel.
Of course, the concepts explained for the AQ can be applied to a Ks as well.
In this case, Golems won’t target the DE Drills compartments because they don’t contain a defense; AQ and BK may still walk around as described above. WBs may fail, or the attacker may need to use a Jump. Golems won’t go in even with a jump. Because there are closer defenses elsewhere (if the base is done right). If AQ and BK go in they won’t have a Golem to tank and could go down very fast. For example if there is a Hound CC to stall the AQ and DPS to take BK down.
Inside Dz – storages

Storages are used inside due to their high HP and, consequently, their stalling capabilities. AQ is already inside, so the funneling and WBs part I mentioned before doesn’t apply here. Storages can greatly slow down a QC or Ks. Limiting the value they can get even if the attacker uses a jump.
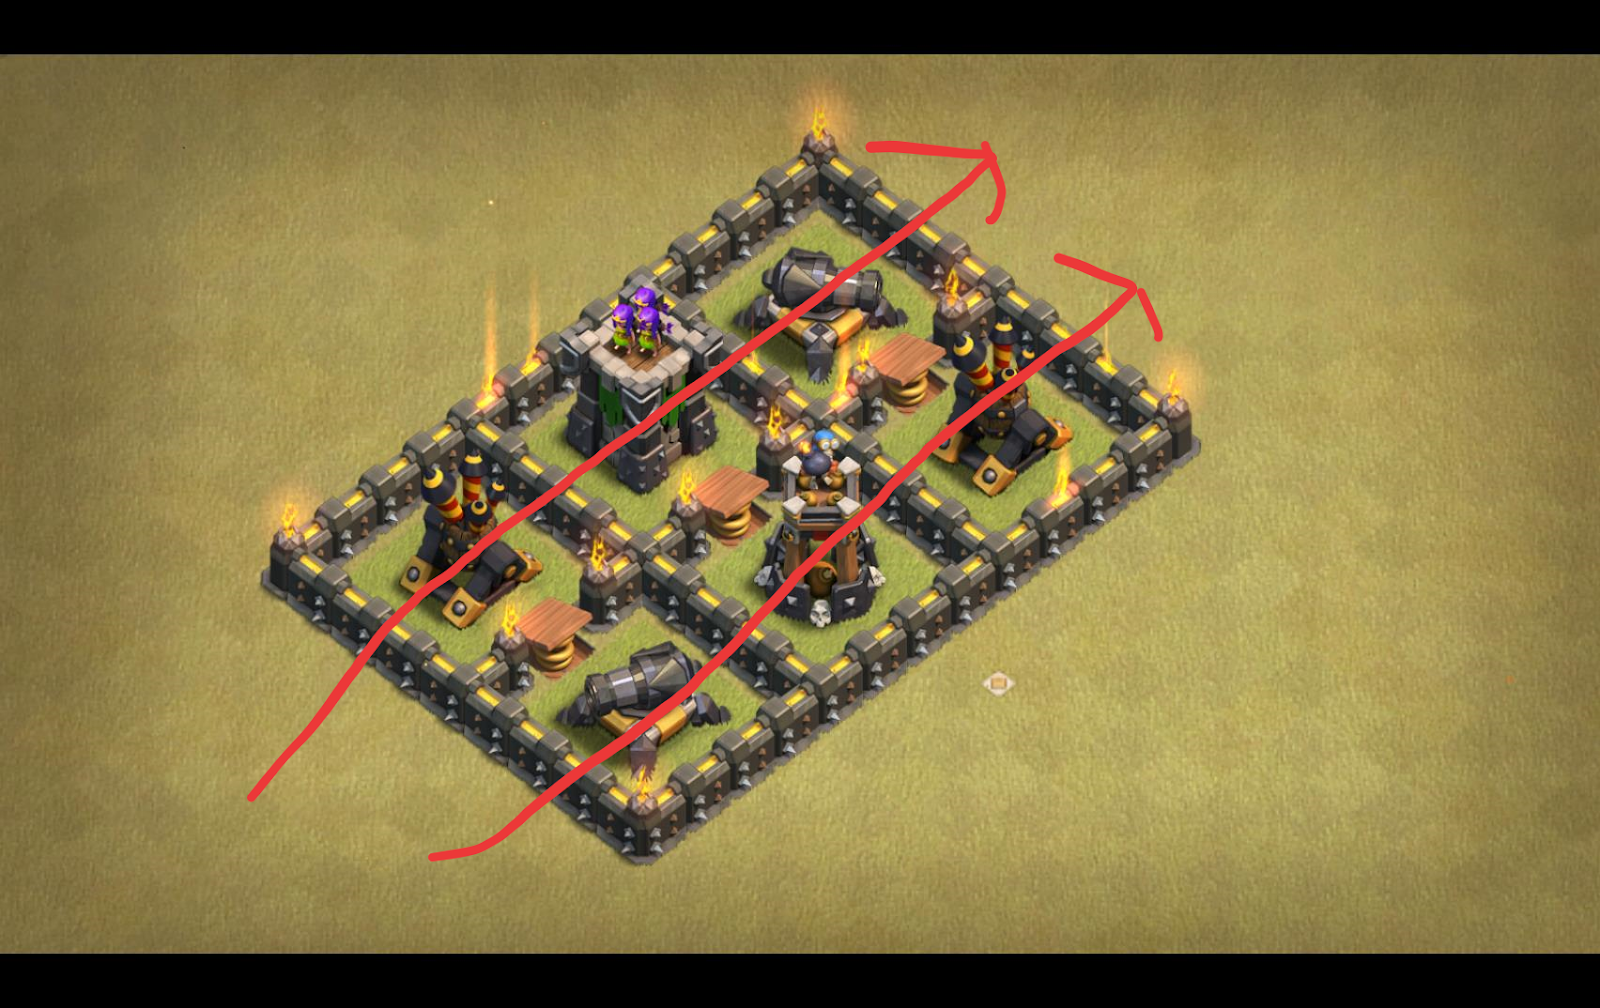
Let’s now analyse how I use an inside Dz.

Blue represents the areas I cut off with non defensive buildings; red arrows show the only pathing that allows Loons to path into the core AD.
Of course, pathingto the AD, although doable, will definitely take a lot of time and consequently give the AD and the other core DPS more time to kill Loons.

As you can see, I used CC + storage to make the other side of the base not accessible.
You need to use non defensive buildings such as storages, CC, Heroes, TH and trash buildings. Trash buildings have low HP and therefore not great for stalling purposes; AQ and TH, as you will see in Sections 2.1 and 4.2, are better used offset to bait or force certain hits, especially in one hit format Wars. You could use BK in the core if he doesn’t have a better spot (see Section 2.2); in this case I wanted to prevent a King trade for my AQ, or at least make it harder.
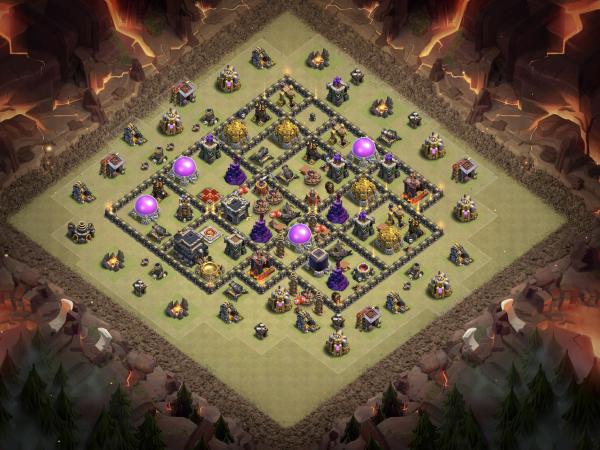
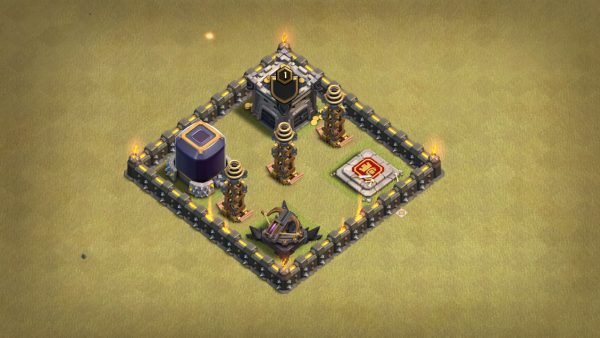
Insdie Deadzones example in a TH9 base

This TH9 Base above shows the pathing around the whole base, it’s pretty hard to access the AD. I opted to have AS in the core to make Lalo harder. As well as X-Bows which at Th9 are your main DPS source and, paired with storages covering them, can be great against QC/Ks.
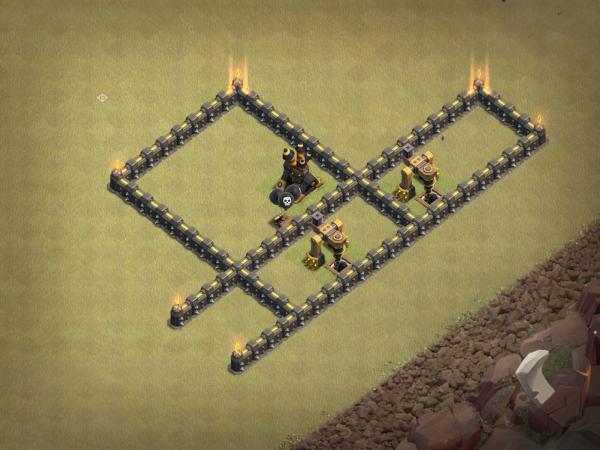
The TH9 Base above below will serve as the final example, you can recognize all the features we talked about before.

This AD zone is great. The attacker can’t effectively QC from 1. As I have a real Dz (the 5×5 with the wall piece) and the two DE Drills Dz. It will soak up WBs but will most likely let the AQ go elsewhere. Even if they were to jump, AQ is too far away; CC + DPS + storages to stall would drastically reduce the effective value a Ks could get.
You can see a SB at 11, near the Mortar, to prevent WBs in that entry too.
As for the pathing itself. The two storages in the core near the WT serve as a way to have Loons circle around. Teslas are meant to be a surprise factor. They will lure Loons in, deal damage combined with DPS + WT + RABs, all while the AS is constantly pushing Loons back.
1.4 Anti-Wizard Comps and Moats in at TH9
Th9 isn’t only about the Queen, since Avalanche or Ks attacks take advantage of Wizards. They have a different walkability range compared to that of the Queen:

You can take advantage of this walkability by using defenses which are at least 2 tiles behind a wall. It ensures Wizards cannot reach them
For example, this setup is great because it uses teslas which may be unexpected and kill Wizards. They can also be used to quickly kill a Golem.

People are using moats with a 2 tile gap in front of the defenses to make it harder for Avalanche. But keep in mind that the moats may be WBreakable because of the length.

1.5 X-Bow Comps in a TH9 Base
X-Bows are very important at Th9. That is the reason why they can have different comps without being a huge waste of walls. Here are a few examples of common X-Bow comps. But keep in mind that you can also use just classic 9×5 / 9×9 / 10×5 / 10×10 as long as you make them unwalkable.
The BB-Server has a channel called Th9 Inspiration where you can find pretty cool designs from Th9-BB Pros. So I recommend to take a look.

This is a classic X-Bow island, it is not that common anymore since it can give huge value for a QC that goes inside it (unless it’s baited) if you don’t have a good value spread. The good thing about it is that you can create good defense rings around the X-Bow which makes it harder for the Lalo/Hogs to get it. Wizards can’t reach over the 2 tile gap, which makes it harder for avalanche and forces a jump / QQ / WB.
Half X-bow Island

This half X-Bow island can also be very good, since it creates hard pathing on for Loons/Hogs on one and it makes the X-Bow unreachable for wizards from 3 out of 4 sides.

Another classic compartment which makes the X-Bow unwalkable for the Queen from the storage side. It is also unwalkable for wiz from 3 out of 4 sides and you can create good pathing around the X-Bow.
This is a pretty nice comp for the X-Bow, it is very wall expensive but it makes the X-Bow unwalkable. The problem is that it can give huge value for a one golem (CB) Sui / Qc , so you need to make sure that you cannot reach too many defenses from this comp.

You can also use this comp for spring framing, which will be explained later in the section dedicated to spring traps.
If you want to avoid the hassle of TH9 Base Building. Click here to grab a TH9 Base built and tested by a Pro NOW!
2- Defenses at TH9
2.1 Queen
The Queen is the strongest defense on Th9 and she’s very important against any kind of strategy. There are basically 2 ways of using her, which all have different advantages/disadvantages:
- The central Queen (in the core) is hard to get with a Sui, but she will usually be taken out by any kind of Ks/Qc since they will aim for the core. I do not recommend using her like this, because a sui lalo can still use skelly on her, so it is kinda useless to make her not Suiable – plus the attacker may come from any direction, so it’s harder to place traps.
- The most common, and in my opinion best way to use the Queen, is the offset and walkable Queen, since it is very easy to implement in your bases. It also forces the attacker into specific entries if he wants to get the Queen, which helps the BB to decide how and where to trap. Always keep in mind that the Queen shouldn’t step outside the base or it will be possible to kingtrade her.
2.2 King
The King is strong against any kind of ground strategy, but it can also help against the first phase of an air attack. You can either use him near the Queen which makes Sui/Qc for her a lot harder, since he stalls the attacker and adds Dps on the troops, or you can use him away from the Queen to protect good Sui value like a NFZ or 2 ADs.
King and Queen together can make a Qc Hog more easily, since the Hogs won’t have constant damage from the King, but it could also be a bait.
The King works the best in high Dps areas like a Teslafarm, since it takes time to kill him, which allows the teslas to deal more damage.
2.3 Clan Castle (CC)
Keep in mind that your CC should be fully covered by any kind of splash damage like a WT/BT against Skelly Donut. Both offset and central CCs can work very well, but the filling is way more important than the actual positioning as it can shut down entire attacks.
The classic Hound CC is very useful against Ks/Avalanche attacks, since it separates the tanks from the Queen/Wiz, this gives the Dps more time to shred tanks, while the Queen/Wiz are killing the hound.
It is also very useful against Qc, because it takes a lot of time to kill a Hound, which means the attacker can timefail; Hounds are mainly used in unlureable CCs so that they may force rages/ability, especially in high DPS areas.
Sui Lalo hits need a way to clear the CC, so if the CC is unlurable they may be scared of a Drag CC (which kills loons quite easily and can’t be killed with a poison) and may not opt for Sui Lalo at all.
Golem CC
It is pretty nice against Qc, because the death damage can force the Queen ability if she is at low health; otherwise it’s weaker than the Hound CC since it doesn’t split the wiz/Queen from the rest because the king or pekka would also target it.. Both golem and hound CC deal little to no damage, but are great at stalling the Queen and are best used in the core and near DPS areas to force rages/ability.
Damage CCs
They can vary a lot: many people use 1 Baby + 1 Witch + 1 Valkyrie / 3 Valkyrie + Wiz / Double Witch. All of them can be very good against Qc, but you can kill the whole CC with 1 poison. This makes it easier for Lalo to kill the CC mid attack with the poison, but keep in mind that most of the people use this CC offset to protect an area from Suis, since they struggle a bit with Dmg CCs.
The classic Dragon+Baby Dragon (+Archers) CC is very strong against Sui Lalo if the attacker cannot lure it, which means the Sui would have to go deep inside the base to kill the CC. This forces the attacker to bring at least a double poison or use a rage for the pups and 1 poison to kill this CC.
2.4 Air Defences (ADs)
Zap wars
The first thing to consider is whether your ADs are zappable or not, if they are zappable you will often be hit with ZapDrag and to defend it we need to understand the zap radius first.


This is the range of areas that the zap damages BUT it isn’t equal to the amount of tiles you need between buildings to make them non zappable.
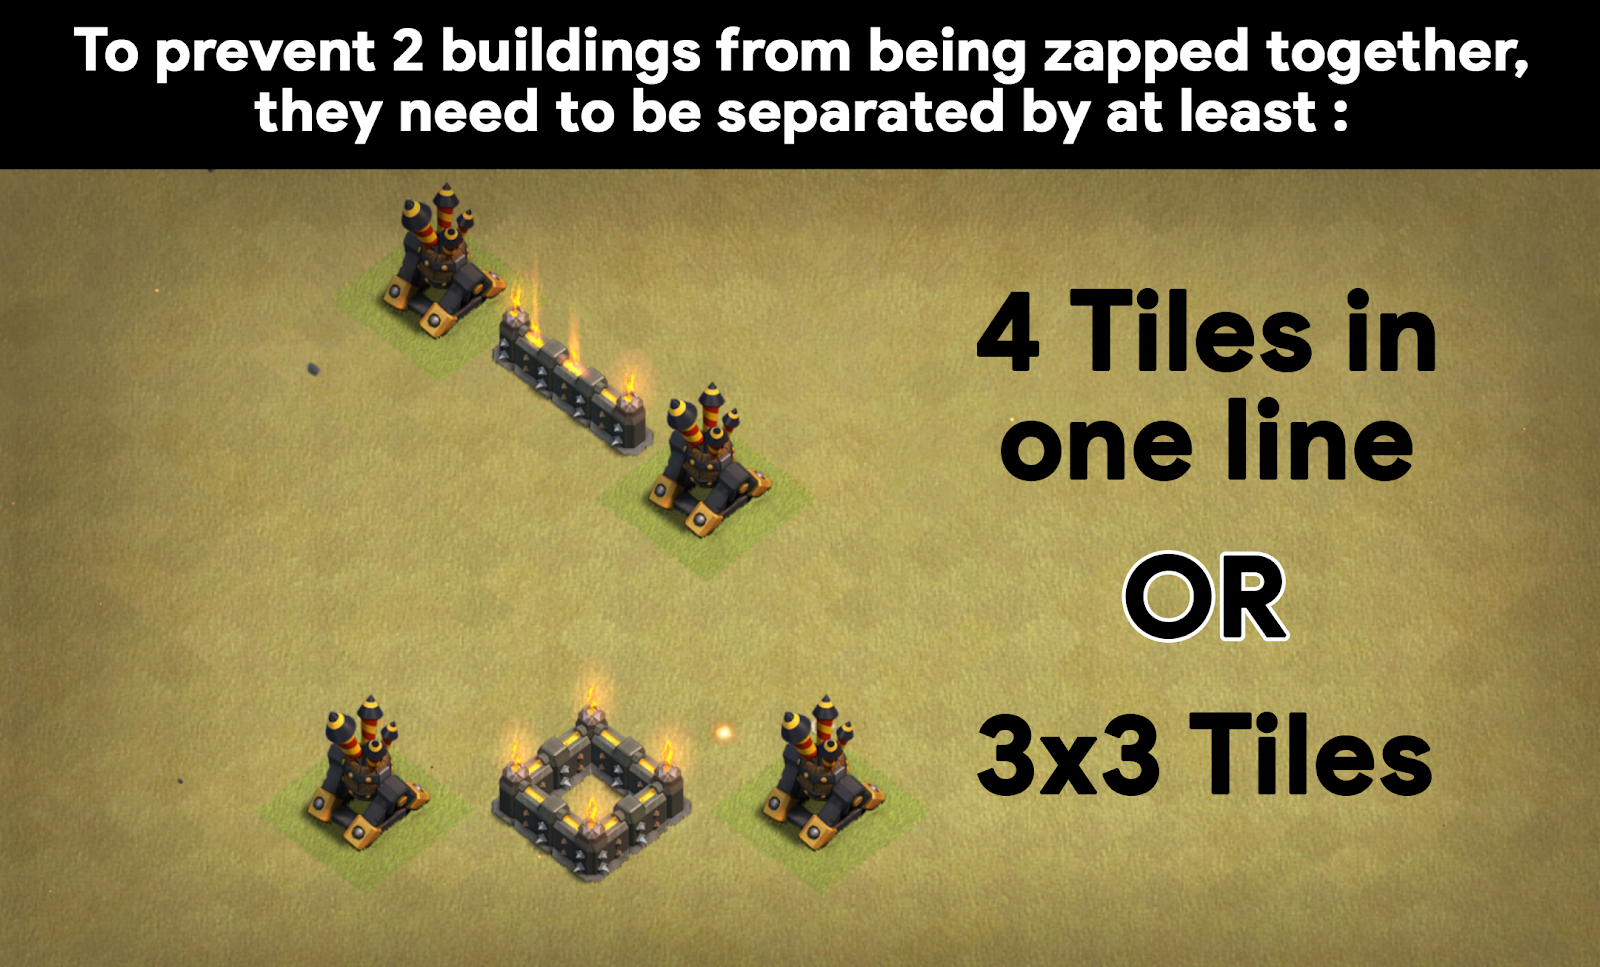
In practice this is the amount of tiles you need to have between ADs or any other building to make them non zappable.
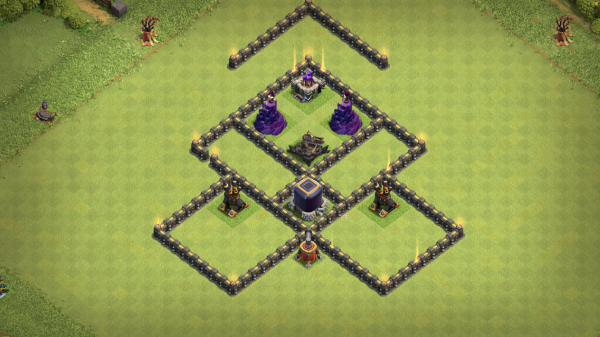
You can still have a paired AD setup but with a 13×9 instead of 9×9. 
Adapted from SHEEV#2285 – Notice how we use a DZ between the two ADs, this helps against Lalo (you will see a detailed explanation of this in the Lalo section). Even though the ADs aren’t zappable they are indeed quakeable, so it takes 1 less spell for the attacker to get the ADs.
No zap wars –
In these wars you can use the setup above but you can also use paired ADs in 9×9 comps, these make defending lalo way easier although they don’t provide huge protection against QC.
One thing to keep track of while using paired ADs is to have some kind of splash nearby like Mortars or BT, even a BK helps since sometimes attackers try to Skelly paired ADs. If you have only Mortars covering a group of paired ADs then people can try to tank the mortar with a Barbarian, it’s less common and risky but something that you need to consider if your opponents prefer to use Skelly spells; other than that, your AD placement depends on the AD shape you are trying to make.
ADs are key value at Th9 so you don’t want them to be directly targetable and sometimes you want to have hard pathing into them to make Lalo tougher.
ADs also determine from where people will charge: attackers never charge into a comp where there is an unreachable AD that could snipe off their Healers.

When using ADs, you can use compartments in a way that you can’t reach two ADs from the same compartment. This makes the base overall stronger vs any Air hit, but as you can see you need to be careful about jump value (DE Storage in this case). Make sure to avoid having easy pathing between the ADs, this is one more reason I used the DE Storage instead of another defence.

Same idea as before, with a different wall layout.

Adapted from R4zZ0r#8246 – the picture showcases a variation of the previous concept. X-Bows are also not reachable from each other’s compartments, and the Storages are a good way to split Loons from Hounds while also providing some tanking vs any QC/Ks.
You can create a potential NFZ with GAT and/or 2 WTs; ADs and X-Bows make a QC very tricky due to the ADs potentially sniping Healers and the amount of DPS. ADs also aren’t walkable from outside (near the Gold Storages), making them harder to reach.
As always, a jump over the Gold Storages or the small Dz between the X-Bows gets massive value. For this reason, be careful about spam attacks such as Gowipe and Avalanche, and try to use some tricks to stop them too.

This concept from Kevin Hart#4607, although wall consuming, can greatly mess up a QC.
- Hole at 3 makes it harder to funnel AQ into the AD, the moats are also not WBreakable
- Wiggly walls at 4:30 force the AQ towards 5, the AD at 3 can then snipe Healers
- Storages at 6-7 make a QC there time consuming
- To access the AD at 6, the attacker would need to double WB. This could be hard if timed wrong or if you have a low HP Building (see Section 1.3, Advanced Dz).
Keep in mind that, since it’s an open concept, spam strategies such as Avalanche and Witches may take advantage from it.
Another note is that Holes can be double-edged swords: they make funneling harder, but if used wrong they could also advantage Golems going in or make an easier funnel which won’t even need WBs. We recommend reading the Golem Traps Guide as well as the Hole Guide and combining the principles for both.

Another idea from SHEEV#2285. A Sui from 12 can get AD + AQ, that’s because AQ range extends a bit into the AD compartment, and can consequently be lured when a Ks from 12 approaches the Cannon. A way to avoid that is to make her compartment slightly bigger so that her range is the same as the wall (=to get her, the attacker would need to WB and enter AQ compartment).

By adding just two tiles, the AQ is now safer from any entry from 12 due to her range not entering the AD compartment. You can of course extend this concept to multiple sides, so that the AQ is covered from multiple entries. You can also consider having a TF in that extra 2 tiles vs QC/Ks, but make sure to test it or it may not work at all.
Note: don’t extend the AQ comp to protect her against QC/Ks if there’s no QC/Ks that will come the way you’re protecting her from. Also, be careful about the reachable value from inside the AQ compartment after you have extended it, 9×9 and 10×10 are still the best against Spam armies and yourisk making your base weaker.
2.5 Bomb Tower (BT)
The prime usage of BT is to prevent a skelly donut to get Queen and CC. It’s also useful to make using skelly on the Queen mid lalo tougher since BT only targets ground troops and won’t be tanked by Hounds or Loons – although good attackers always wait for Loons to kill the BT if the Queen is near it, and then they skelly her.
In Zap wars people may zap your Queen+BT+any other point defence nearby, since BT is essentially another GB, for this reason you may either want to have a WT near Queen and CC to discourage zap goho users, or have no other ground traps near BK – in a zap goho attack, after zapping AQ the KS generally comes for the BK so that the backend (Hogs) fail.
Note – Since BT is essentially a GB, you don’t want it to be directly targetable: a GB for 2 Hogs isn’t a bad trade for an attacker. 🙂

2.6 Air Sweeper (AS)
These aim to defend 3 things in general: Drags, QCs, Lalo.
Try to stick to centralized AS. In zap wars, AS are good value for attackers doing zap Lalo. The angle which the sweeper should face depends upon Lalo entries and the areas where you want to make a charge harder to perform.They work well when facing NFZ: that makes drags/QC into NFZ harder, and then people can’t just start lalo into a NFZ. The only other tip for deciding upon sweepers direction is that both sweepers shouldnt face the same area, because this would make it very easy to start the Lalo / Drags / Qc from behind the sweepers.
2.7 Wizard Towers (WTs)
WTs are your prime splash defense at Th9. The placement of WTs depends on a few things.
- It’s recommended that you keep 0 WTs near an AD – the WT range shouldn’t cover the AD, otherwise the Hound will tank it and make Lalo easier; you want WTs to target Loons instead.
- Don’t have all WTs on the same side.This makes it easier for witches as well as various other attacks.
- WTs are valuable to an attacker so don’t give WTs away for free.
- Not recommended, but sometimes you can have one outside WT in a base. While using these, you need to keep the trash ring a bit dense and generally have it 2 tiles away from the WT so that people can’t easily Sui their BK for your WT; also make sure you have some kind of air DPS around it to avoid an easy Loons snipe.
- Try to avoid directly targetable WTs since people could tank them with 1-2 Loons, and then the WT would target them and not the main pack of Loons.
2.8 X-Bows
X-Bows are particularly good due to their huge range. You can place them on Air & Ground, or on Ground only when you’re absolutely sure your base will defend air hits.

This is a bad example of an X-Bow comp. We should use X-Bows as a point defence with slightly bigger range. Try to start with using unwalkable X-Bow comps. (walkable X-Bows aren’t necessarily bad but it’s not a concept that should be used by a starter :D).
Even X-Bows in just a 9×5 or a 9×9 can work well.
Here is an example base with 9×5 X-Bow comp.
Another thing new builders try to use are X-Bow islands. They aren’t that bad, and they make pathing around X-Bows harder for the attacker, but they are a huge waste of walls and a QC can get good value from the big comp as explained before in the compartments chapter. 
I would suggest half or quarter islands since they are cheaper on walls and the comp wouldn’t provide as much reachable value for a QC as a regular island. If you are having issues with placing X-Bows you can try using the X-Bow comps mentioned in this guide.
2.9 Cannons
Cannons are point defences with very high DPS. They should be used with ADs since that allows us to use ATs and WTs in another region of the base as a nfz.
Double Cannon – should you use it? Its pros are its DPS, higher than a normal cannon, while its range and re-target time aren’t as good as the usual cannon. You should use it in ideal entry points, to fry golems as the attacker does the push. For this reason, don’t use this on the edges, where it’s easier to pick it off, but rather on the middle of your base sides. It works well with golem traps as well. Also remember that the double cannon is weaker to QC so don’t use it in a good QC spot.
2.10 Archer Towers (ATs)
Generally, have ATs with WTs and cannons with ADs. You shouldn’t have all ATs near ADs.
You will almost always end up with 3-4 ATs covering ADs; try to not have all of them covering ADs since that makes Lalo easier because of the reduced Dps on loons but still make sure every AD has ATs covering it to kill lava pups faster.
2.11 Geared Archer Tower (GAT)
If you have a GAT, consider using it in a NFZ since it’s deadly to Loons and can’t be tanked for long by Hounds due to its short range. The GAT can also make WB entries tougher if you keep it 2 tiles behind the wall, it won’t target the Queen and will hit WBs due to its shorter range. Use its WB-killing ability wisely 😀
Just like the Double Cannon it can fry Golems quite fast, but it can also make Skelly Donut harder due to its high rate of fire. I would definitely recommend using it.

Anti WBs & Anti Witches compartment by SHEEV#2285.
The GAT range is really short, so the X wall junction near GAT – WT is the only thing the GAT can reach outside the walls. This means that WBs dropped to open up that junction will die due to the GAT, proving especially useful against WBs. The same thing applies for Witches: they will go near the GAT to take it down while Skelly will go outside; as a result the GAT is free to snipe Witches since they don’t have Skelly to tank anymore.
Air Hits – This setup is an expansion of the AD setup we talked about before, here GAT is in a NFZ. Remember to keep GAT opposite of ideal QC entry points (so usually GAT opposite of AQ) as you want it backend; also don’t use GAT close to ADs or it may end up targeting Hounds instead of Loons.

Ground Hits – This setup acts as a Golem Trap. The moat is two tiles away from AT & Cannon, which means that Wiz can’t kill the defences from the other side of the moat, this means that they will stay up for a long time. Golems will be attracted towards them since they’re outside defences, and will get roasted by GAT + all the DPS in that area. AT & Cannon will take a while to die since Wiz can’t reach them and Golems don’t really deal much damage; when the main troops (Wiz, Heroes) arrive, Golems will be almost dead.
2.12 Mortars
The best defence you have at Th9 by far (or maybe not). The prime usage of a Mortar is to prevent direct targetability of key values, so they’re kept outside of walls generally.
A Mortar has low dps so keeping it inside the base is most of the time useless.
It’s also used to make pathing harder, or even make Tesla farms less obvious. You can keep it near Ks entry points to lure the Golem away.
2.13 Teslas at TH9
A Tesla is a wonderful defense for every BB, because it makes your bases less predictable. Some tesla spots may be very obvious, but that’s ok as long as they serve a purpose. There are a few ways to use Teslas.
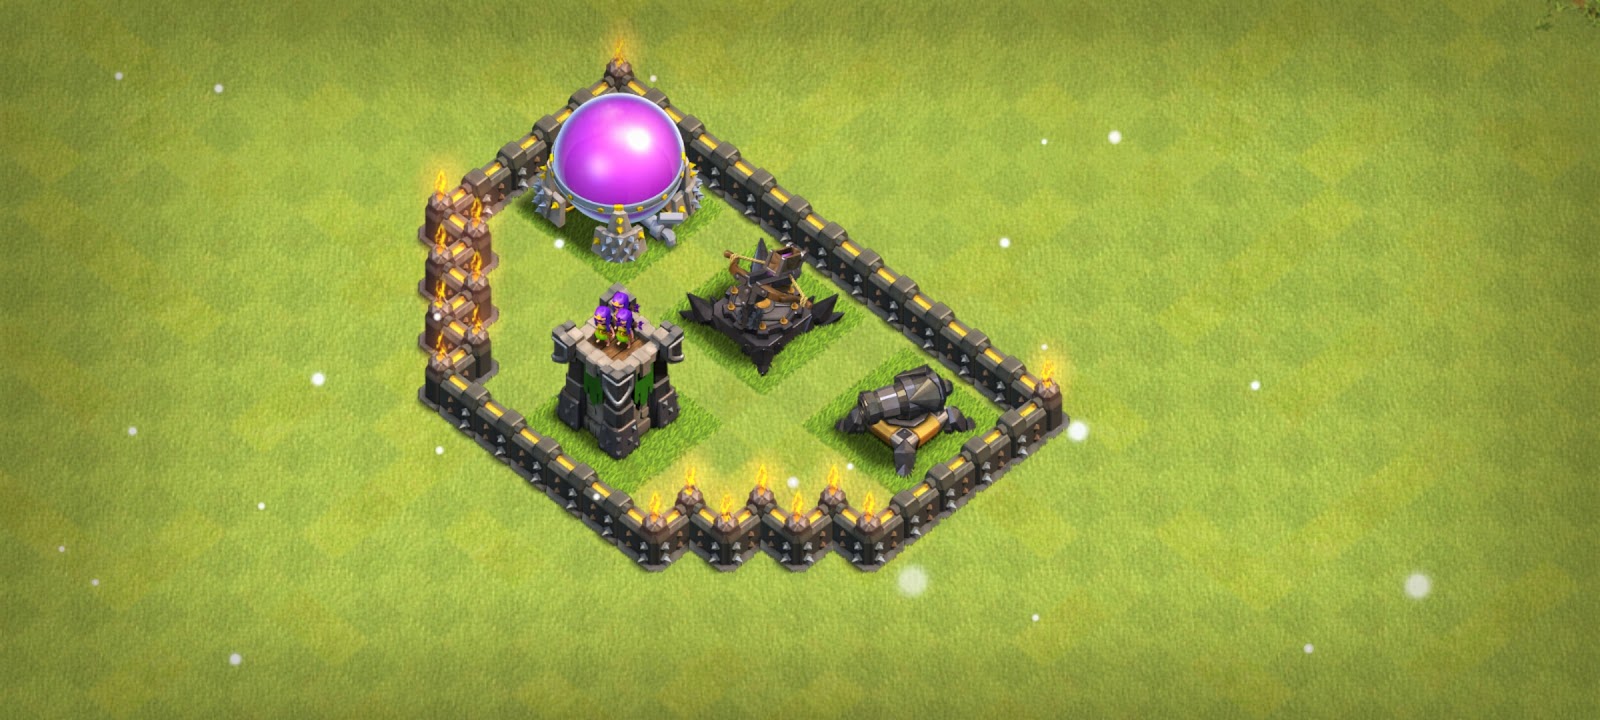
- The classic Tesla Farm (TF) is a wonderful high DPS area which is mainly used as a NFZ, so it should be away from the ADs (picture below)

Many people use storages in front of them to make it harder to take them out, but you can also use them in less HP areas near ADs to get the full surprise potential, just make sure that the Hound will pop early (add SAMs).
Note – storages make TF spots obvious, so you can consider having less storages or having random storages throughout the base as fake TF spots.
- The corner TF, also known as troll TF, is a very fun way to use teslas, since people won’t expect them and may panic. The usage of RABs, spring traps or SAMs can make the attacker fail when the troops arrive in the TF or when he tries to snipe the TF with Loons/Hogs. If you place traps, make sure that a single Loon/Hog won’t
trigger most (or all) of them, unless you’re sure they won’t have leftover Hogs/Loons to trigger the traps. You could also have a Troll Tesla in a corner for timefails.

- You can also use teslas for pathing purposes. The basic idea is that people won’t expect the teslas, so they can influence the pathing or create complete defense rings around important defenses like X-Bows or ADs.
This picture made by Kevin Hart#4607 shows how the Teslas influence pathing
around this AD (the same idea can be applied with X-Bows and WTs):


This concept from EM#2378 splits Loons (red) from Hounds (Blue). The setup has been tested in No Zap wars, if Zap is allowed then spread the defences a little more.
- inner TF are very strong against Sui Lalo attacks because they work like a surprise NFZ, so it is usually better to not have them near any kind of ADs. Here is an common example of a core TF combined with a CC island:

Or this concept from Warrior uses inner tesla combined with a half GAT island:

- Anti Avalanche Teslas are basically inner Teslas which cannot be reached by Wizards. This will give the Teslas more time to kill/damage the Golems/Wizards.

- Teslas are also a great way to lure Golems away from a good entry, so the Ks/Avalanche has less tanking power inside of the core. These pictures can show how the Golems could be lured away because of the Tesla:


- Core TF adapted from Czar#7937: the best place for a TF is offset, but Core TF has its uses. Let’s start with a 9×9 Core TF.
This symm setup is weak to a QC from the side comps (the ones without ADs), as the QC can access 3 Teslas.

This is a variation of the previous setup and it’s stronger against QC. The best use for a Core TF is however with Teslas close to each other and away from the possible entry points rather than a spreaded setup.


here you can see how the TF could potentially mess up Loons/Hogs pathing. The expected entries are from around 6 o’clock.
Core TF in a 10×10 Core opens up more possibilities as there is more space.
This setup is again not ideal due to walkability. All Teslas can be reached from 4.30 and 10.30, making it really weak against a QC or any Ks with AQ behind Tanks. the enemy has of course no way to know where Teslas are, but you still want to avoid giving too much value.
This setup follows the same idea as offset TF in the Core which was described for 9×9 Cores. A 10×10 Core allows however more flexibility as you will see in the example below.
The baited entries are around 6, and TF is opposite of that. As you can see, any entry from 6 would need to survive DPS (X-Bow) to enter the core, and then go through high HP Buildings (CC, DE storage as well as BK) while being under DPS fire yet again (TF, GAT, Cannon) to actually reach the Teslas.
If you don’t consider Teslas, WT is isolated from the rest of the defences due to pathing. You could even have outside defence near WT to create a ring, which would make it harder for Loons/Hogs to go to the WT and have the WT deal a lot of splash damage to groups of troops.
The TF is an area where troops would accumulate before going into the WT – as such, it’s a good idea to have traps in the TF (RABs, Skelly, Springs, maybe a GB somewhere around like near GAT).
As always, the TF needs to be opposite of possible entries. You don’t want someone entering from 12, disabling WT with hard pathing + GAT + TF + CC + BK. Since that is indeed great value, you should make entries from there harder (hard funnel, outside storages, not a lot of anchor points, potentially SBs vs WBs) and make sure that there is enough value in the opposite side to justify and entry (AQ, ADs/WTs, …).
Sometimes you can actually reverse bait, for example the attacker may follow your train of thoughts and decide to enter from 12 and/or Zap/Skelly AQ, in which case you can have the TF near the baited entry. Core TF are an advanced concept, so don’t use them if you haven’t properly understood the basics first.
3- Traps at TH9
3.1 Spring Trap
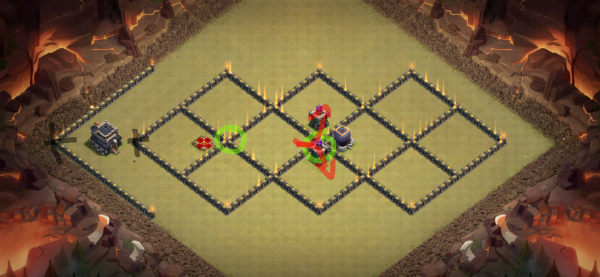
The spring trap is very good against Hogs. It can kill up to 3 Hogs, this depends on how the Hogs trigger the spring. A spring trap should be between 2 defenses or touch defenses (diagonal spring) to kill Hogs, don’t break the rule unless you understand the Hog pathing very well.
I will show you now how to use central springs in classic compartments, but keep in mind central springs can only work perfectly if the Hog pathing is right. Testing and adjusting is really important for spring traps at all THs, so watch where the Hogs go and place the springs in the most common pathing.
Note: Pathing represents the way the troops will go. If you’re unfamiliar with this concept, check here – Part 2, Section 3.


This springtrap in a 9×7/10×7 comp has the best chance to kill 3/3 possible Hogs (Hog pathing should be like the red line), so it’s a good way to use a spring, but the problem is that a 9×7/10×7 comp is not common and not good in the current base building meta, so I do not recommend to use it; there are comps that are wall cheaper and have a similar spring effect.


A 9×6/10×6 comp combined with a spring kills usually 2-3 Hogs (the red line shows how the Hog pathing should be); this comp is pretty common and good in the new meta, it’s used to minimize the QQ value together with a 9×5 comp. You can also use this concept for a good double spring spot, if you do not have enough other spring spots in your base.


This spring in a 9×5/10×5 comp kills 1 out of 3 Hogs most of the time, but it can also kill more Hogs if the pathing is similar to the red line. I recommend to always have a defense in front of these springs/don’t have both defenses directly targetable, because a good attacker can just deploy 2 groups of Hogs to take both defenses out at the same time, this would make the spring useless.
The following example shows how to use a spring trap if you have an outside defense in front of a 9×5/10×5 comp. The red line shows how Hogs would path: the spring trap in the middle is not the best choice, you have to move it one tile closer to the outside defense so that more Hogs will trigger the spring.


If you want to place springs between outside teslas which touch a wall, move the spring one tile away from the wall, so it will work better against witches too. Here is a little example for you:

Diagonal springtraps are more important in higher THs like Th10+, but they can still be effective for Th9. They are usually useful in combination with a sweeper or a Tesla:


The problem with these sprint types is that Hogs can skip one of the springs if they have a specific pathing, so you’d waste 1 spring:

As you can see the Hogs would only get 1 spring with this specific pathing, so I suggest you to think about the Hog pathing and which of your diagonal springs would always work. Remove the springs which will not work most likely.
Spring Framing in a TH9 Base
You can influence Hog pathing with walls or trash buildings, basically everything except a defense, so that more Hogs will path into your spring.
I will explain wall spring framing first, it is the better and constant working way to frame Hogs into the spring. It’s necessary that you always have 2 walls on each side of the spring or Hogs might skip it.
Keep in mind that spring framing with walls is very expensive and could cause trouble with completing your wall skeleton, so I suggest to use it only when you have already completed the wall skeleton and have a few walls left. All of these concepts can be used as fake spring spots, this can be good because it makes your traps less predictable.
The following examples show you how Hogs could path around, if you save a few walls, instead of using 2 walls on each spring side:


The springs would still more likely kill Hogs than without wall support, but you don’t have “perfect” springs. The most effective non-”perfect” spring frame is when you frame only one side, so you need only 1 extra wall in a 9×5 comp. This gives Hogs a option to skip the spring, but it is still better than a spring without any framing:
This concept can also be used to create good sweeper springs. 

As you can see there is nothing framing the bottom side of the spring trap, so Hogs can still path around it. Any trash building will force the Hogs to go into the spring. Example:

Here are a few classic good examples with “perfect” framed springs (the ones without a comp around can also be used inside a comp):


Hogs don’t have any other way except going directly into the spring trap because this is always the closest way to get to the defense without jumping over the wall.
This is a common mistake I have seen in the review rooms, people use framed springs and think they are safe against hogs:

The problem is that 2 groups of Hogs can destroy buildings on each side at the same time, which makes every spring useless:
I recommend having framed springs where the attacker can’t destroy the pathing into your spring traps easily by having multiple Hogs groups.
In the picture below, Hogs will be forced into the framed springs and there is no possibility for the Hogs to skip the frames.
You can also use spring framing with trash buildings like in the picture above, this doesn’t work as well as spring framing with walls, but it is less obvious. You can use this concept inside or outside of the base, Ilike it because you don’t have to waste walls for good springs. It works like wall spring framing, but you need a building on each side as opposed to one wall on each side for the normal framing. It’s important that there is no free tile for the Hogs, so that the Hogs are more likely to go into the spring. 


It’s also possible to combine wall framing with normal trash framing, but you have to pay attention if you do it correctly.
Don’t use walls and trash on one side for spring framing, or Hogs could path between trash and walls; Hogs could path for example between the dark storage and the wall, so they won’t trigger any springs.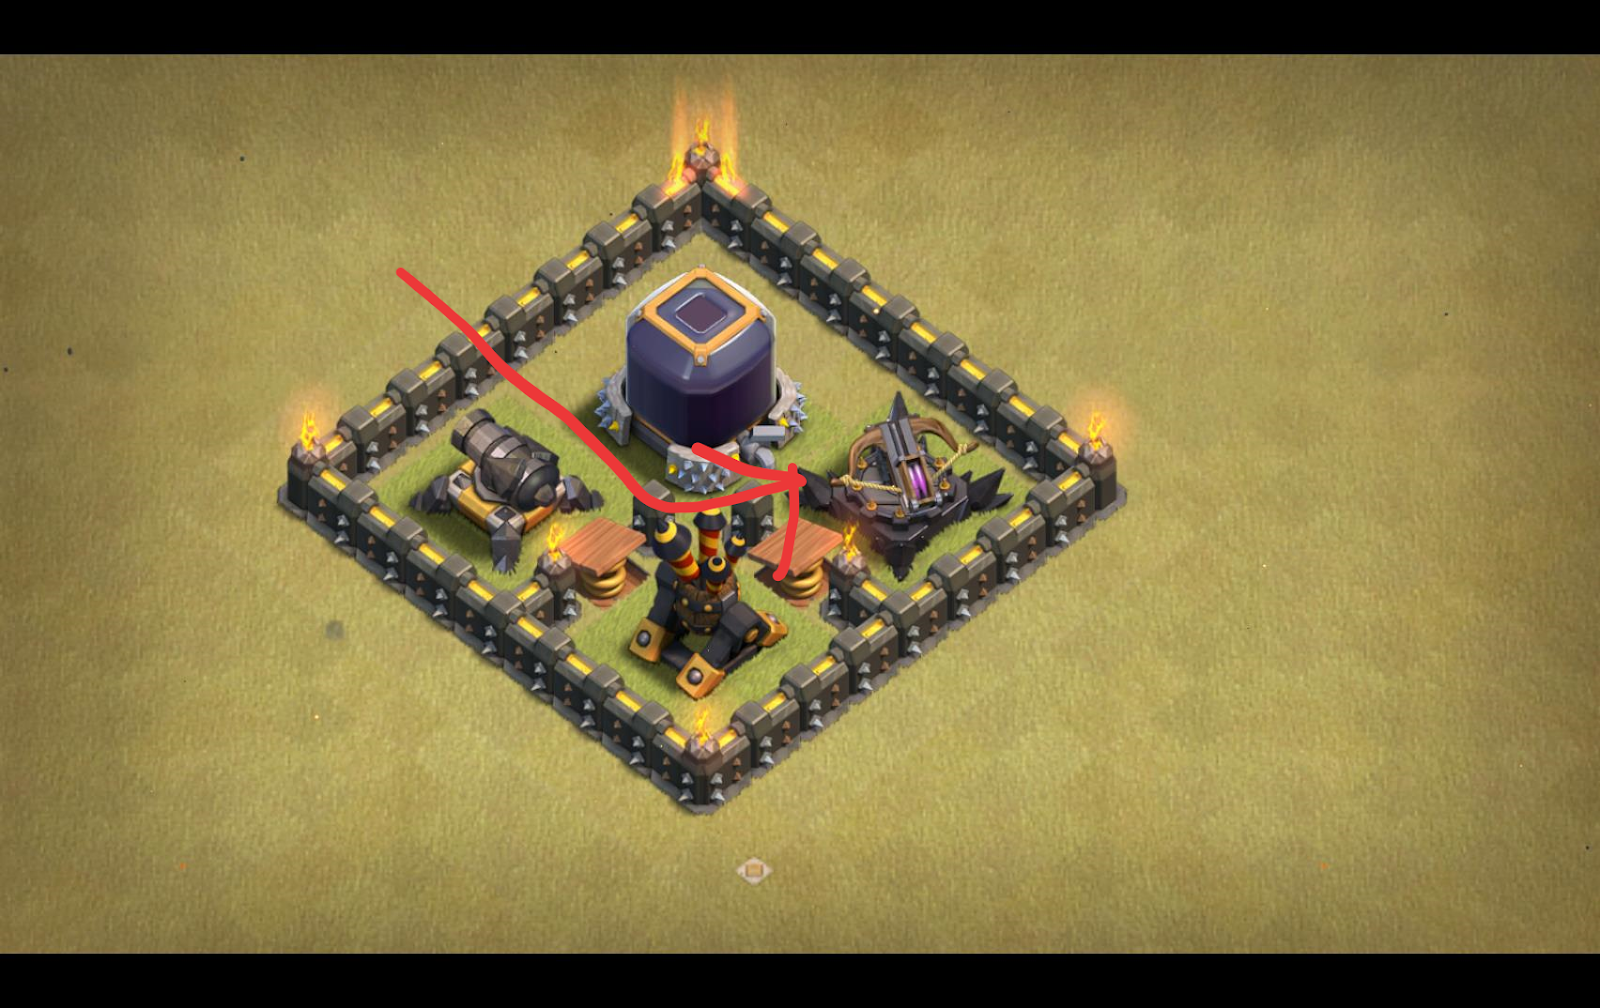

Here is a better example, you have one side with walls only for framing purposes and the dark storage on the other side.
Builder huts can be pretty useful for it too.
You can also use the wall skeleton and trash to create good unexpected springs in your trash ring.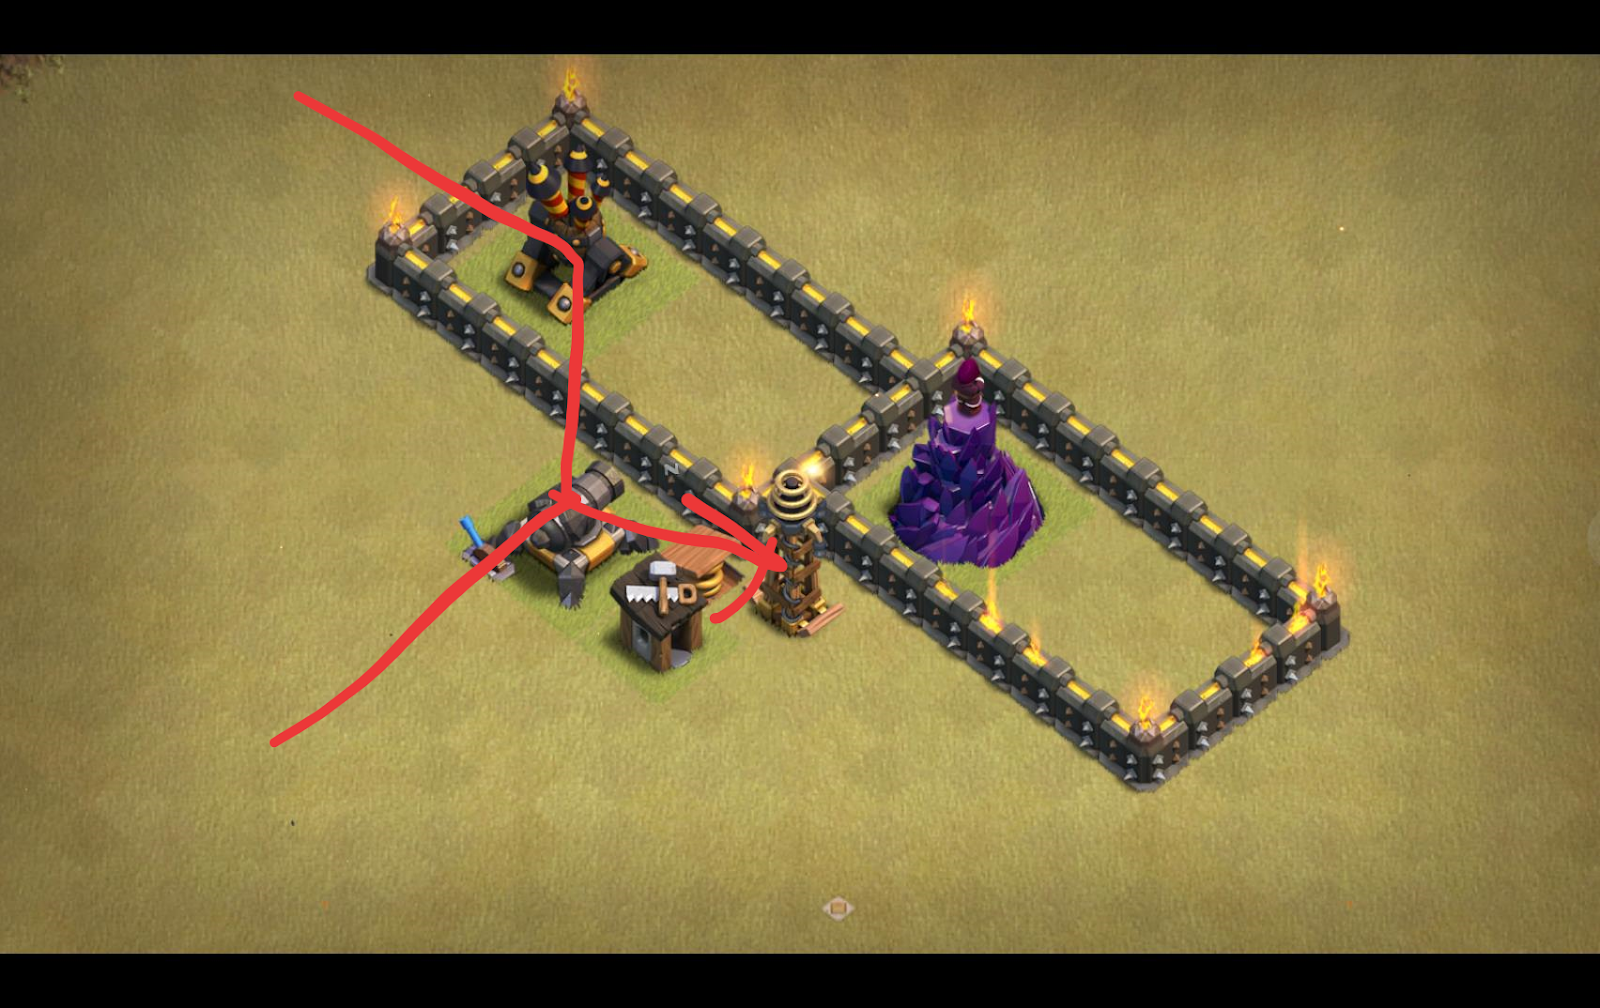

3.2 Small Bombs (SBs)
SBs are very useful against WBs, you just need to place them 3 tiles away from the specific wall and use buildings to funnel WBs into the SBs. Here is an example of how you can funnel WBs into a SB.


You can also prevent double layer WBs if you use SBs like this:

3.3 Giant Bombs (GBs)
GBs should always be in hog pathing, so they will hit Hogs all the time. These examples show how you can use GBs in Hog pathing.


The next example isn’t very consistent because the attacker can influence the Hog pathing with the deployment. This means the attacker has a 50/50 chance to avoid the GB, and a smart attacker would for sure take advantage of this and avoid the GB in a cleanup hit.


You shouldn’t have 2 GBs too close to each other as that would give the attacker too much heal spell value. Here is an example of the heal zones in my base:

Most of the people have their GBs away from the Queen, because if someone hogs he will most likely try to take out the Queen first and hog the rest. Keep in mind that Skelly Hog exists and it could take advantage of your GBs placement by getting your GBs in the backend with a KS/Sui/QC and skelly your Queen while he hogs. Try to create GBs spots, both inside and outside, so that the attacker doesn’t know where your GBs really are.
Super Giant Bomb
You can also use 2 GBs and a minimum of 2 SBs to kill a group of Hogs instantly, this setup is often called Super Giant Bomb (SGB). For the setup to work, you need SBs in the middle and GBs in the outer part, and it will instantly kill Hogs only if they trigger everything at the same time, so they need to go into the SBs.
If you want to use the SGBs, make sure that Hogs cannot trigger 1 GB too early or it won’t be an effective SGB. You also need to make sure that the Hogs (or at least the majority of them) go into SBs so that everything is triggered together, because Hogs that will go into GB will only suffer damage from GB+2SB and won’t immediately die. For this to work, you need good pathing, which we will analyse in the pictures below.
Let’s try to understand the importance of good pathing leading into the SGB.

This is a bad SGB: Hog pathing will be influenced by the AT, so the yellow marked GB will be triggered separately from the other GB. This bad setup gives the attacker the chance to pre-heal and prevent Hogs from dying.

This SGB is good, since the pathing can only go straight through that comp, which means everything will be triggered at the same time, but be careful about pathing outside.

This is a very easy but working SGB pathing. Both inside and outside pathing will lead Hogs into the SGB as there’s no other way for them to go.
Obvious SGB spots can however make people choose a different strategy or just another entry, so consider fake SGB spots. You should also pay attention to non defense areas like storages or Dz which can create great pathing leading into the SGB:

There are also nice little surprise options for SGBs with this Tesla setup (also known as “german SGB”): 

This setup is very special, since it is used in the trash ring. You need to make sure that Hogs will path into this SGB from in and outside of the base. Pay attention that nobody can trigger a single GB too early, you can avoid this with a good 2 layer trash ring. The springs are only optional, but they work very well. In the setup, the Teslas are outside near the map’s edge and the Mortar (or any other defence,but usually Cannons/ATs/Mortars) is outside and near the walls.


Note from Marco – I used the same setup back in the days (the pictures above are from January 2018, but I experimented with SGB in 2017 too). I’m not sure where the term “german SGB” comes from, but I liked using SGBs to shut down Hogs.
When I implemented the setup, the idea was to have Teslas to create pathing leading into the SGB, and springs to prevent attackers from sending 3-4 Hogs into the Teslas to dismantle the SGB. Usually, either the attacker didn’t notice the SGB+Teslas until it was too late, or noticed it while funneling/killing free trash, tried to send Hogs which then died due to springs, and had to decide if he wanted to invest more Hogs and dismantle the SGB or try his luck.
Usually, on symm bases I actually had 2 SGBs and both were opposite of AQ, so it was a pain to hog because Skelly Hogs didn’t exist and you couldn’t really clear AQ+2 SGBs with the QC/KS.
3.4 Seeking Air Mines (SAMs)
SAMs usually have two main purposes.
- Against QC – the SAMs hit the Healers; that makes it harder to keep the Queen alive, so the attack most likely fails. SAMs placement is based on testing: you need to trap the best and most common entry for QC. Keep in mind that you do not want all SAMs very close together or they might hit only 1 healer even if 2 are triggered.
- Against Hounds to stop Lalo – you logically need to have SAMs near ADs/in Hound pathing/common Hound entries or they won’t hit anything. If you stack 2 SAMs on one AD, the Hound will pop very quickly and the Loons will face more damage due to the AD staying up. I don’t recommend having more than two SAMs on one AD + pathing leading to that AD as that’s overkill and essentially wasted SAMs. I also recommend having at least one air targeting defence near the AD to help kill the Lava Pups faster (for example, one AT). The disadvantage of the double SAMs setup is that people will get more value if they Sui/QC that specific AD, and will then have Lalo/Drags survive more in the rest of the base.
3.5 Red Air Bombs (RABs)
RABs should be used away from ADs and their Hound pathing, so that they will hit groups of Loons instead of Hounds/Lava Pups. In the pictures below I represented Hound pathing: 

You may still choose to have RABs in some Hounds pathing zones, as Lalo would usually target nearby ADs and not go from one to the farthest one.
3 RABs together can kill one group of Loons, but they are more risky since a Hound/Sui/QC would profit from taking the zone with them out.
Keep in mind that experienced players let their Hounds fly over NFZ, especially WTs, so you may have to adjust your RABs to avoid them being triggered by Hounds.
3.6 Skeleton Trap
Mainly known as ground or air skellies are wonderful weapons against either Hogs or Lalo.
- Ground skellies are used away from the King, Queen and the other ground skellies to avoid giving good poison value: the attacker can’t poison all skellies at the same time, which means they will deal constant damage on the Hogs.
- Air skellies should be treated like RABs, they work wonderfully against Loons so you should put them in NFZ or other good RAB spots.
4- Trash Ring in TH9 Bases
4.1 Free Trash
The trash ring is super important for every base: a good trash ring can cost a lot of troop space to funnel. An important way to increase the amount of funneling troops needed is by protecting most of your trash buildings, this means that you shouldn’t have too many buildings where I can use archers/minions etc. to snipe them without defences killing the troops.
4.2 Town Hall
The Town Hall is a very important building: in one hit formats it secures you a star, so you need to make sure it’s at least somewhat, but you can also use it as an extra storage. You can either use it inside as a high HP building to slow down wizards/QC etc. or you can use it very centrally like in an anti 2 star base.

If you want to use it outside of your base then keep in mind that you should protect it, so it cannot be sniped by a wiz/minion etc.

Keep in mind that people always want to have at least amsafe 2 stars attack in 1 hit wars, this can be very helpful in the baiting process. Sometimes the TH has a TF/fake TF spot to throw the attacker off, and you can assume that people would prefer to QC the TH side and leave the other for the backend rather than leave the TH backend and risk getting a 1 star hit if something goes really wrong.
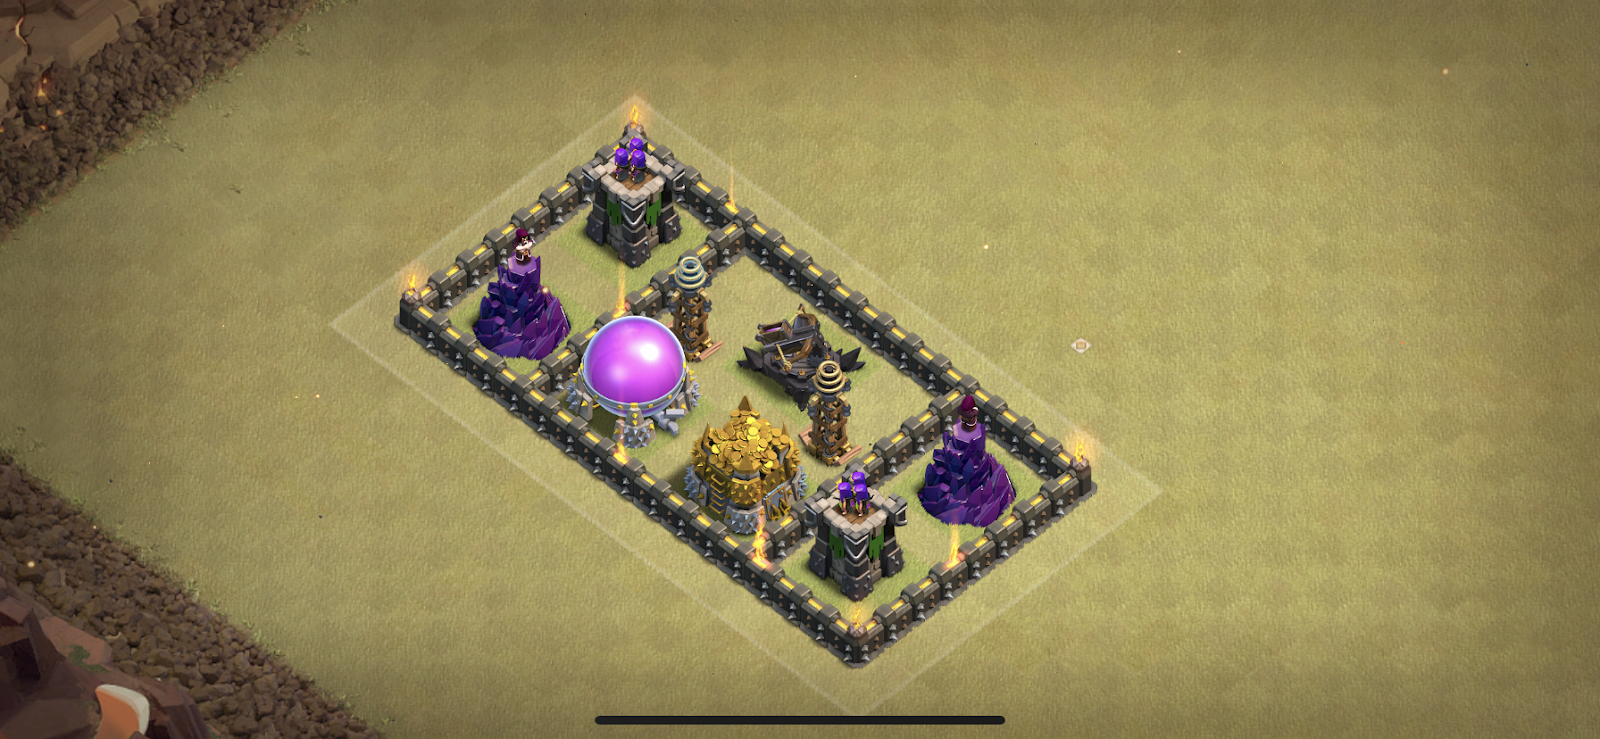
4.3 Storages
Storages are nearly as useful as the TH, since they stall troops and can also create wonderful fake TF spots. I recommend to always use some of them inside, since it helps to split wizards/heroes from golems. You can also create compartments with storages and other non defensive buildings which work similarly to a deadzone, but they slow the attacker down more since the DZ is empty by definition. Here are 2 base examples where I used internal storages.

You can create good TF spots with them because they stall the troops a lot and consequently the troops suffer more damage; you can also create good fake TF spots with storages, since for the reason above they are very commonly used near real TF.

In this example, we have a spot that could be a good TF spot, so it can either be a real TF spot or a convincing fake TF spot. Remember that, when baiting, you want to use a level of bait so that the attacker falls for it but you don’t waste too much.
For example, 2/3 storages may be needed to let a newbie/bad attacker think that you have a TF, but in competitive leagues 3 storages is so obvious that people may just assume that you don’t have a TF (and then maybe you actually have it and you outsmarted them, or they drop a Hog to test and they outsmart you and so on).
Generally, the more an attacker is skilled the less bait you want to have for him/her to fall for it, this is what is often referred as “subtle bait” and used a lot in competitive leagues such as CWL (CWL Premiere where I, Marco, do BB) or Th9 leagues against good clans.
Conversely, if you have a big bait, a good attacker knows it’s either a big bait or wasted storages and may just QC the area with less storages and devise a plan if you do have TF there + another plan if you don’t.
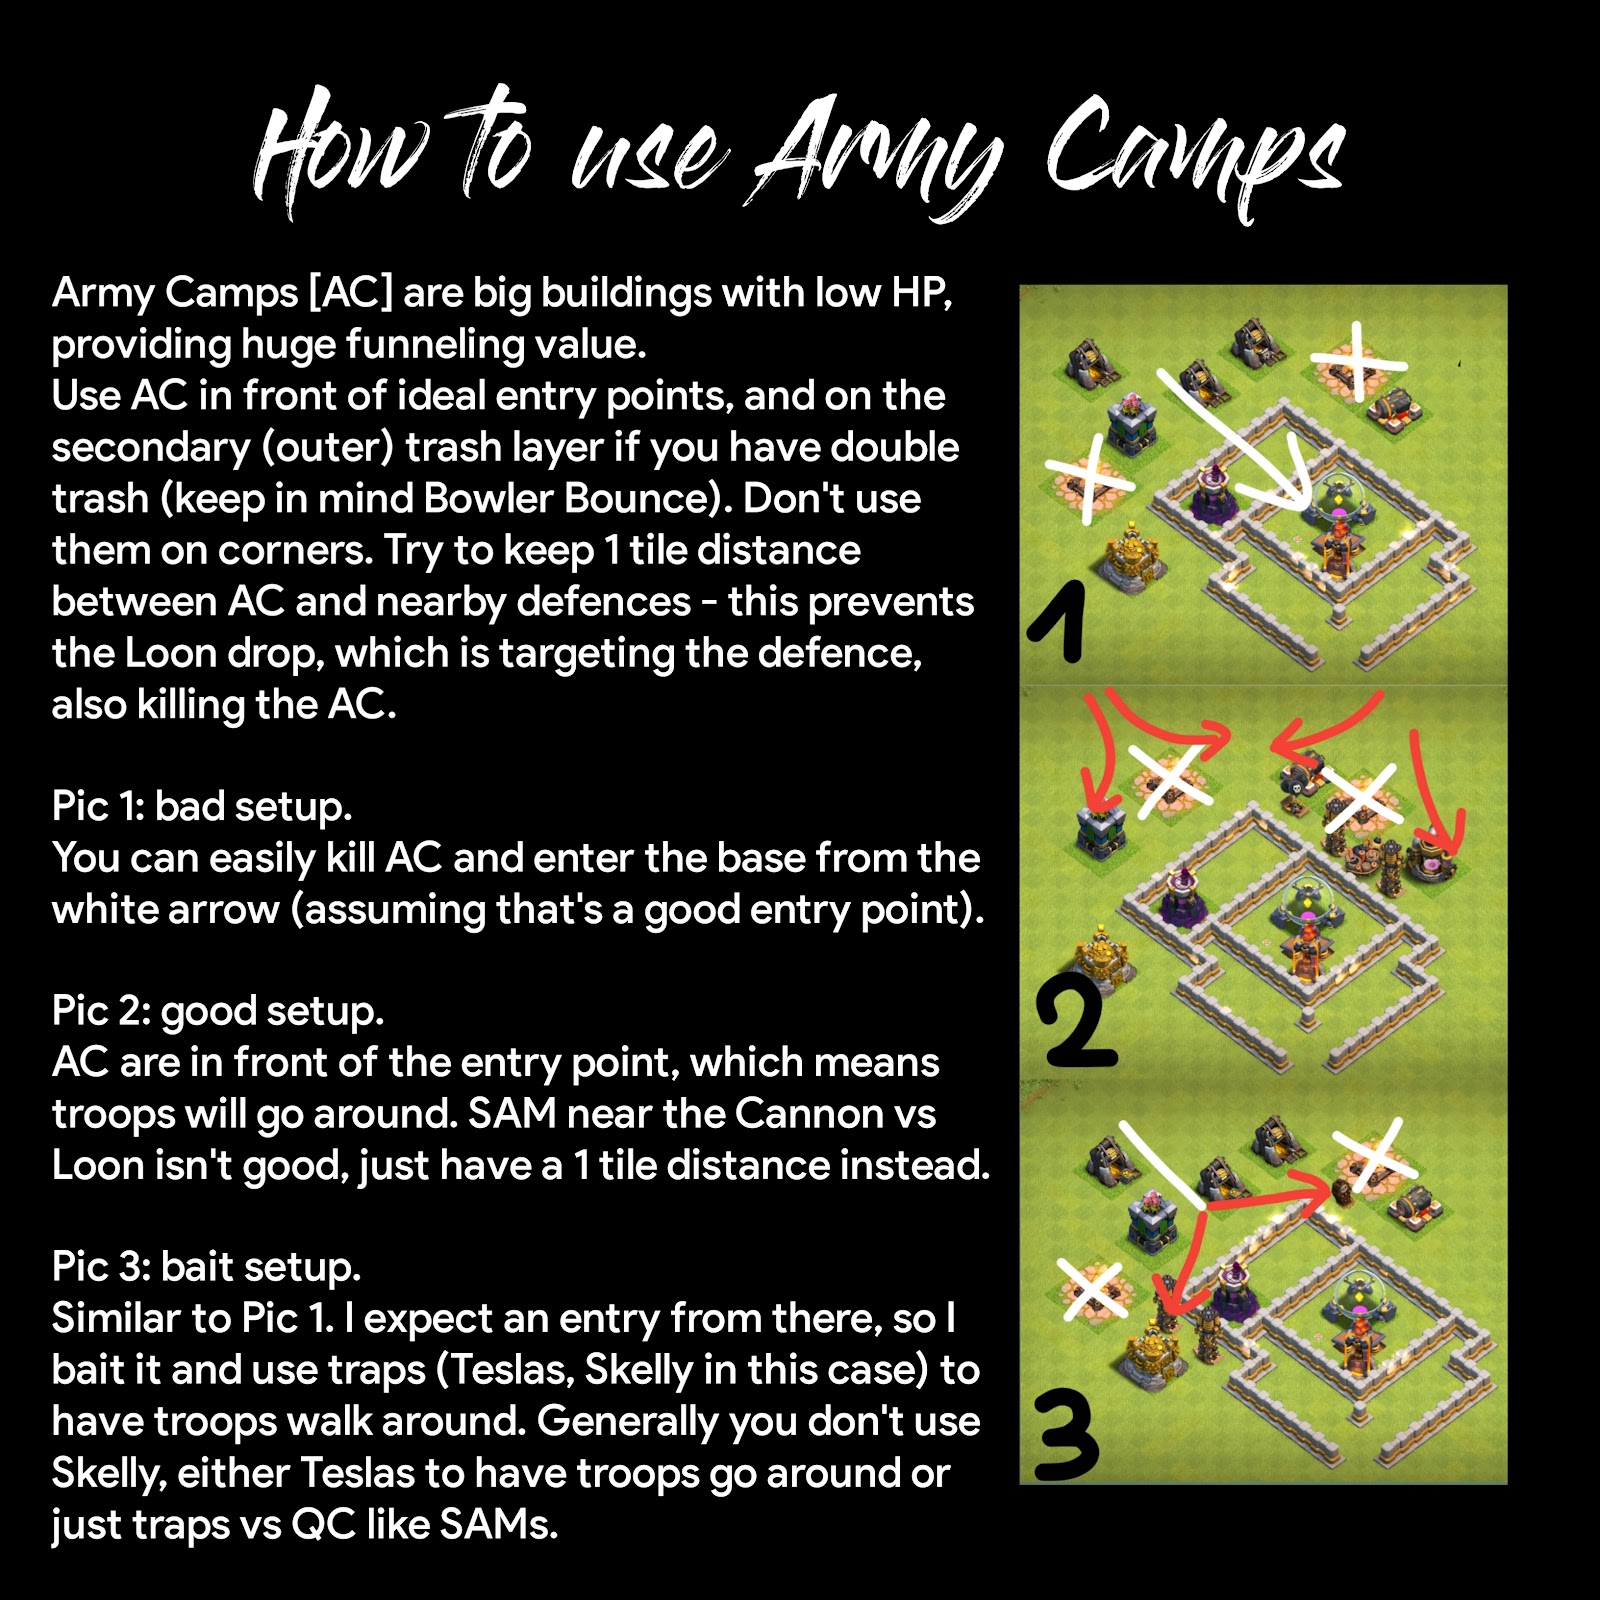
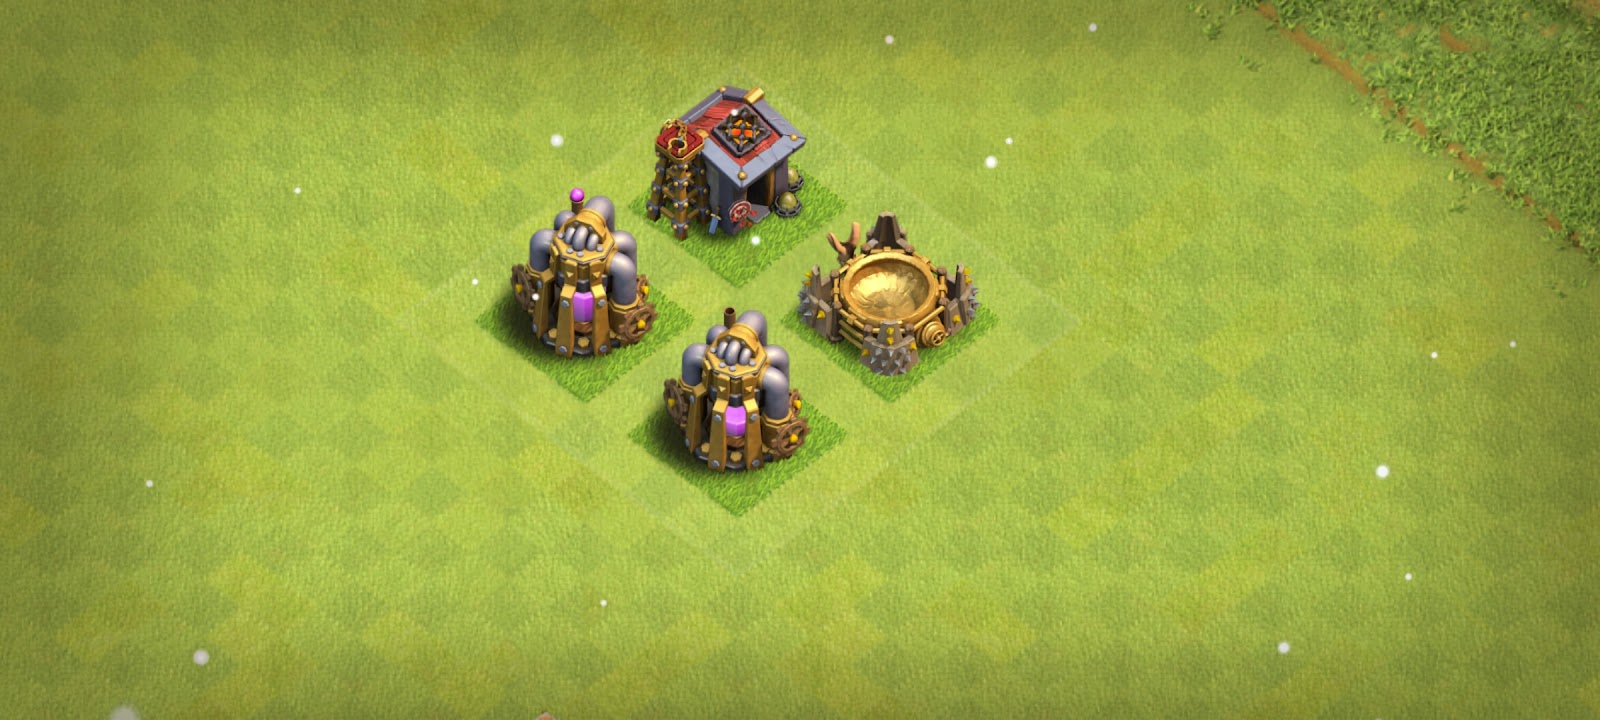
4.4 Army Camps
Army camps are very important because they allow cheap funnels if not used correctly.
My friend Marco has made a good picture for this problem.
!armycamp command in the BB server
4.5 Valkyrie Funnel
People can use Valks to funnel if you have touching trash. This is easy to solve, you only need a minimum of a 1 tile gap between all of your trash buildings.
Bad example: the 3 buildings on the left can all be targeted at the same time

Good example: at least 1 tile spacing
5- Attack Strategies at TH9
5.1 Witches
We don’t focus on Witches because they are a broken troop at Th9 and are banned in the competitive leagues. If, however, you still want to know how to defend them, feel free to consult Marco’s Th9 Guide linked here – Part 1, Section 3 & onwards. It’s a bit old though.
5.2 Lalo
Lalo has 3 main types of strategies: Ks Lalo, Sui Lalo and QC Lalo.
Sui Lalo is still the fastest and strongest strategy in the game, which profits from the great variability: the Sui can go for the Queen, backend NFZ or just defenses to create better pathing. This makes it so hard to predict and defend it. Ks Lalo and QC Lalo go deeper into the base, so it’s easier (to certain degrees) to spot likely entry points and trap them/trap the backend.
A concept that is strong against all kinds of Lalo is a No Fly Zone – NFZ in short.
A NFZ is a Th9 concept which focuses on separating Hounds and Loons and then shredding down Loons since Hounds fly over them due to the NFZ and don’t provide efficient tanking; it consists of pathing and non defensive buildings to basically block Loons from following Hounds (more pics below).
A NFZ already has splash defences, if you also have an appreciable amount of DPS nearby it can force an heal without needing a GB in case they opt for Hogs, hence we recommend trapping NFZ with springs.
While creating an NFZ in your bases you must keep note of these points.
- Try to have NFZ away from the Queen so that people can’t destroy it with a QC or, if they choose to destroy it, they won’t then get your Queen.
- NFZ should be away from Hound pathing and away from ADs, this way Hounds give a minimal amount of tanking for Loons while flying over a NFZ.
- People like to fly Hounds over NFZ to trigger traps, so you as a builder should make sure to spread air traps like RABs and Air skellies so that a single Hound can’t trigger all of them. However, always consider having RABs or Air skellies in a NFZ, since that makes a NFZ deadlier.
- As already mentioned, don’t have large NFZ.
Here are examples of working NFZ:


All of these are a bit big but you can also opt for using smaller NFZ. BK in a NFZ isn’t necessary; while using BK in a NFZ you must be also wary of QC Hogs. If you have a geared AT, consider using it in a NFZ since it’s deadly to Loons and can’t be tanked for long by Hounds due to its short range. Generally, a NFZ should be a splash killzone, but you must make it so that a QC/KS can’t easily kill everything.
It is also very important to have a decent AD shape which makes Lalo harder. Y / I / squared shapes are very good, but extreme AD/NFZ separation also can be good. Below are some examples of ADs shapes.
Y shape

I shape
Square NFZ/AD separation 

QC Lalo against a TH9 Base
The most common strategy in the competitive Th9 gameplay because it’s a really strong strategy. People often try to get the Queen with their QC, but often doesn’t mean every time and so baiting QC Lalo isn’t as easy as it seems. You need to test all the possible good entries, it doesn’t matter if the QC gets the Queen or not.
QC is super strong and nearly impossible to stop at Th9 due to the lack of DPS compared to higher THs. You can, however, use SAMs in common entries to (try to) kill Healers. Always keep in mind that you also need something to kill Hounds in the backend. So I personally don’t recommend bait with like 4 SAMs.
Ks Lalo is not as often used as the other 2 Lalo strategies, but still a good strategy. The Ks usually goes for the Queen. The Ks needs a lot of spell support, so the attacker doesn’t want to waste more spells on a Skelly for the Queen. This helps you to bait this attack and defend it, basically keep the traps away from the Queen.
Other good strategies against Ks are to use storages near the entry to slow wizards down. Golem traps near the Queen can force people to use a QC/Sui. You can read more about them in the Golem Trap Guide.
5.3 Hogs at Th9
Ks Hogs
It is awfully strong, but luckily there are still a few tricks to defend it. You need to focus on the 2 different phases to stop it. The first is logically the Ks which comes in with 1-4 Golems to get the Queen, CC and extra value like good spring spots or splash damage and the second is then the Hog phase.
A Hound CC is very good against any kind of Ks attack, because it separates Wiz/Queen from the rest of the Ks. As a result, the Golems have to tank without getting any support.
To make sure that the Ks doesn’t get too much value, you need to kill the Golems as fast as possible. To do that, you either need constant DPS on the Golems or you could use a Golem trap to shred golems as fast as possible. Once again, I recommend reading the Golem Trap Guide.
You should also combine high DPS with internal storages to slow any Ks down. This limits the possible value the Ks can get.
You should also try to keep the Teslas away from the Heroes, so the Hog part will have more DPS on it.
Keep your ground traps away from the Queen, so the Ks cannot disable any of them, this means the Hogs will struggle with your backend.
The use of SGBs can be very helpful as long as they work all the time. I recommend to use them only once you understand the Hog pathing. Here is an simple example base where I placed all my traps away from the Heroes:

Some rare strategies, however, profit from this kind of trapping, for example Ks/QC Skelly Hogs will aim for your backend while using Hogs+Skelly on the Queen side to avoid the traps.
Remember to also avoid giving too much Heal/Freeze value,for this reason you don’t want splash buildings too close to each other but rather a bit apart.
QC Hogs
It is one of the strongest armies at Th9 since it includes a QC (and QC is broken at Th9), although it’s a bit base dependent. It aims to get Queen, King and CC while also creating good pathing for Hogs. If you don’t protect your Queen with splash, attackers could Skelly the Queen while doing the Hog part of the attack.
There are some key factors which determine where a QC is most likely to come from.
- AQ, BK, CC need to be taken out. Don’t place your BK and AQ too close and too external, otherwise the attacker may trade his BK for your AQ+BK; on the other hand, if AQ+BK can’t be traded, the attacker will need to charge there.
- ADs could potentially kill Healers, so they limit the potential QC.
- QC Hogs usually has only 2 rages and therefore a short QC, so the easiest and shortest QC is usually the most likely one.
This usually narrows the potential QC down to a handful of them or less.
After knowing how the QC would enter, you can trap the backend with ground traps to get the Hogs down.
QC Ks Hog needs different trapping, the attacker will get your Queen with the QC/Ks and then use the other part for the King + extra value in the backend. This means you have to move the springs away from both Heroes, otherwise they will be taken out during the QC/Ks phase.
Zap Hogs
It is easier to bait and defend. The attacker will zap AQ with any splash nearby (generally a BT, which is there against Skelly as we discussed above), and then use a Ks to take the BK out. If you are expecting Zap Hogs, I would recommend to generally have the TF away from BK. Have your ground traps away from BK but let them be spread; in f9 wars (2 hits) the attacker could just Ks the area where you have a lot of traps, and then Hogs on the rest in a way so that they end up on the BK and kill him – spreading traps will avoid this issue on cleanup,or at least make it harder.
The reason why Zap Hogs work well is that if you use a Ks for the Queen, she will roast one Golem down by herself which makes the Ks weaker due to less tanking; with Zap Hogs you zap the AQ and therefore Ks won’t have to deal with her. Since Zap Hogs has a lot of Hogs and you can’t have AQ/BK to deal damage (since they will go down respectively to Zap and Ks),you need to kill Hogs quickly. You can work with SGBs or spread Healzones (since Zap Hogs only has 2 heals), and make sure to test springs so that they kill 3 Hogs each time.
5.4 Avalanche at TH9
Avalanche is a strategy which uses 4-7 Golems combined with Wizards. The spells used can vary a lot; some use QQ/Jumps to get inside of the base, but some also use just basic Avalanche with a lot of skelly spells to destroy unreachable defenses. Here are a few tricks to defend it:
- Pay attention to the QQ/Jump value inside your base, for example it’s bad when the attacker can reach all of your unwalkable point defenses with only 1 QQ. You can avoid this huge QQ value with the usage of 10×10 / 6×10 paired with 5×10.
- Having unreachable point defenses is always very important against an Avalanche. People can just Avalanche without any WB/Jump/QQ if you have for example all of your point defenses walkable.
- The usage of Golem traps is of course very important, so I suggest you again to read this Golem Trap Guide if you haven’t already.
- I personally suggest to use a lot of storages inside the base to slow the wiz/Queen down.
- It is also very useful to take a Hound CC for splitting the Wiz/Queen from the tanks.
QC Avalanche can be used even in leagues with the classic 3 Golem cap. The QC usually aims for the unreachable point defenses inside of the base, and then the Avalanche part can just work around the base without any WB/Jump necessary.
As I already said before, it is super hard to stop a QC at Th9, but it is an advantage that you could use all SAMs to bait a specific QC/more than one entry.
A good spread of unwalkable point defenses is very important so that the QC needs a lot of time to get all of them.
Always try to have the Teslas/TF away from the QC area so that the Golems have more DPS to deal with.
Examples to defend Avalanche


Just as an example, these two compartments by SHEEV#2285 feature hidden holes behind the AT. They will lure Golems in and your DPS will then kill them. More of this in the Golem Trap Guide.


Adapted from R4zZ0r#8246
This skeleton is quite basic but really good against Avalanche. The two arrows represent the two best entries, coming from any other point would split the troops too much.

You can bait one entry with the TH, in one hit formats you can’t risk getting a one star.
By placing any non defensive building in the core (in this case, a DE storage) you will have Golems splitting and going sideways. This also means that any troops in the DE Storage compartment won’t be tanked and could be killed with DPS.
To counter a QW from the sides, you could use Army Camps or good trash in general to have her waste time and/or walk around.

Lastly, for two hit formats (or one hit against brave opponents) you can have one more trick up your sleeve. If they start from 3, Golems will be used to go to the anchor point (in this case, Cannons). Teslas will then pop and, due to being outside, Golems will retarget and go there. This means that anything dropped behind Golems won’t have a Tank to cover them anymore, and could die due to DPS.
Important: this works because the Cannon is inside and the Teslas outside. If the Cannon was outside, the Golem wouldn’t retarget; the attacker would’ve had time to drop WBs or figure out what to do for all the time needed to take the Cannon down.
5.5 Dragons
We distinguish on Th9 in general between 3 main types of Dragon based attacks:
Sui, Ks and QC/QW Dragons/Baby Dragons.
Sui Dragons / Baby Dragons are mainly strong in Zap wars, since you usually need to take out at least 3 ADs with your Sui and spells.
There are a few basic ways to defend Sui Dragons at Th9:
- Don’t have ADs and/or Sweepers zappable together, it won’t be worth for the attacker to invest 4 spells for one AD and this will just force him into other strategies.
- Directly targetable ADs aren’t good against Dragons, since they can be easily taken out by a small group of (hasted) Loons / Hogs, which allows the attacker to use the spells for other usage. Just use a defense in front of ADs to prevent this:


You can also consider using better pathing, so for example by moving the Mortar close to the Cannon the troops would need to go Mortar – Cannon – AD.
- Do not have any ADs easily Suiable together. This means you should avoid ADs together. Generally ADs which can be reached from the outside, or can easily be suicided by the Heroes are bad. You can make specific areas hard to Sui. To do this you can use a lot of ground DPS or a King to force a CB Sui.
These AD setups are bad, since the attacker can sui 2 ADs without a WB or get 3 ADs from one comp. Keep in mind to spread the ADs wisely.

ADs are not the only important thing to stop a Dragon attack, since high DPS zones can serve a similar purpose. For example a TF can shred Dragons combined with high HP buildings.
ATKZ (AT Kill zones)
They are a special way to have high DPS zones inside the base – you use 3-5 ATs inside the base. This creates yet another high DPS area against Dragons. It can also create some inner DPS against Avalanche / QW based attacks. The Geared AT (GAT) is great against Dragons since it has one of the highest DPS. But keep in mind that you need to stall Dragons in front of it (with high HP buildings / AS / CC troops), so it has more time to kill Dragons
ATKZ can give good Zap value. This can make attacks like QC Zap Lalo / Hogs or just Zap Lalo / Hogs a lot stronger. For this reason I suggest to use more spread out ATKZ in Zap wars, where you cannot zap more than 2 AT’s together.
You should also consider that the ATKZ is away from ADs just like a NFZ. It makes sure that the attacker won’t be able to tank this ATKZ easily.
The first example shows an ATKZ which should never be used in Zap wars. As you can zap all 4 ATs together
The second one has only 2 zappable ATs together, which makes it more useful in Zap wars / F9. You can also create your own ATKZ setups, as long as you follow the mentioned points.


This leads into another very important topic – the use of storages.
Storages are a great way to slow down all kinds of Dragon based attacks. This helps especially in NFZ, since the attacker will try to get the ADs with his Heroes and spells, so the Dragons need to be slowed down in the other areas of the base.
You can also use them to split Loons from Dragons, so Loons will die out, otherwise Dragons can just tank all the time for the Loons while the Loons target the important defenses and make good damage.
The trap usage against Dragons can be slightly different, but keep in mind that you only have to trap against them if your base doesn’t defend Dragons with regular trap placement.
Since the attacker takes out the ADs with his spells and Sui, your SAMs shouldn’t be close to those ADs. You can either use them to destroy a Hound (which will be used to take out a backend AD, if necessary) or place them inside your NFZ, which kills Dragons very fast together with a bit of DPS.
RABs are basically not very useful against Dragons, so I still recommend to place them against Lalo.
Air Skellies are great combined with high DPS areas: the Dragons will be stalled, and that gives the DPS more time to kill the troops. As usual, don’t have Air Skelly in Hound pathing, so that they will always stall the Dragons and can still be useful against Lalo.
KS Dragons / Baby Dragons
This is one of the rarest strategies which also makes it so easy to defend. The Ks usually aim for 3-4 ADs, and the backend Baby Dragons can take out the remaining defenses while the Ks still tanks for them. The attacker decides if he wants to use Dragons or Baby Dragons based on the Ks size: the bigger the Ks is, the more likely he will use Baby Dragons.
Clumped ADs setups, which are often used in extreme NFZ bases, can be weak to Ks Dragons. This bad example allows the attacker to reach all ADs with one jump:
A good AD spread can make it impossible to use these strategies. For example I or Y shaped ADs are beautiful for beginners and also good against common strategies like Lalo.
Other good concepts against Dragon are already explained above.
Qc/Qw Dragons / Baby Dragons
Probably the strongest and most viable strategies in this Dragon/BBD list. It can profit from many different kinds of base and AD shapes.
Let’s talk first of all about the QW. This strategy profits from 2-4 walkable ADs, which can be taken out by a simple QW on the outside. The attacker usually brings Dragons for this kind of attack, since the QW doesn’t cost as much spells and the Dragons can then have 2-6 spell support. The QW stays in general on the outside.
Having unwalkable ADs can prevent a QW as long as the attacker won’t be able to use a 1 layer WB to get this AD. The pics below represent bad AD setups, since a QW (with or without WB) can get 3 ADs with low spell costs:


Having a decent AD spread will prevent a very strong QW Dragon attack. Which means shapes like I or Y are a nice way to avoid this strat. But even square setups, which are in general weaker to Lalo, make a QW Dragon attack a lot harder.
You can also use unreachable Dps to make specific Qw spots more expensive. Because the queen cannot reach the dps and so she needs more spells to survive.
QC Dragon and especially QC Baby Dragon is a super strong strategy. Because you can’t really defend it even with a good AD shape like I or Y. The QC gets deep inside the base and will get the ADs anyways. Only a square AD shape is an effective way to make a QC Baby Dragon super hard. But as I already mentioned a square AD shape makes your base weak to Lalo.
Cover your ADs with enough DPS.
It ensures that the attacker can’t use a cheap QC to get good value and consequently make a QC Dragons possible.
I suggest in general to follow the basic tricks from our QC section. But there are some slight changes in trapping for specific strategy.
- SAMs can be great to stop a QC in a specific entry. You can also use them in your backend against Baby Dragons.
- This means spreading out SAMs in areas where no Hound will tank for them. This way the SAMs always hit a Baby Dragon.
- You can use double SAMs for a backend AD. It ensures that a mini Lalo portion will die out quickly. Resulting in the attacker geting lesser value than expected.
- Separate your ADs. This way a QC Baby Dragon is a lot harder because you can’t reach 2 ADs from one comp. The core of your base shouldn’t give access to more than one AD.
- The Teslas and small / big NFZ should be away from the QC area. It dishes out huge damage on the backend.
- Storages in front of air DPS can be a great way to slow down Baby Dragons. Because the attacker then would need to use more to get a similar value. Keep in mind that a TF protected by storages is more obvious.
- Storages can be used against a QC. The Queen will need more time to get through the base. It can often lead into a time-fail since the attacker doesn’t get as many ADs as necessary in the same time.
Free TH9 Base
Here’s the link to free TH9 Base for War, Farming and Trophy pushing. Get them right now.
Links to YouTube + Guides for TH9 Base Building
Here is a small list of BB Videos which will teach you basic and advanced BB techniques.. Please subscribe to our YouTube channels as well as our friends’ Sheev, Zeedos and Irfan to honor their work. Thank you!
To understand Th9 Base Building better, we recommend watching every video 🙂
Videos
First, EM – Th9 LB #1
Second, EM – Th9 Live BB #2
Third, EM – Th9 CML Base #1
BB Server Podcast #1 – Base Identification
Sheev – Unconventional BB: Ground X-Bows
Guides
Marco’s Th9 BB Guide – useful for Part 1, Section 3 (Witches) and Part 2, Section 3 (Pathing). It has been used as a comprehensive guide for 2017-2021. Although it’s a bit outdated we recommend checking it out if you’re unsure about general concepts. Do not use it as a guide on how to defend up to date attacks. Unless you’re interested in defending 2017 Meta strategies instead of the current ones 🙂
Golem Trap Guide by Irfan
Hole Guide by Dressie & Marco
Combine these two guides to use Holes which can both help against QC and also be a Golem Trap 👌
Join the BaseBuilding Server to learn more.
Final Words from Authors
Thank you for reading this guide!
If you have problems with understanding anything join our BB-Server and ask some of the Th9 Pros.
Warrior Main writer
EM Main writer
Jzb Main writer
Marco Co-writer, Main editor
Warrior
Hey! Warrior here,
I have been playing Th9 since 2018 I think, Started playing competitive in 2020 and I am pretty much new. Have played with clans like EB9, subsidium, b2w etc. Like to build for different leagues although I’m still working on building more consistently 😀
EM
Hello Boys and Girls my name is EM,
I am a 18years old base builder from Germany. Started my BB career in december 2019, when Sheev invited me to his clan sapnu puas. Played in some leagues for Subsidium or Broskieskimoski. Now I don’t play Th9 often, but I still love to build. I also play/played Th5/7/8/9/10/11, because every Th has different great BB aspects.
Jzb
Hello everyone! Jzb here.
I’ve been playing clash for about a year now, casually at first but I slowly got more into it. I started playing competitive about 6 months ago and started building about 5 months ago. I really enjoy being part of this amazing community and learning from those around me.
Marco
Hey! Marco here.
I’ve played CoC for ages now. In the period around 2016/17 I had the most fun with Th9. I wrote my Th9 guide, played in competitive leagues.
Currently do Th12BB in Yolo Mode after a long journey in TWSS, A&B, EoV and !CT!.
I stopped playing Th9. But I’m here to help as an old guide writer/editor and to share some tricks that I also use in other THs. Enjoy!❤️
Thanks a lot to all the Th9 Pros who helped writing this guide and Marco who helped editing. This wouldn’t have been possible without you all!
Contact us on Discord!
If you think there’s something we should add:
Warrior#1266
EM#2378
Jzb303#7721
If you think there’s something to edit and fix:
Marco#0264
Thank you for sticking with us 🙂
We wish you a nice day ❤️