
Introduction
Are you looking to master TH10 base building? Building a strong and impenetrable base is key to defending in wars. But with so many strategies and tactics out there, it can be overwhelming to know where to begin.
That’s where we come in. Our comprehensive guide covers everything you need to know about TH10 base building, from the best strategies to step-by-step instructions for creating a perfect base. Whether you’re a novice or a pro, our expert tips will help you dominate the game and rise to the top of the leaderboards. So let’s dive in and get started!
Table of contents
Compartments in a TH10 Base
Compartments should be as wall efficient as possible without providing access to too much value. Always think about where you can save walls to use in more important parts of the base.
However, compartments shouldn’t be too big either, especially in areas where large comps would provide access to a lot of value. When building a base, think in terms of reachability. A queen can reach 4 tiles, so if multiple high value defenses, such as an inferno, several ads, and the enemy queen are all reachable (within 4 tiles) of a single compartment, it’s giving too much value and needs to be changed. Another thing to consider is bowler reachability. Bowlers can reach 2 tiles, which is why you often see inferno compartments with 2 tile gaps if they don’t have the 4.
I prefer the classic 9×9/9×5 comps, because they do not use too many walls and they are pretty good at keeping value spread even. 10×10 comps are great for GB and especially SGB spots (Will talk about SGB later). 10×5 are pretty good for classic GB spots, but they can be used for springs as well. 10×10 are usually better for IT comps.
Classic comp sizes are:
9×5 or 9×9
9×9 comps are good, because it can provide unreachable spots for buildings. I used colors to show you this walkability, if the queen walks along the marked side, she cannot reach the marked buildings.


Here is a example for a 9×5 comp and the walkability, yellow and blue shows again what is reachable from a specific area:

And that’s why you use 9×9/9×5 comps (or a little bit bigger) , because it is the minimum of walls, which can make the buildings from the outside unwalkable. (Depending on the queen position and the surrounding walls)
10×5 or 10×10

Use this comp along the edge,
it should never lead inside the base/be
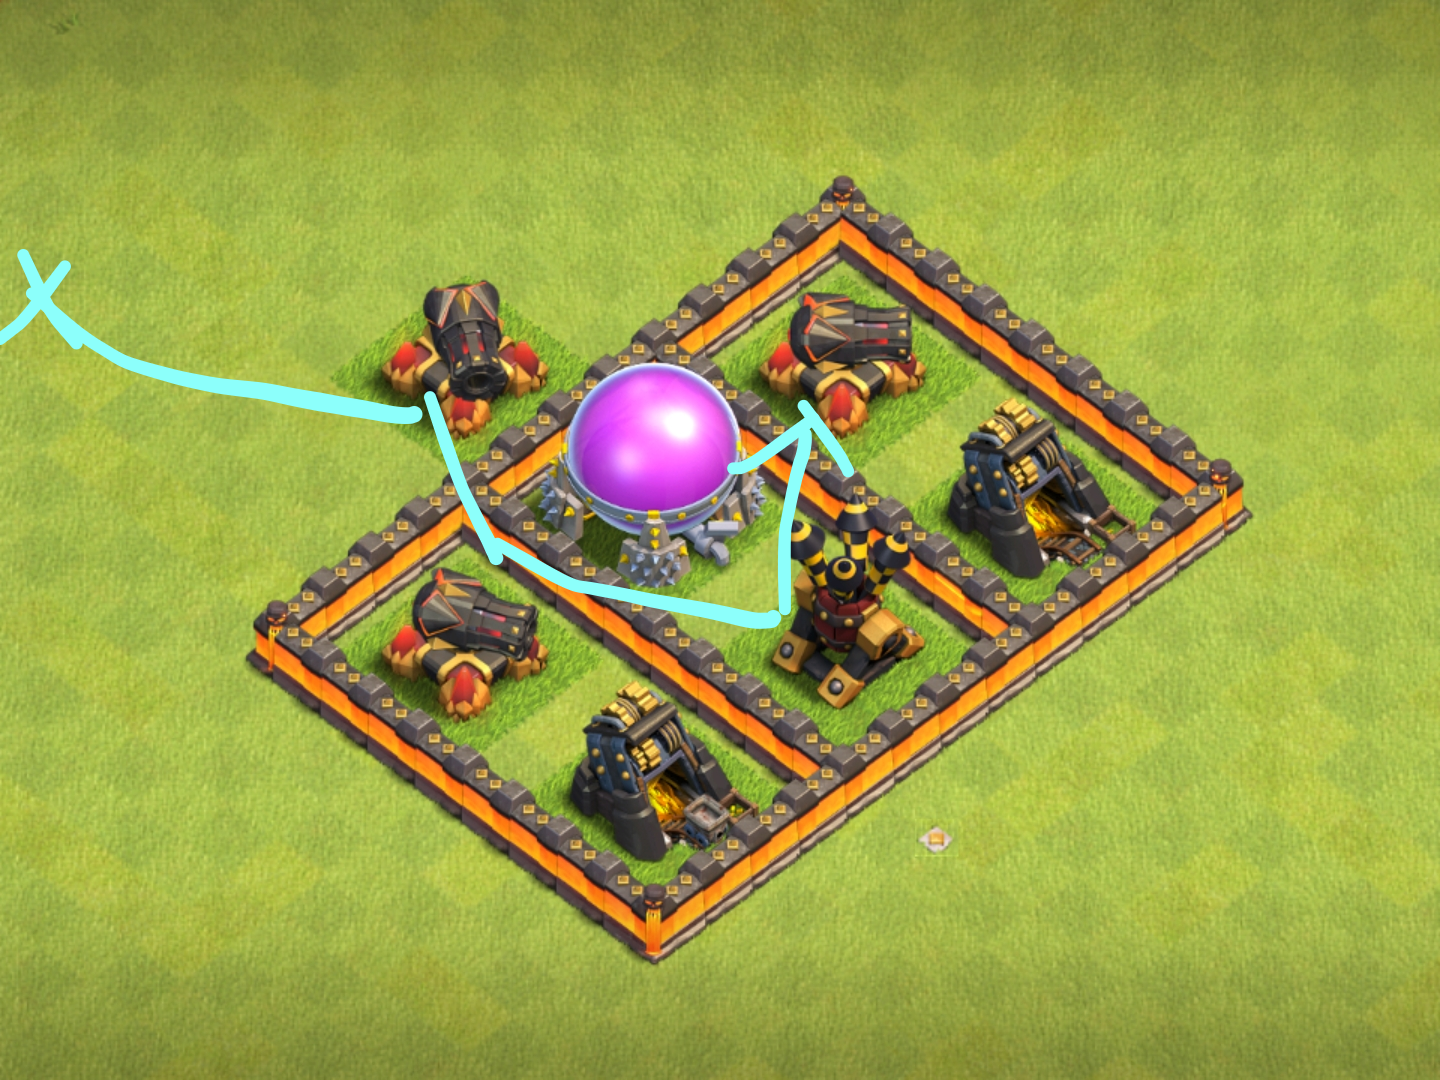
inside the base: This example shows that a long comp should not lead inside the base, because only 1 WB is necessary to get huge value. And even unwalkable ADs or IT’s cant prevent the attacker from taking profit, because a smash/spam attack can take advantage of it.

The building in the middle isn’t walkable from the outside, you can use different defenses and buildings for this comp. I prefer the X-Bow, but you can be creative and try new ways to use it. Make sure that you copy the walls correctly, or the middle building might be walkable from the sides.


These comps are good for corners, you can use it for awkward pathing to a AD/Bow/WT etc. The X-Bow is the unwalkable building of course.


( Sorry for the audio )
This video can show you an example of how I used the wiggle wall comps in one of my bases.
Deadzones
Deadzones (Dz) are a way to separate value and make things unwalkable from the outside/inside. It can make the pathing for Lalo/Hogs more difficult, but if used incorrectly, it can be a double edged sword. Poor deadzone usage can make pathing easier rather than harder for units, if the pathing it forces is optimal for a certain hit.
Deadzones should never be wider than 3 tiles, because that is the minimum distance a queen can’t shoot over. The deadzone length can vary but keep in mind that longer deadzones can create easier pathing for miners or dragons, because they usually wont go into/over the dz, so the attacker can use a dz to keep troops inside the base.
Below are some examples of deadzones:
Below is another example of a good deadzone. The deadzones make the x-bow unwalkable from the green area and neither x-bow can be reached from the other x-bow’s compartment.

Channels
Channels are pathways that lead through the base and can be accessed from outside the base. There are many ways to use channels, but be careful that your inferno towers aren’t walkable from inside of the channel. Also, use unwalkable ADs/IT’s from inside of the channel to snipe Healers, making qc impossible. I suggest you have a minimum of a 3 tile channel, so that the queen can’t reach the other side of the channel.
These are examples of channels:


 You can also use a ‘dead end’ channel in your bases, which can also help you to still build more compact. But you still need to have unwalkable Ads / IT’s / Dps to kill a Qc into this ‘dead end’. Here are a examples:
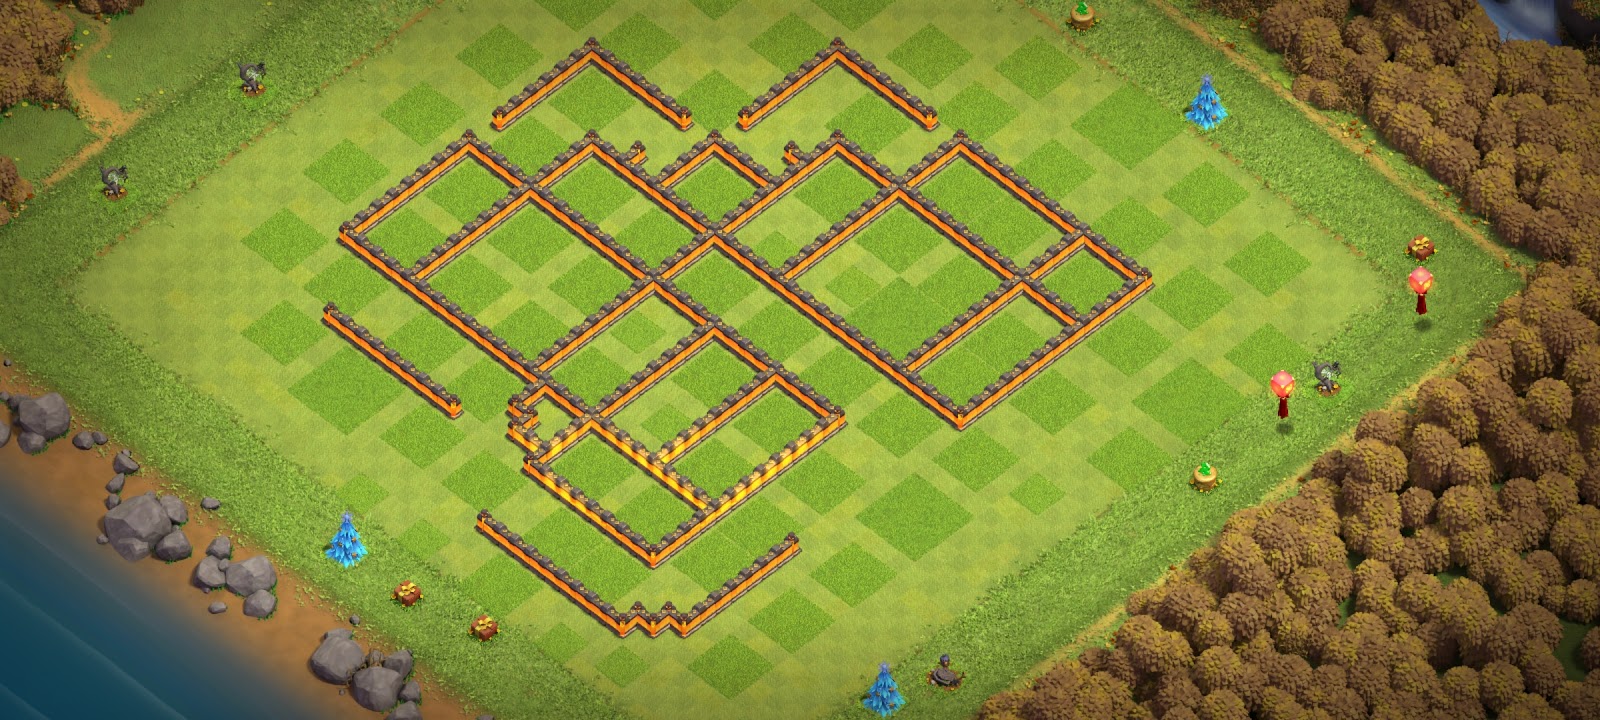

As you can see, I have all of the IT’s and 2 AD’s which will snipe healers, when the Queen enters this channel.

https://youtu.be/82hj_KNrMl4 (Sorry for the audio)
These videos explain channels in more detail, I recommend watching them, when you finish reading the basics of the guide. It’ll give you an overall view why they work.
Moats at TH10
Moats are probably one of the difficult things to understand, but very effective to create a hard+expensive funnel. You can use them to make good entries more difficult to enter, or to protect key defenses from being suicided. Keep in mind that these are only examples of different moats, no need to copy them.
Here are a few examples for moats:

This one is pretty ineffective, because the queen can still reach the buildings behind it. That’s why I don’t normally recommend using it, unless there is a 1 tile gap before the defense. In the picture below for example, the AD is one tile inside the 9×9 comp, making it unwalkable.
This example is a very common moat type, because it makes the buildings behind it unwalkable, which can mess with the QC.

This is a concept to have unwalkable ADs in the corner, it makes a Qc harder, because the attacker has to invest in a WB, or the AD can snipe Healers.

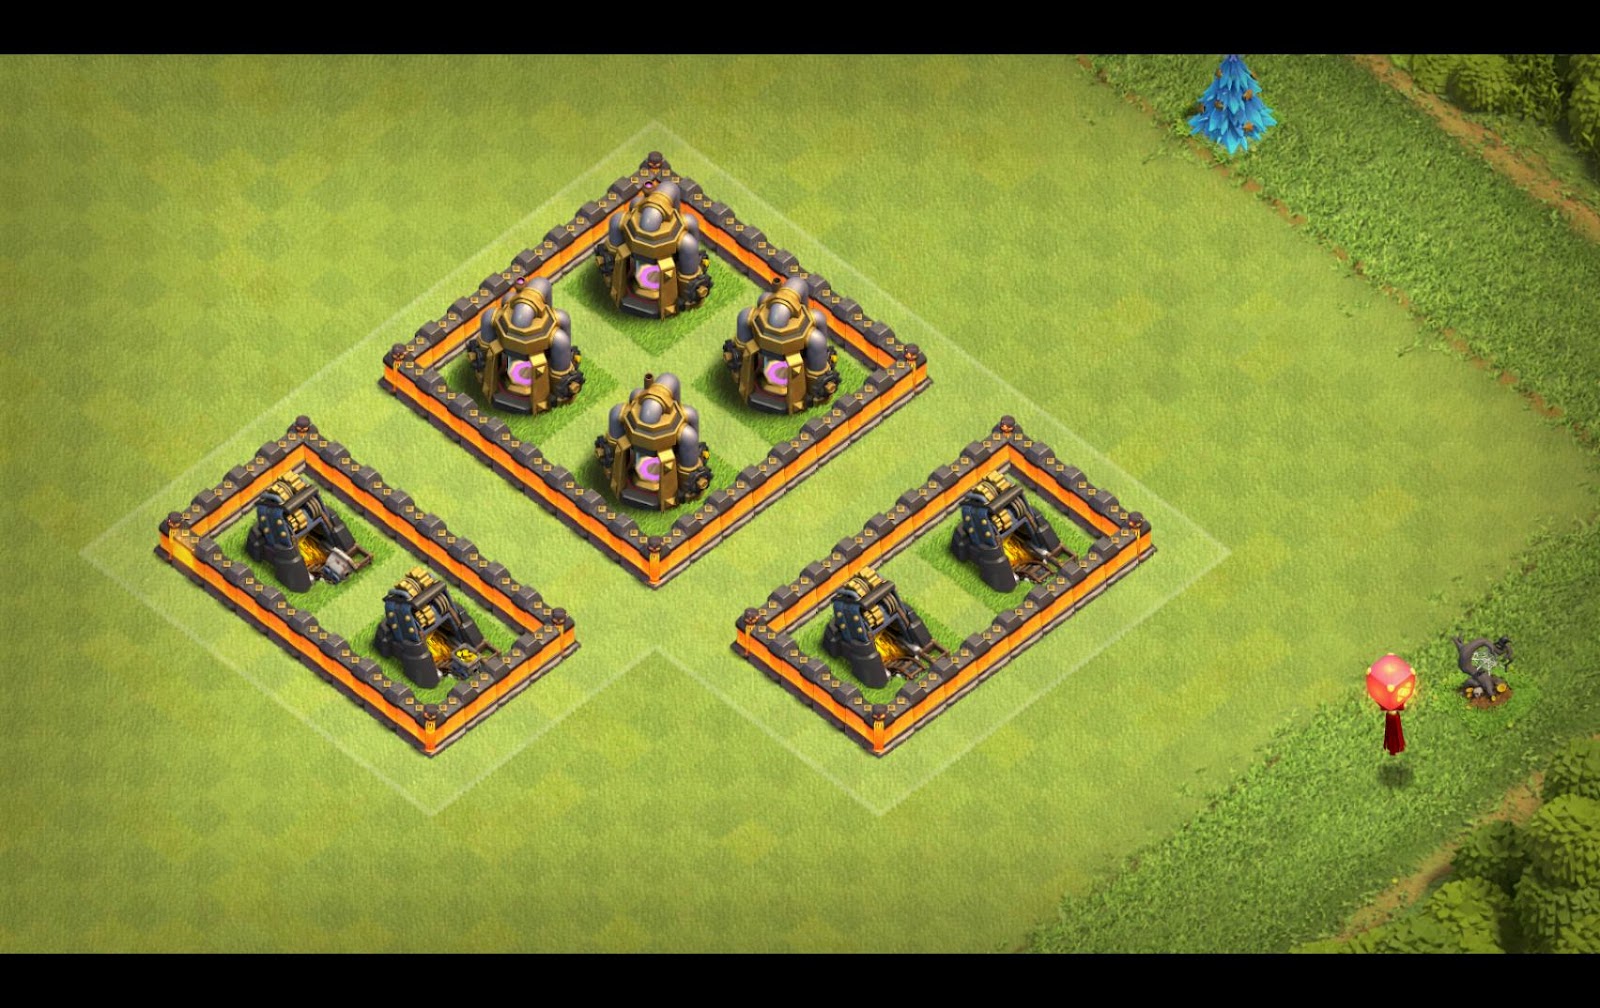
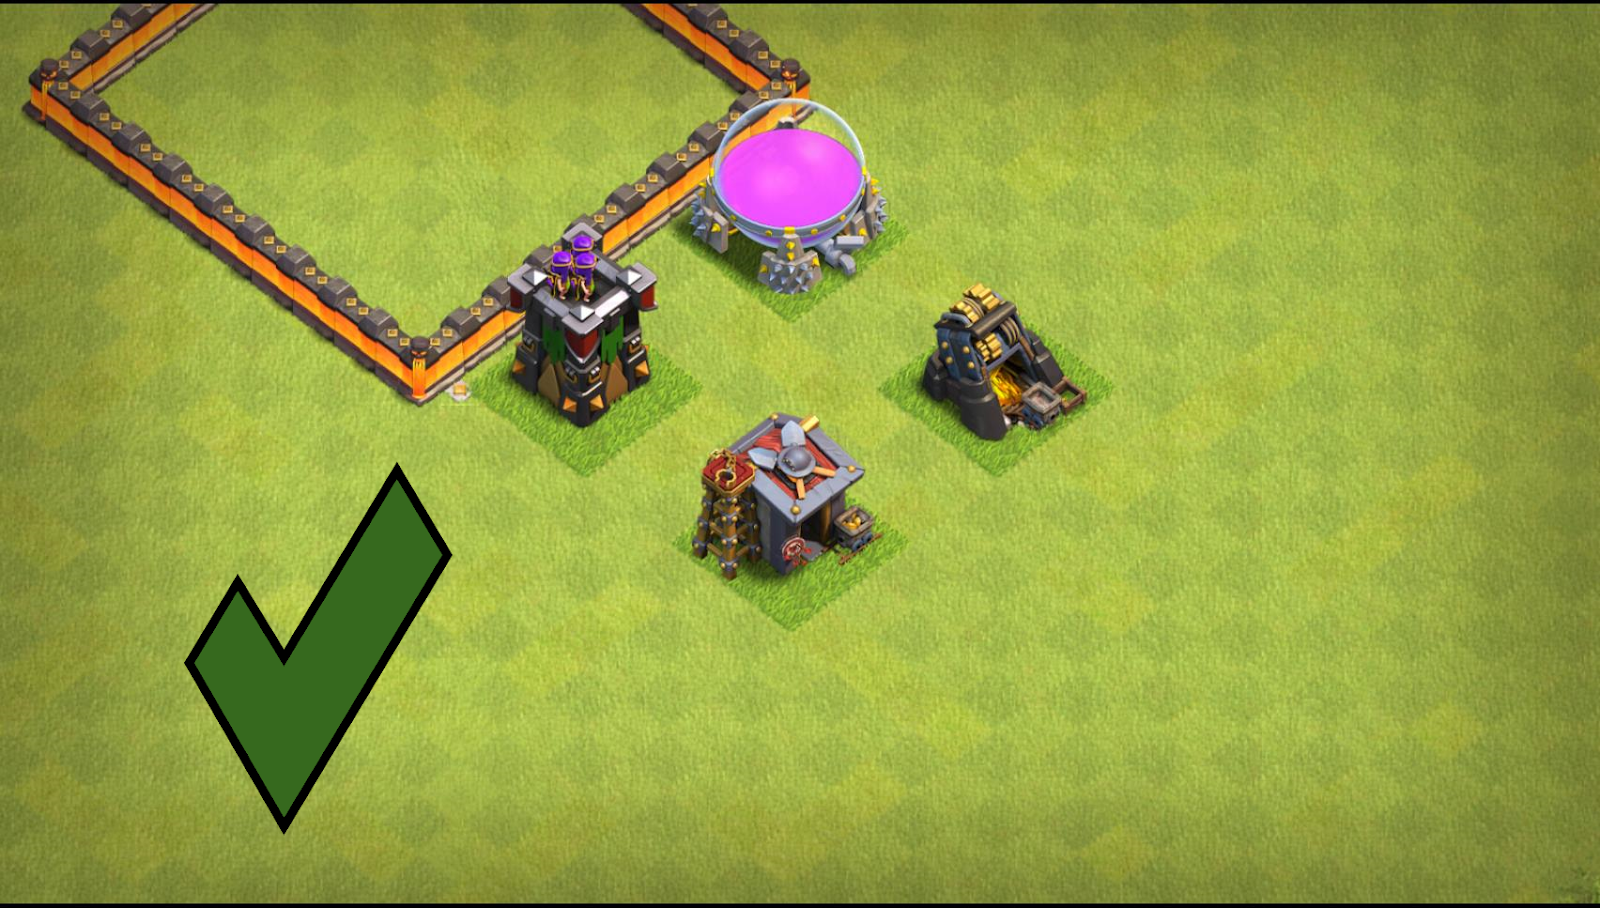
Inferno Tower Compartments in a TH10 Base
Infernotowers ( IT’s) are the best defense at Th10, so it should be protected very well. You can be very creative with these comps, but always think about the wall costs+use of these comp sizes. A good multi Inferno is unwalkable, so the attacker can not sui/walk the IT easily. Single IT’s could be walkable, as long as the qw would cost many spells. Moats are great to make a walkable Single IT’s expensive to reach.
Important: The Loon/Hog pathing should lead around the IT’s, so you have constant dmg for a long time on the Loons/Hogs.
The IT walkability/freezeability:

Here are a few examples of common + good IT compartments at TH10:

The classic IT island, it is walkable, so you have to protect it with comps and dead zones.
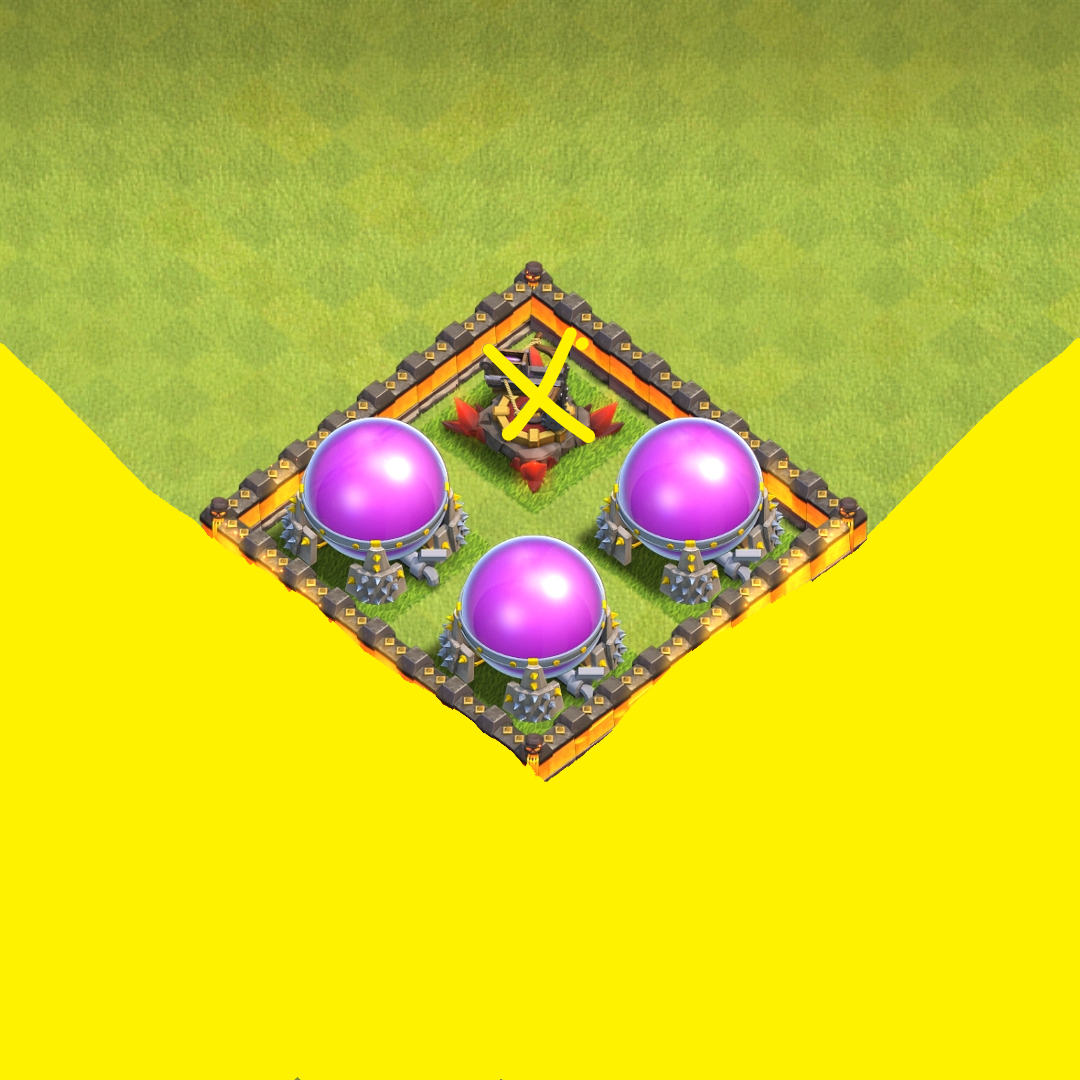
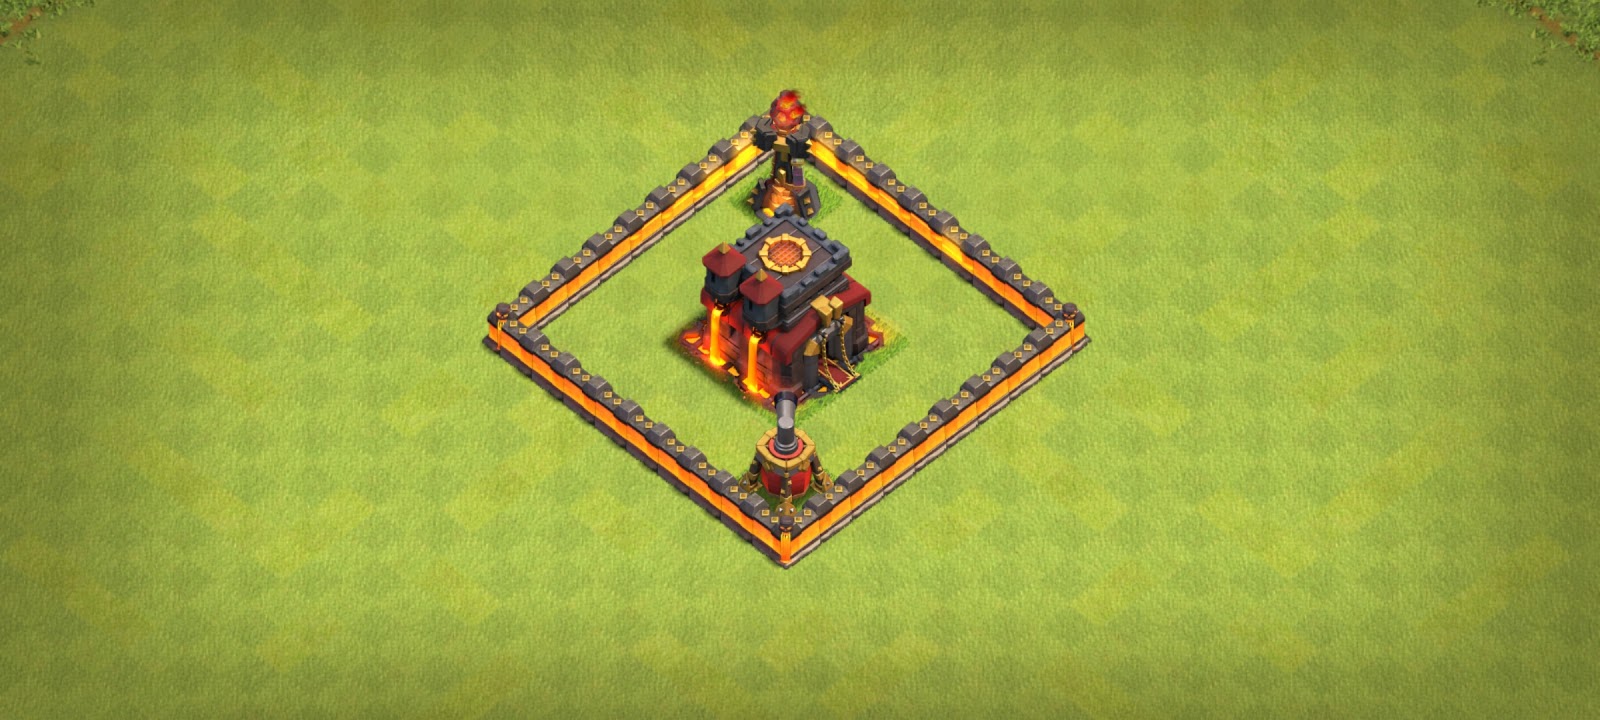
The next concept is similar to the IT island, but it isn’t walkable from one side. But you still have to protect the walkable sides with comps and deadzones.


The above IT comp is often used poorly. Pathing must go around the IT, or else it doesn’t work well. This is also classic comp to stop spam and make a qc a bit more difficult. Pay attention, one jump over the It can give access to a lot of things, so spread your value wisely.


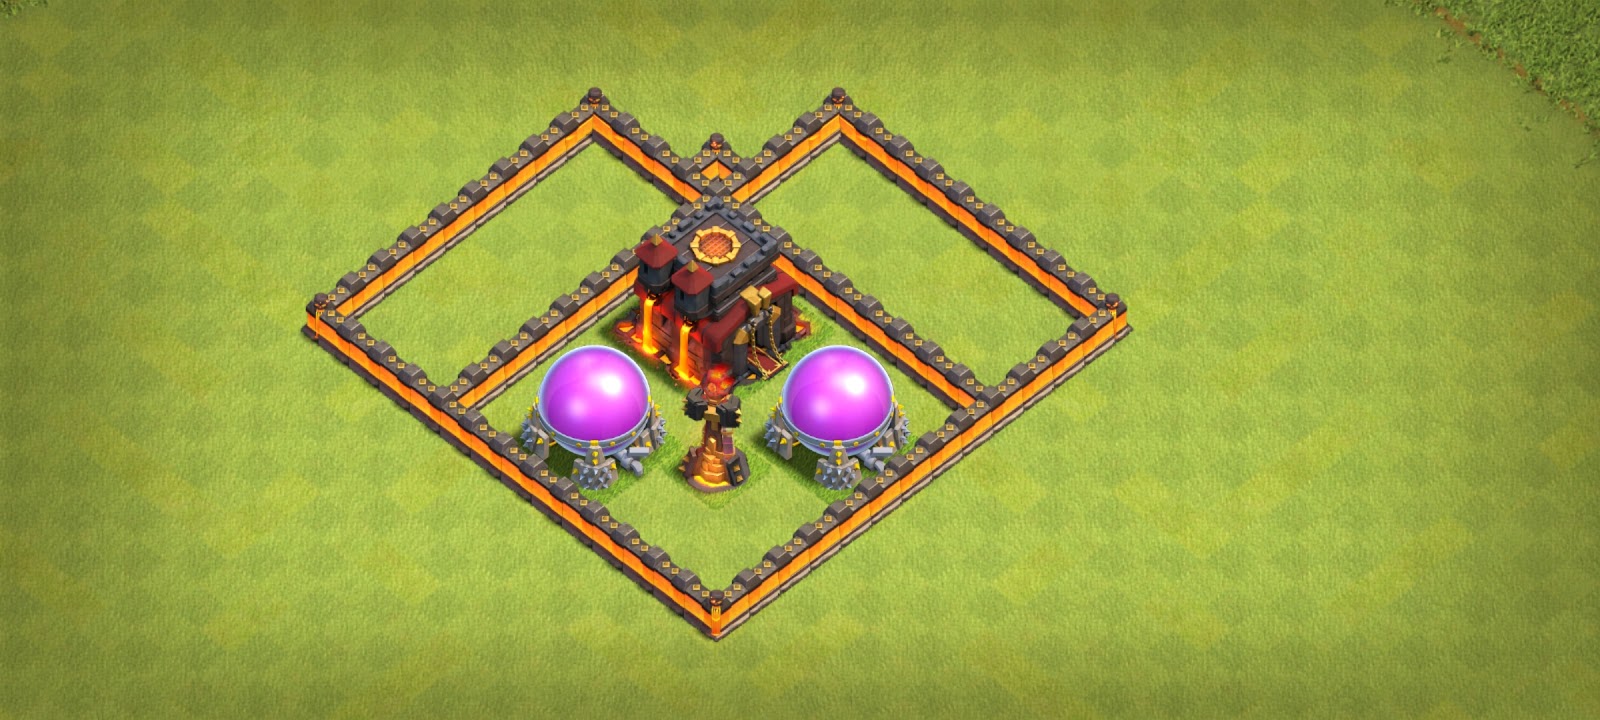
The 9×9 is a powerful IT comp, it makes the IT unwalkable from 2 sides ( the top sides). This allows you to create a better value spread in your base. Storages inside are very effective against Miner, especially combined with ground skellies.

This is a classic 10×10 IT comp. It is a good comp, that allows to make the It unwalkable from the 2 top sides. It is better than the 9×9 IT comp, because the IT can’t be reached from outside bowlers/wizards, but it is a bit more expensive than a 9×9 comp.

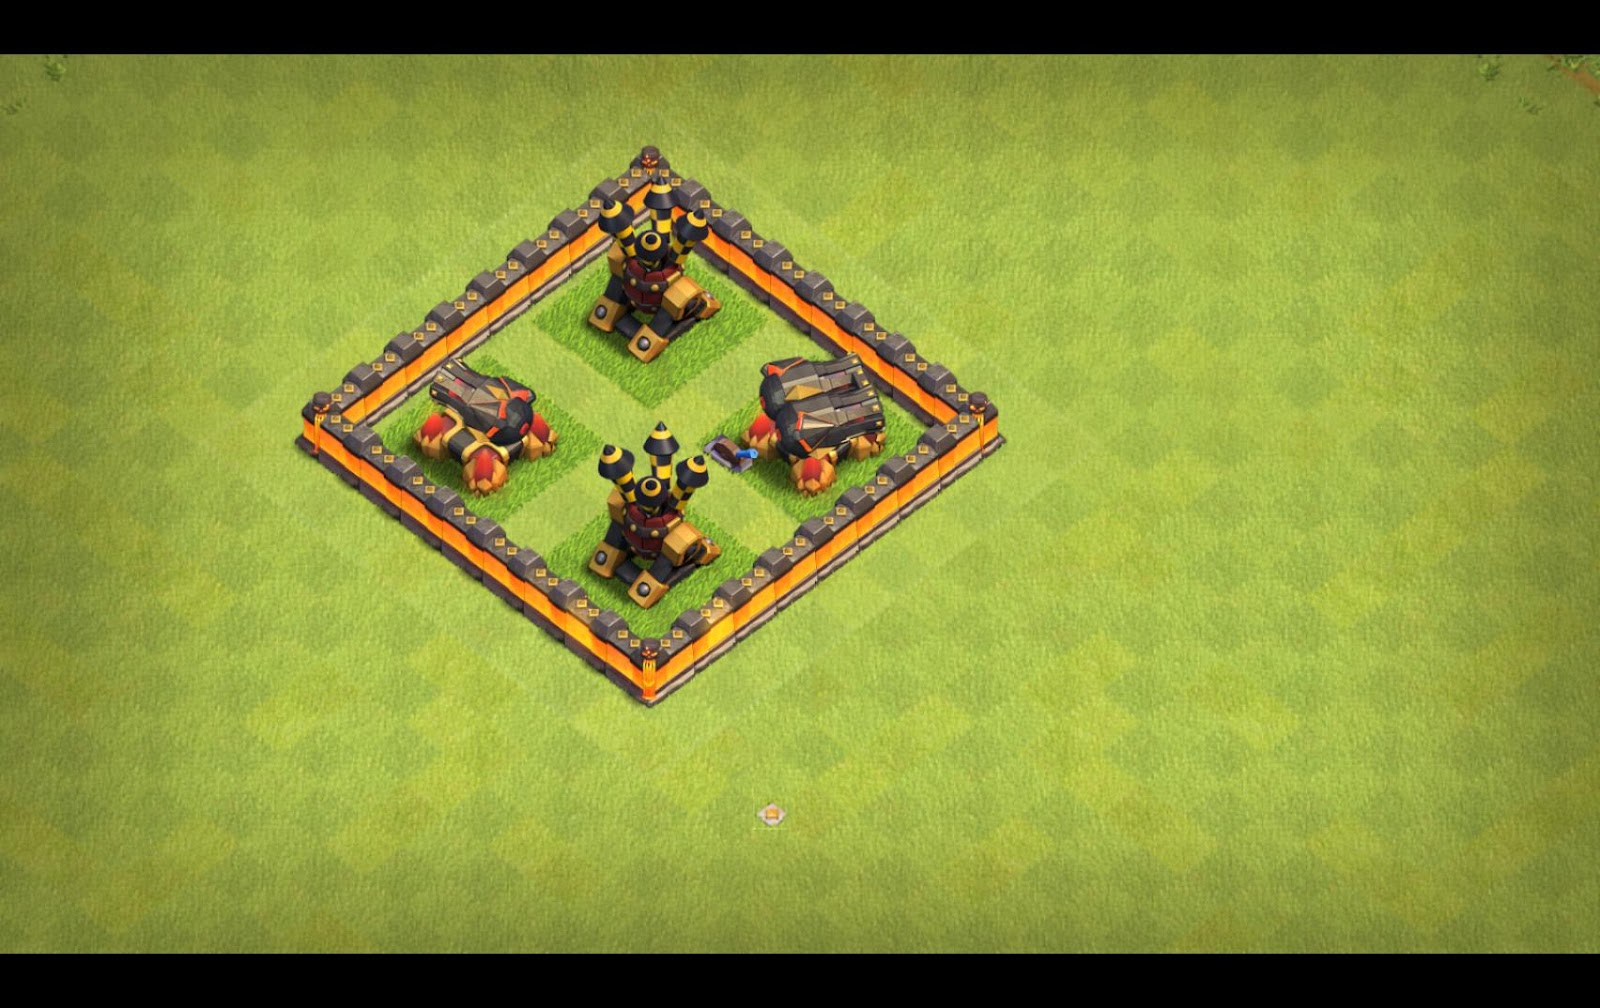
This comp can create unpredictable pathing from the Queen, when she comes from 4-5oc. That makes a QC a lot more risky, especially when there is unreachable DPS/AD’s when she goes the wrong way. You can also split this comp to spread your value and not give too much value from one comp.

This is a comp that I’ve been using a lot. You can place storages to slow down miners inside it. Walls can also be used to make it harder to path to the inferno tower. I don’t recommend using defenses inside this comp, since it gives easier pathing for Loons/Hogs. It works great combined with moats, which can also protect your outside defenses from being taken out too easy.

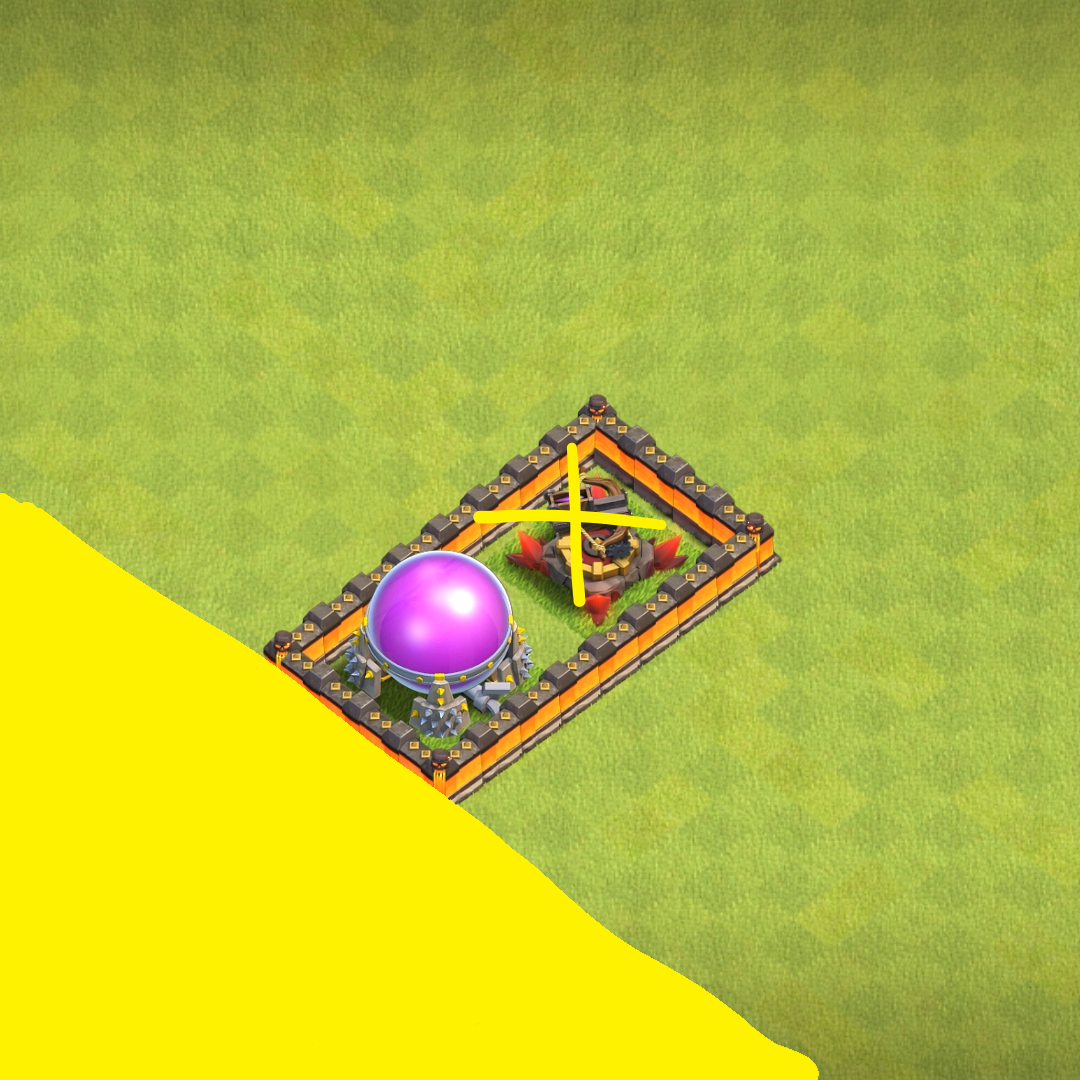
This IT comp can be used for corners of the base, it is a cheap concept, but the Loon/Hog pathing isn’t difficult. Use dz or storages or other concepts to make it more difficult.
This comp is also cool because you can divide it in (your own) different ways. This will make it difficult to charge. For best pathing, put defenses around the comp, but not in it.

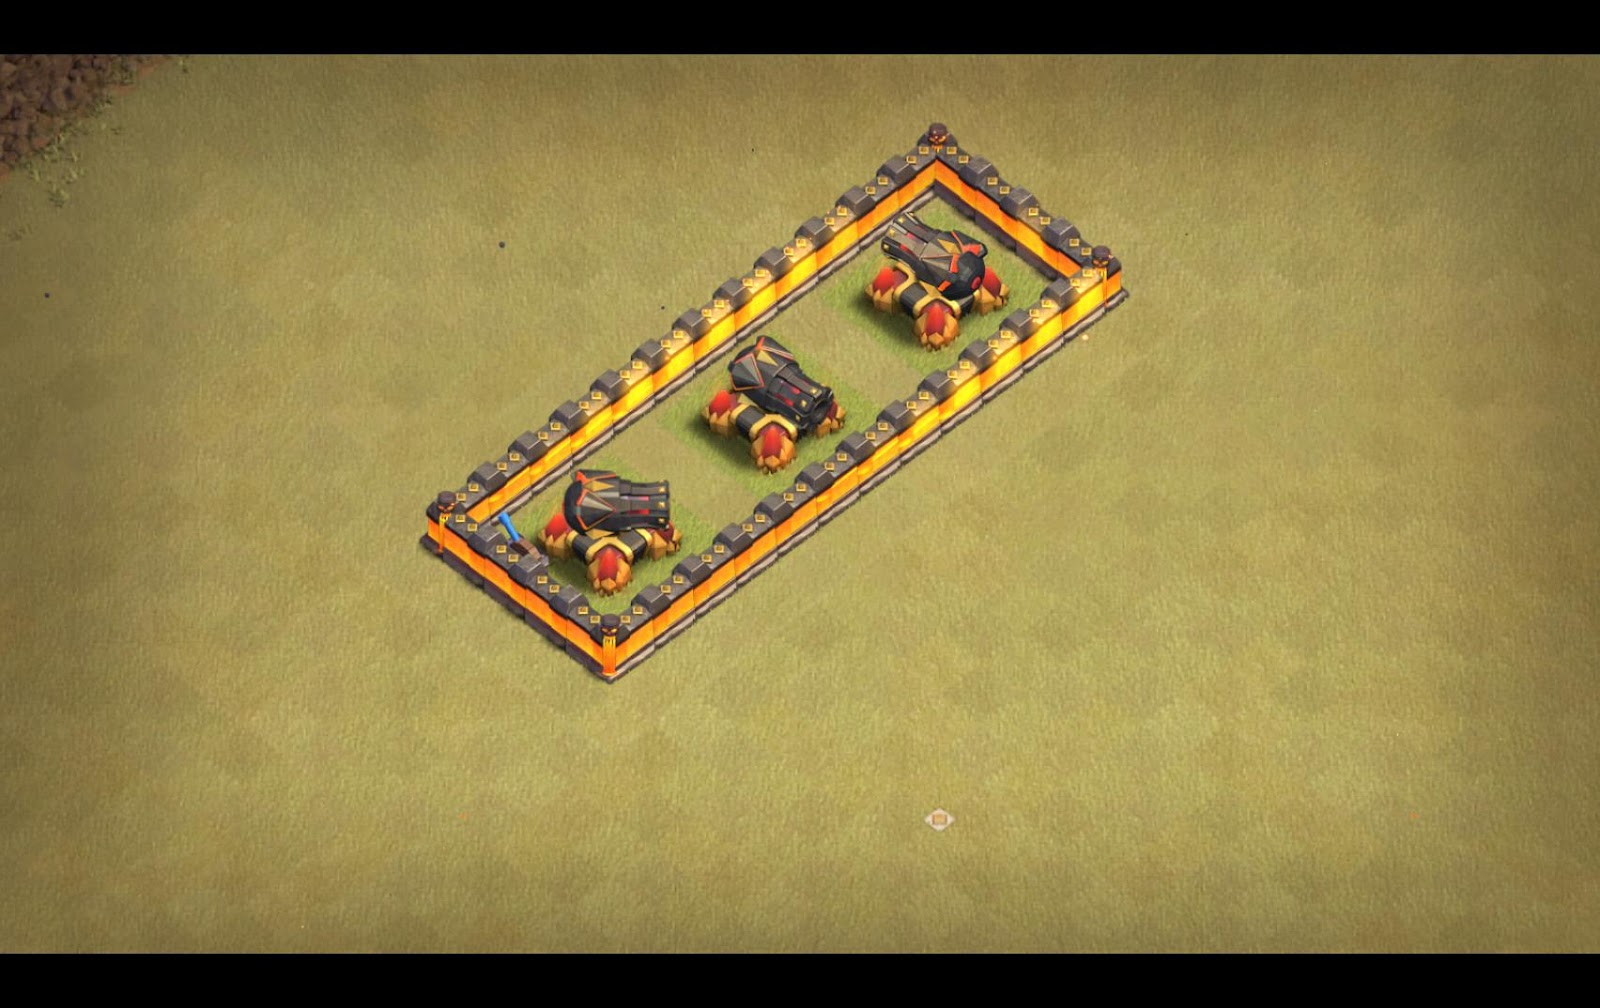
some examples:


Don’t divide it up too much because it starts to cost a lot of walls.
Building fast at TH10
Building a skeleton for a TH10 Base can take a lot of time, since we’re counting the tiles all the time, but if you use ‘spacing’ buildings you can speed it up and make your life easier, freeing up your mind to think about whether what you’re doing will actually work.
(9×5)


Building compartments in this way might be annoying at first, but once you get some practice it’s much faster. Here are some more measurements to practice.
(9×9/9×5)


(10×10/10×5)


(Diagonals)

Free TH10 Base
Want to grab a free TH10 Base? We are sharing not one, not two but in fact, THREE TH10 Bases. Claim those bases while they are still HOT!
Want a TH10 Base built for YOU from the Pros? Get 5 Pro TH10 Bases built by Pros who have 3+ Years building experience. The bases are priced less than 1.2$/Base in THIS PACK. Grab them NOW and get your TH10s those juicy Zap dragons defenses.
Pathing of troops in a TH10 Base
It is super important for a base builder to understand the pathing of specific troops like Loons and Hogs. Both of them target defenses, but they still dont have the same pathing rules. Why?
Hogs, stay at the edge of defenses, while Loons fly slightly over them.
Hogs at TH10
Let us talk about Hog pathing first. Hogs normally go to the closest defense. Sometimes they don’t, just because CoC is weird sometimes.
I think the best way to understand pathing is to draw it. For example:

Hogs are staying on the outside of defenses, which can create different pathing depending on the angle of the Hog placement.

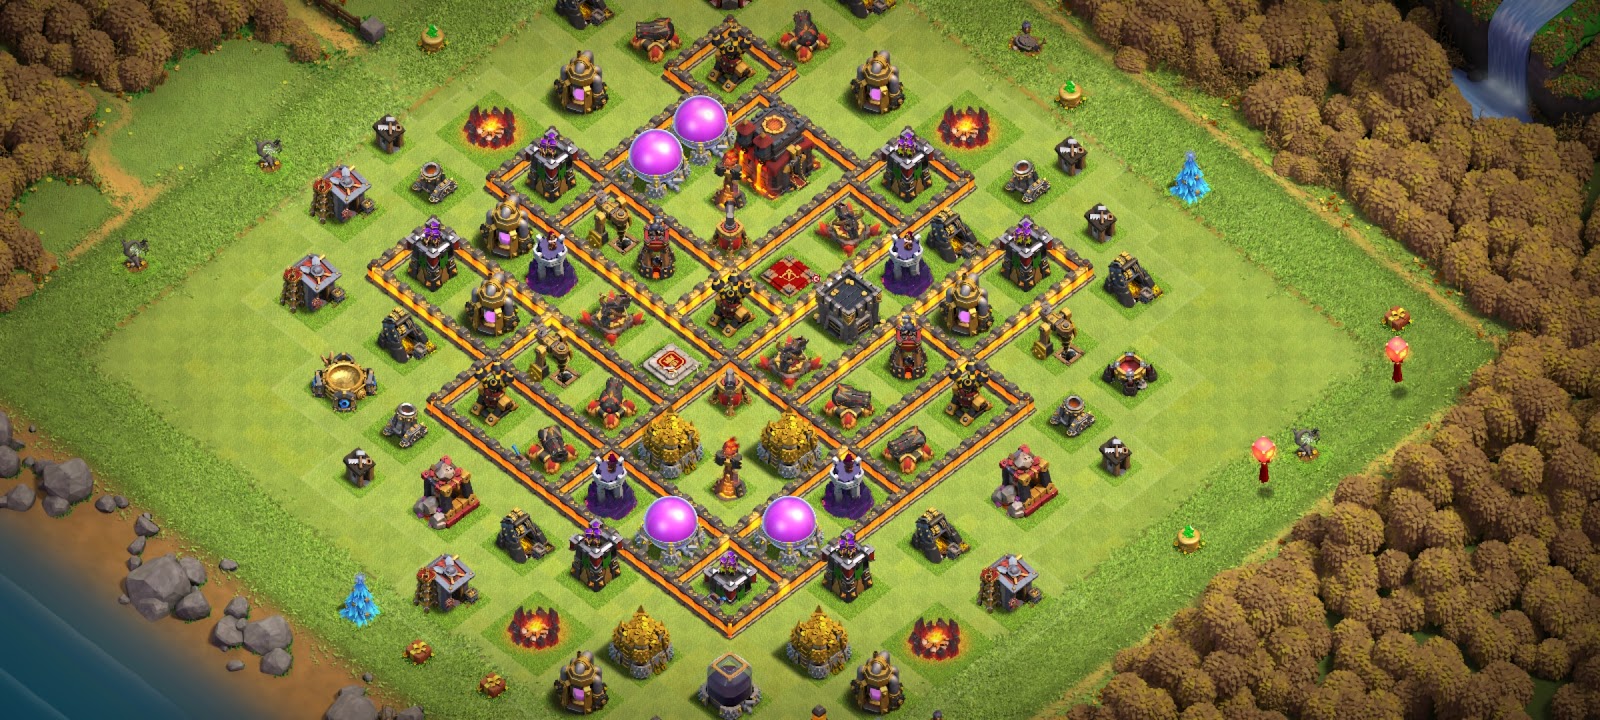
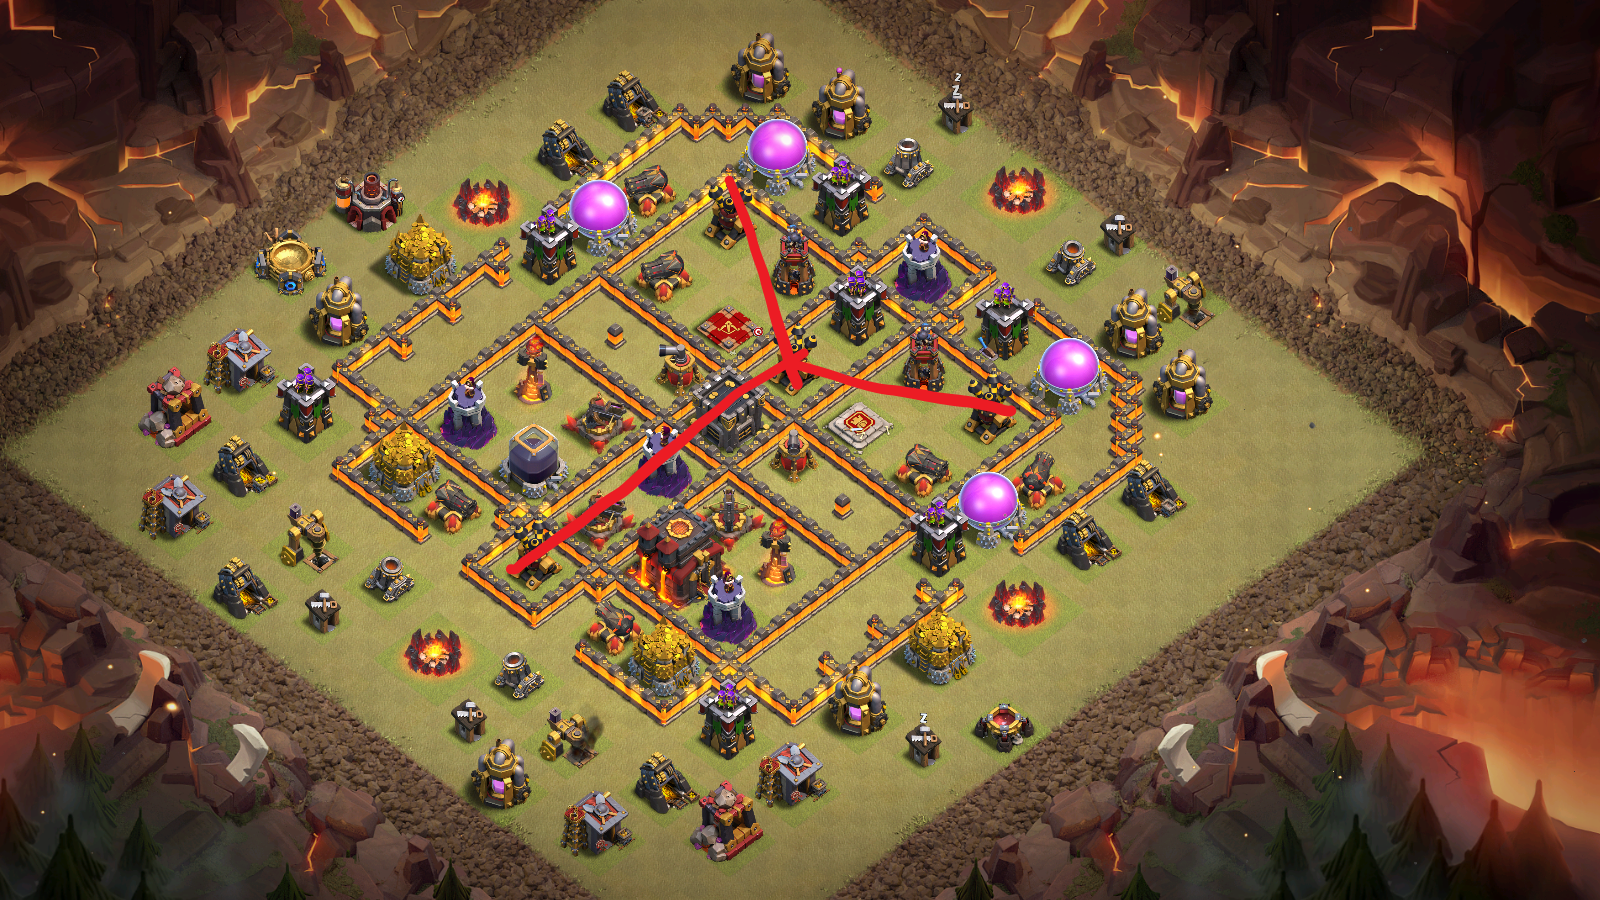
Here is a example of a complete Base with Hog pathing.
Note: pathing may vary a bit if multiple groups are dropped, but this is still very helpful.

Every defense in the base is super important for the overall pathing. A lot of defenses have more than 1 option, because different angles of the Hog placement influences which defenses is the nearest.

Defenses are not the only thing that affect pathing. I marked every non-defensive building / deadzone that’s within the base. As you can see, they can create areas where hogs cannot path. So when considering pathing, also think about where you place your storages/dz’s, and how it affects the overall pathing.

The IT is the strongest defense in a Th10 Base and you need to protect it. You usually want to have a defensive ring around IT’s, so they have more time. Using this, the IT won’t be taken out by Hogs early. This forces the attacker to hold some Hogs to snipe the IT; this’ll split their attack, and they’ll lose momentum.


These are negative examples for a defense ring, because Hogs can still naturally path into the IT. Try to make it hard for Hogs to path to the IT early. As a general rule, they should go at least to ¼ of the base before the IT.

One problem with defense rings around IT’s is that they some can be easily broken, which creates an easy way for Hogs into the IT comp. As you can see in the example above, the red marked AT was taken out, so Hogs go directly to the IT.


Always consider how difficult it is to break your defensive ring. If it’s easily broken, try switching it up to make it harder. Keep in mind, perfect pathing does not exist, you can only make it a lot harder for the attacker.


Sometimes defense rings around IT’s are not always the best option. Defensive blocks (marked in white) can also help to slow Hogs down, which allows the IT to deal more damage.
Loons a Th10
Many people think that Loons fly over the middle of a defense before they drop their bombs. This is false. Loons fly slightly over the defense, which makes a difference for the pathing. The following examples show you that the Loons stay on the edge of a building. The green circles show the shadows from the Loons and red shows where they started:


These pictures show you that the Loons can aim for a center tile. This is different from hog pathing because Hogs stay on the outside of the defense. This can create whole new pathing scenarios, depending on the Loon placement angle.


Even if the 2 cannons are technically the same distance from the AD, the cannon behind the AD will usually be targeted. Loons wont stay exactly in the corner of the defense, their normally a little inside, moving it closer to the cannon behind the AD.
Miner
Miners target every building, making it harder predict their pathing like Loons or Hogs. Attacks like Mass Miner or QC/QW Miner profit from bad deadzone usage.


These examples show how bad deadzones can help miner attacks. The miner is funneled by the dz’s. And a dz on one side still helps miner pathing, because the attacker only needs to funnel one side to create pathing.


This base shows how deadzones can easily be used as a free funnel. That is why you have to pay attention while using deadzones. The attacker just would have to funnel the orange marked areas and the miners would stay inside the base, as a big group.

I placed tesla in the dz, which will make miners split. This will probably surprise an attacker in a fresh hit, and the Miner hit will most likely fail.
Defenses
Inferno Tower
You can use IT’s in 2 ways: single or multi. I would suggest to always use 2 multi’s as a beginner, because it is the best against many strategies. Lalo, Miner, Hog etc. are all strong troops that will take more damage from a multi, since it targets more than 1 troop.
Single IT’s make it often more difficult to defend against nearly every backend, especially Lalo.
2 single IT’s is bad in my opinion, because you it is likely that you would get tripled by witch spam or mass miner. Even for experienced BB’s, I wouldn’t use more than 1 single IT in your Bases.
Queen
The Queen is alongside the IT’s as the most important defense. She can hurt all attacks, and is a threat to all attackers. She is powerful all around in your base, so you have to protect her. Here are a few ways to place the queen:
- A central queen. The queen can not be taken out by a sui, but a qc/ks can come from “all” sides to reach her.
(I don’t like this, because you can’t predict an entry and place perfect traps.)
- A offset, but unwalkable queen. This allows you to bait a specific entry, and now you can place traps in the backend of the base. Also, the queen cannot be suicided without a wb.
- An offset and walkable queen. A sui can take the queen down, but you place perfect traps for the backend. You can protect the queen with a CC, (so a sui is more difficult) or you have an unlureable CC, which kills the backend of the hit. To make a sui more difficult, you can use moats, or keep the king closer.
King
The King can be used in many ways, here are some of the most common:
- He can be kept near the queen, so he can tank for her and damage enemy troops and heroes. It also can be used to bait a Qc Hog, since King and Queen together is good value.
- Can be kept in the backend of the base, to hurt backend hogs. Is also perfect for Miners in high dps zones, since he can tank the miners while they’re taking the high damage.
- Can be placed in an an area where a sui would get good value. This can make the sui more expensive, or sometimes attackers will avoid this area, because of the king.
Defending Clan castle in TH10 Base
The clancastle is a powerful weapon. It can protect specific areas, force the attacker to avoid a specific strategy. It is basically a weapon against every strategy, so long as you know how to fill it correctly. Here are some good and common CC fills:
1 Hound + 1 Loon / Archer
This is a classic CC. It’s very good against Smash attacks like Pekkasmash or Falcon; it splits the Valks/Pekka/Bowler from the Queen because only she can target the Hound. But keep in mind that this CC wont work as well if the Queen kills the CC before she gets inside the base.
Also, a hound will be more effective if it can stall a qc in a high dps area; it can normally force an extra spell or ability.
The problem is, the hound doesn’t do too much damage, so you can ignore it with ground/air troops easily. Attacks like Mass Miner or Mass Hog can just ignore the Hound and run over your base. Dragon based attacks or sui Lalo can also just ignore this CC, so I don’t suggest this CC for 2hit wars unless you’re 100% sure that the base will defend these strategies.
1 Golem + 1 Loon / Archer
A Golem CC solves the Mass Miner problem, since Miner will be stalled while attacking him. The death damage is very good too, so it forces at least an heal for miners. It is again very useful to have the Golem in a high dps area, so it forces a spell. This can also force the queen ability, because of the death damage.
But the Golem is like the Hound CC, which is not useful against Air attacks like Dragons or Sui Lalo. This can be a big disadvantage for 2hit wars.
1 Dragon+1 Babydragon /15 Archer / Witch
A very good anti Sui Lalo or Mass Miner CC, when you have an unlurable CC. The Dragon cannot be taken out by a poison, so the Dragon will do plenty of damage on troops. The problem is that a Dragon is pretty weak against a Qc, since it doesn’t tank enough or do enough damage to be a real threat.
You can take a babydragon with this CC if you want extra damage, but the bonus damage boost will probably be stopped by the dragon. Mass archer are very good and annoying for attacks like with Dragons, because people tend to not bring a poison, which stalls the dragons a lot. The witch makes the CC more effective against Qc’s, so they have to use their poison for the CC. It can be very useful against Dragons too, because the skeletons stall the Dragons, if they won’t be lured away.
1 Witch+1 Babydragon+13 Goblins
A classic damage CC which is very common in siegeless wars. The Goblins are fast and can force the ability, if the attacker doesn’t use a poison/rage early. It can also be a problem, if the attacker only lures the Goblins and uses the poison on them, that means that the attacker has to deal with a babydragon and witch without poison.
The CC hass overall not enough HP to survive a poison, so a Lalo player could just poison the CC, but that is risky since the babydragon will make a lot of damage, when the poison fails.
The witch is always very annoying to Qc and can be also very good against Dragons, since the skeletons stall the Dragons inside the base. ( Skeletons can be lured in a corner. )
3 Valkyries + 1 Babydragon
Just another good damage CC which can still force a
rage / ability / both even if the attacker poisons the CC. It has the same problems like every other damage CC, it is not very effective against air, especially because of the valkyries this time.
It is still a great way to ‘stop’ a sui if you are going to use it to protect an IT.
2 Witch + 1 Babydragon
A very helpful CC against Dragons, since they usually don’t bring a poison, which makes it so annoying to kill the Witches. The attacker can of course just use ground troops to lure the skellies away, but it can still be a surprise. This CC needs a good poison placement, or the Witch will stall the enemy attack for a long time.
Keep in mind that this CC is weaker to spam, for example valks and witches can just deal with them easily.
1 Babydragon + 25 Archer

A rarely seen CC, since it is not so powerful against any specific strategy. You mostly see this CC in 1hit wars, because some people freak out when they see 25 archers, and they may make a mistake. It is also very annoying to lure, since it takes a lot of time and the babydragon comes out at last. The CC is also more likely to be ½ lured, because it takes so long. This makes the attacker more likely to poison early.
X-Bows placement in a TH10 Base
X bows should be usually unwalkable or protected by a moat, which makes a sui/qw very difficult. I recommend to never have more than 2 ground bows in your base, because Sui Lalo/Dragons/Baby will profit from 3 ground bows easily. 1 ground bow and 2 air bows is a popular setup.
There are 2 common and good ways to use them:
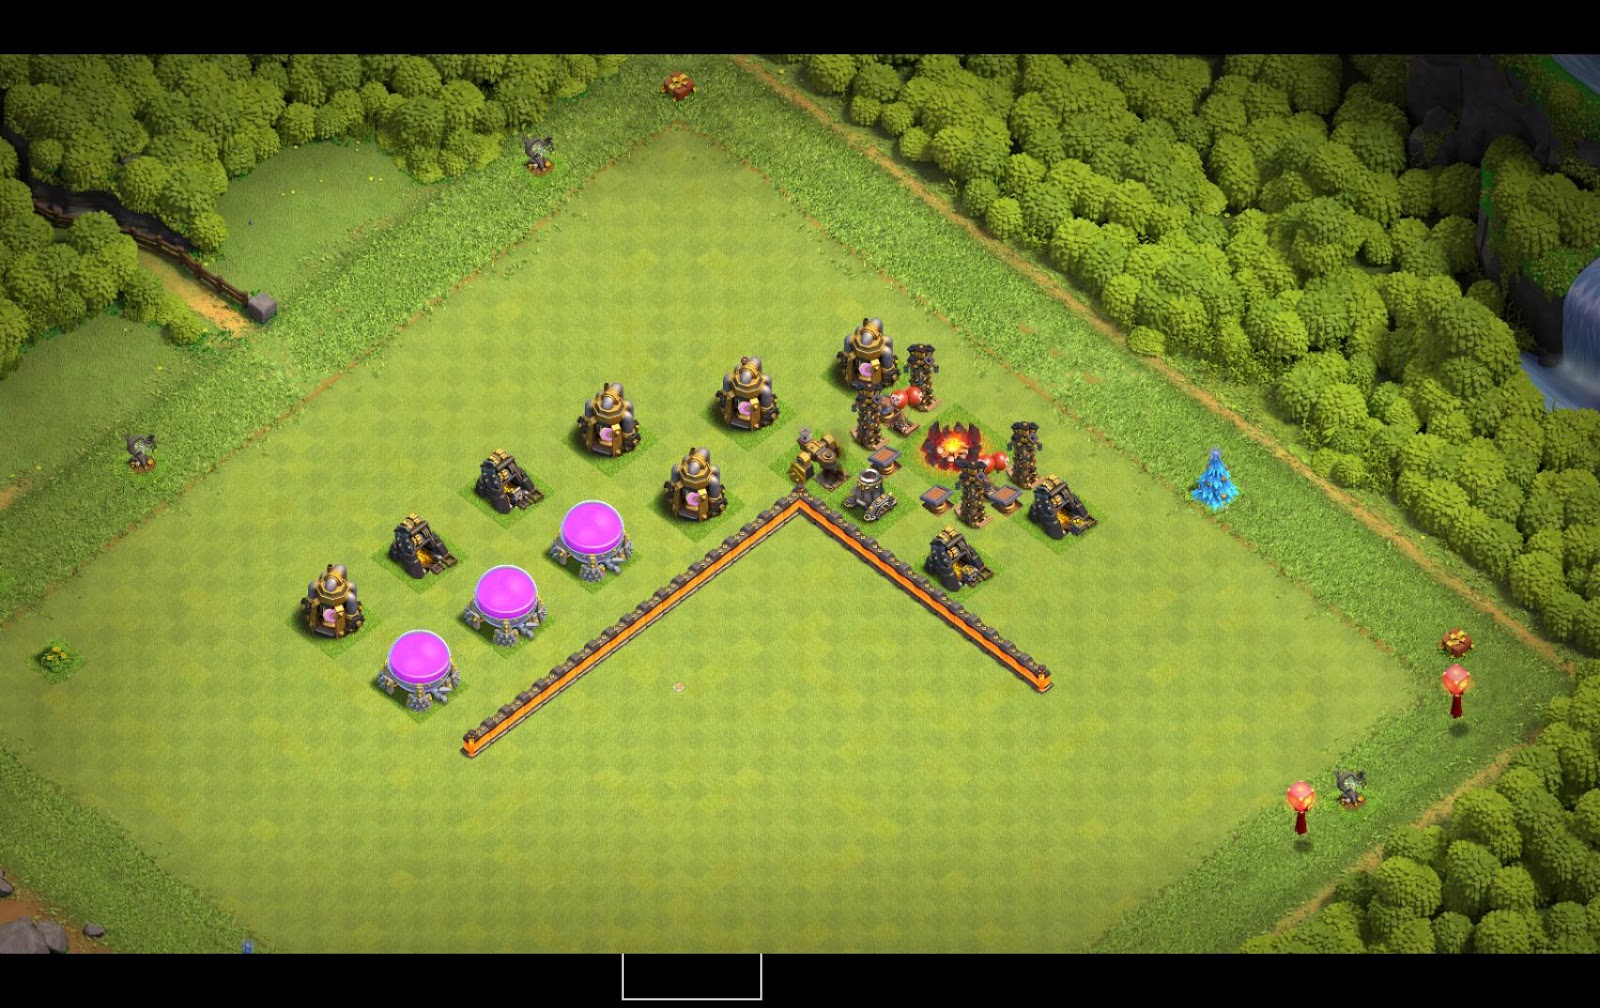
- X bow farm…that is an area where all of your X bows are close together; it creates a dangerous high dps area. The problem: This allows the attacker a good spell value, for example 1 freeze for 3 X bows. Examples for a X bow farm:


- You have to spread the X bows in this concept, so they can’t be reached from 1 comp. And the other X bows should not be reachable from one of the X bow comps. Here is an example for the x bow spread. You can not get 3 X bows in one comp. (It is only an example base, so I am allowed to have walkable X bows. )

Air Defenses at TH10
ADs are important to stop attacks like Baby/Dragon/Lalo. I recommend to never have 2 suiable AD’s close together, because that would be easy for dragons/Lalo.
AD’s should not be too clumped up, so a Qc Baby wont work (more about that later).
The general AD shape should be a Y, I or something fancy. A square/C shape is weak to Lalo, so I don’t recommend shapes like this, especially for beginners. Directtargetable ADs are not good, you have to protect them with less important defenses.
Here a few good examples for a Ad shape:
I AD shape

The classic I shape is pretty annoying for Lalo, because you can create very easily Hound-Loon splits, which makes it a lot harder. A sui for one AD doesn’t change the AD shape, which makes it such a nice shape against Lalo. I AD shapes are usually not working in compact BB styles, which makes it usually less effective against QC’s. The problem is, that compact line ADs will most likely be zapable, which makes it easier for zapdrag.
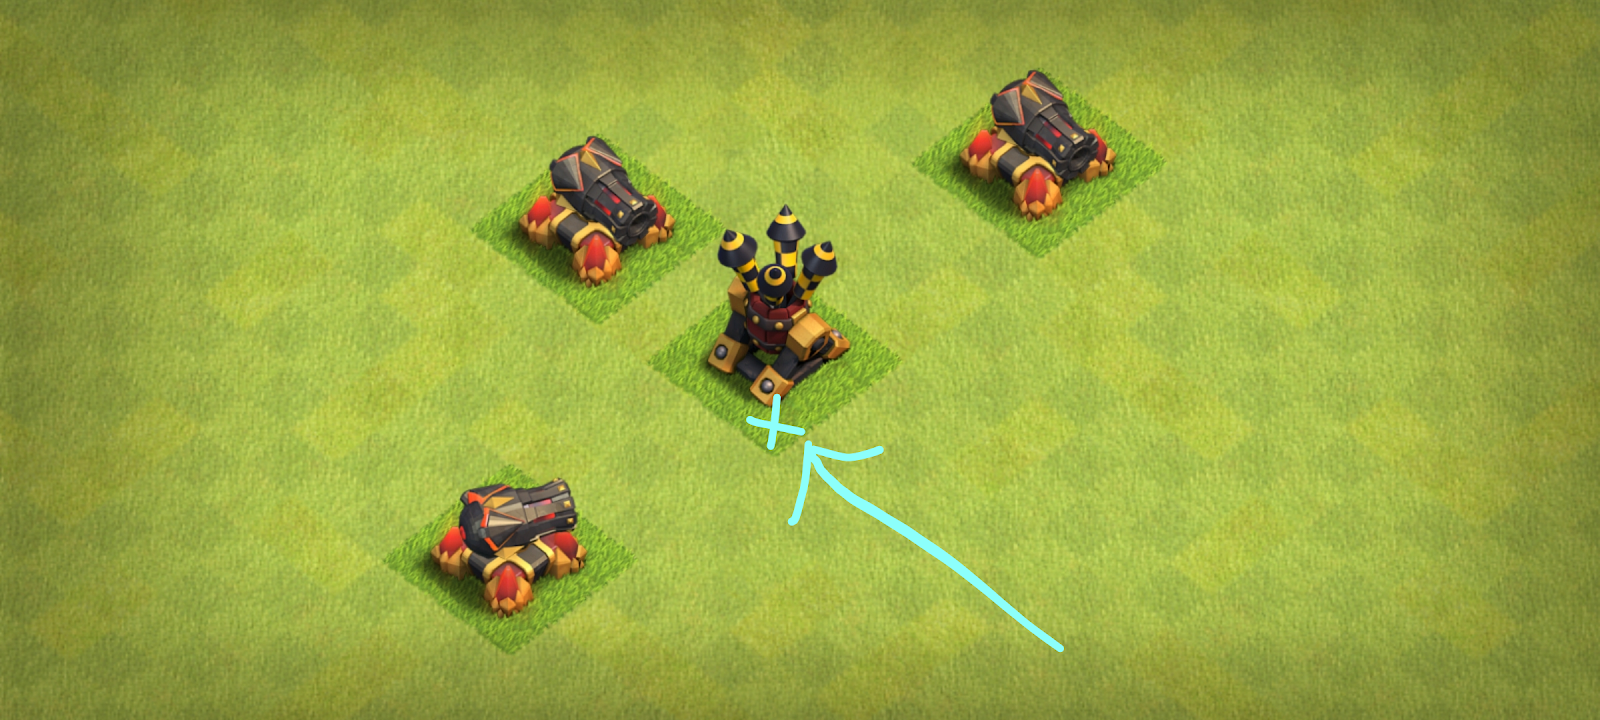
Y AD shape

The Y AD shape allows you to have bigger NFZ areas, so it helps a lot against Lalo. You can also use this shape in more compact bases, which is more meta now.
Thinking about the ad shape like this can also help you identify where the hounds won’t go, to put your loon killing dps there (wt’s, geared at) because it will be more difficult for the attacker to let a hound tank in those areas.
Important: The Y and I AD shapes are good and easy to use shapes, but a good BB can make nearly every shape work.
AD’s can be used to make a Qc impossible, because an unwalkable AD snipes the Healers. This concept is very popular in bases with channels:

The attacker cannot walk his Queen in this channel, because there will always be an AD to snipe the healer.
This example shows again how AD’s can make a specific entry very hard for a Qc. The Queen cannot get into the King/CC comp, because the AD’s will snipe the healers.
Wizard Tower
WT’s are another great way to defend air. The WT range should not overlap an AD, because WT’s are perfect against Loons and they shouldn’t be tanked by hounds.
IT’s have to be protected with WT’s, so the attacker can not batbomb an IT. The walkability from the queen is equal to the freezeability range. You should have 2 WT’s protecting one IT, if the attacker can freeze 1WT+IT together, but I recommend to avoid an IT and WT together freezeable, because that makes also Lalo easier.
Directtargetable WT’s are not good, try to avoid this with mortars/tesla/at etc, because a WT needs time to make good damage on a group of troops and directtargetable WTs doesn’t have enough time.
It is also important that you don’t throw too many WT’s away one the outside, or they will be easily suid / kingtraded, which allows a Dragbat attack to work.
Bomb Tower
Protect the Bomb Tower from being directtargetable, since a attacker could profit from it, by sniping it with a few Hogs. The Bomb Tower (BT) has 2 main tasks:
- Protect the Queen for skelly spells. The Queen is a strong defense, but a Sui Lalo can invest 1-2 skelly spells for her. You can make this more difficult with a BT nearby, which will kill the skellies. She can’t be 100% safe, but you should have at least 1 BT near her. WT’s are not as good as BT’s to protect the Queen, because they will be tanked by Hounds/Loons, which allows to skelly the Queen more easily.
- Use BT’s to force a heal on Hogs/Miner. Never have 2 BT’s/GB’s next to each other, since you want as many heal spots as possible.
It also helps to think about placing bomb towers near/between ad’s since there will be less splash there if you spread your wiz towers properly .
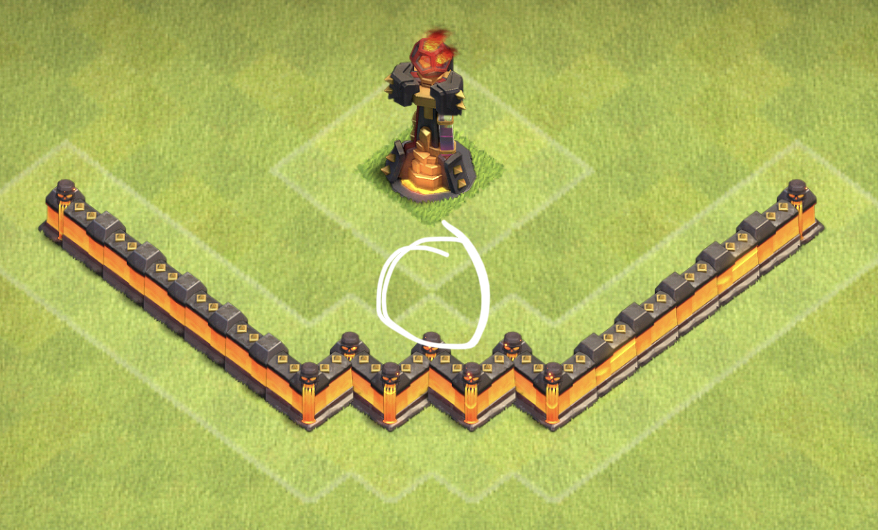
Air Sweeper
Sweeper are super important defenses against Lalo/Dragons, but they can make a Qc more annoying too. Sweepers are normally unwalkable, since the attacker could profit from with a Sui/Qw Lalo from walkable sweepers.
Sweepers should point in directions with IT/WT, because these are the defenses, which needs more time to kill groups of Loons. The perfect sweeper covers a good Qc entry as well, so the attacker will probably need more spells/won’t use this entry.
Hidden Tesla usage in a TH10 Base
One of the strongest weapons for a base builder, you can use them for many things, here are a few example:
- The Troll Tesla.
You can use troll tesla to cause a timefail. Place them into corners. SAMs can be used to avoid a loontrade.

- The Troll Teslafarm.
A rare concept…you use 4 tesla in one corner to have a unexpected high dps area. This can be combined with good springs and RABs/SAMs a surprisingly and deadly concept. Both of these concepts can be used for 1 hit wars very well, but the attacker will profit from these concepts in a 2 hit war. This is for example a extreme troll teslafarm concept. This concept is so much fun to use in 1 hit wars, I recommend to try implementing it in your base.

- A concept, which can mess up the funnel. You can use tesla to protect free trash areas or buildings from getting a good bowlerbounce. This example shows how you can bait the attacker to use a bowlerbounce for the funnel, but this tesla will mess the funnel. It is a bit obvious, but you can make it less obvious.

- And of course the classic Teslafarm (TF) inside your trash ring. It is a good way to place springs, but I do not recommend using GB’s inside a tf, because a TF already forces a heal and a GB is just extra heal value. A classic TF example:

This example is obvious, so here is an obvious fake TF and a surprising TF. Base building is all about having unexpected bases.
- A very special way to mess up pathing. You use a tesla inside of a dead zone, so the Miner/Hogs will have an unexpected path. The example shows a base, where the dead zone could create nice pathing for miners.

But inside of the dead zone is a Tf (can be 1-4 tesla), which will mess up the pathing.

Archer Towers in a TH10 Base
AT’s are like cannons; a necessary defense to have a overall good Dps spread, so you shouldn’t have a specific area with only 2 point defenses, since a Qc can charge there with low costs.
Archer tower are useful defense for many functions:
- AT’s should protect your trash layer, so you won’t have too much free trash.
- AT’s should be near WT’s, since they need a point defense to protect them.
- Use AT’s to stop WT’s/AD’s from being directtargetable:

Geared Archer Tower
The geared AT ( GAT ) is good for shredding loons at close range; it is a very nice defense in a NFZ since the high Dps forces at least 1 freeze or it will wreck loons. The GAT combined with a sweeper is a powerful weapon, because this allows it to kill even more Loons.
The short range and fast shooting mechanism can be also used to make a specific WB a lot harder, because this GAT can’t be tanked easily; it snipes WB’s in this specific area. Use moats or 5×5 comps to force the WB’s into a spot that is protected by the GAT.
Cannon
Cannons are like AT’s; very important to keep a costant Dps in your overall base, so there won’t be a specific area, where the attacker can sui like ¼ of your base. Again try to always cover your base with dps.
Cannons are the best friend of your AD’s, so you should keep them together. AD’s need ground Dps to protect them and cannons need air Dps to be safe against Loons etc. You can also use cannons the same way as AT’s/mortars, to prevent a directtargetable AD:

Geared Cannon
Basically not very useful at Th10 due the short range and Qc meta. It won’t do anything special against a Qc, since it targets the Queen way too late. Since Golem based attacks are rarely seen, geared cannons shouldnt be used to kill them, especially because you can just stop Golems with high Dps at Th10.
So I personally don’t suggest you to use the geared cannon at all.
Mortar

Mortars won’t be really helpful against most of the strategies, but there are still ways to profit from this defense. You usually want to keep them outside of your base for a few reasons:
- You can save walls for more important things.
- They can mess up the pathing, that the Loons/Hogs will go outside of the base often.
- They can prevent directtargetable WT’s/AD’s/BT’s:

Traps in a TH10 Base
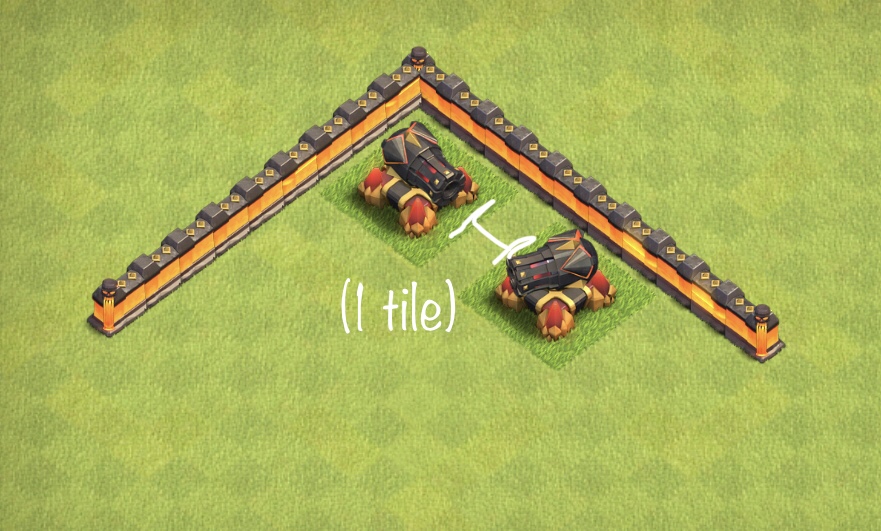
Spring Trap

Springs are good ways to defend Miner / Hog/ Hybrid attacks. Springs should touch 2 defenses if you want them to work against Hogs or Miner.


These are classic ways to use spingtraps, but keep in mind that the springtrap will work the best if you have them in the Hog pathing. You’ll need to understand hog pathing to better place spring traps.

ThIs is an effective way to use springs between tesla to kill Hogs or Miners (Other buildings could lead the Miners around the springs.)

This is a wonderful concept that is working very well against Miners and Hogs. Keep in mind, that this tesla could make the pathing to this IT easier. Diagonal springs are in general a good way to go, if you wanna have good springs against Miner. But also normal double springs can work very well. For example like this:

Here is a little Springtrap guide made by me and Dressie, it was never finished but can still help you to understand the trapping mechanism better. https://docs.google.com/document/d/1mHzasJstECnb46wpR__8YXn6NTOTMQubBHW-MKMUsZw/edit?usp=drivesdk
Giant Bomb
Giantbombs are great to force a heal. A GB should always be in the Hog pathing, between 2 defenses. The GB doesn’t have to touch both defenses, it is enough if the hogs will trigger the bomb while pathing through this area. Spread your GB’s+BT’s, because you want as many heal spots as possible. Little example:


Witch Bombs:
This type of bomb is in my opinion unnecessary for Th10 siegeless wars, because Witch attacks are very rare and sbs are better against a Qc. If you want to use it then keep in mind that the witchbomb should work against hogs too, so it has to be between 2 defenses.

Bowler Bombs:
2 small bombs and 1 giant bomb can kill bowlers instantly, which makes them a good way to stop Falcon or Pekkasmash . There aren’t any rules for bowler pathing, so you have to test where the attacker will most likely enter, so you can place a bowler bomb against this entry.
Red Air Bombs
A good RAB placement is difficult, there are a few things you have to keep in mind:
- The RAB’s should never be in the Hound pathing, since as you want the RAB’s to hit groups of Loons instead of one hound. This picture shows the possible Hound pathing:

- The most difficult part about RAB’s is that you should try to place them away from WT’s, because good Lalo players will fly with Hounds over them to trigger RAB’s.
- RAB’s should be away from common sui/QC/KS Lalo entries or they won’t even trigger.
- 3 RAB’s together can kill a group of loons if the attacker doesn’t use a pre-heal.
I only recommend using the stacked RAB’s in common spots like an IT, which will most likely not be charged and where no Hounds fly over. Do not use stacked RAB’s if the people tend to bring an heal for this specific area.
- Also try to have RAB’s away from the AD range, since that’s usually the range of lavapups; the RAB won’t be very effective if a pup triggers it.
Seeking Air Mines
SAM’s are wonderful weapons against a Qc and any air attack. If you want to defend a Qc, you have to place SAM’s in the best Qc entry so that the healers will die. I suggest you spread the SAM’s against a qc, because you do not want 2 SAM’s to hit 1 healer.
Tip:
Try to place SAM’s in the Hound pathing/near Ads, but still against a Qc. That gives your traps more opportunities to work. SAM’s can also be placed in areas, where a baby dragon could create a nice funnel. This can ruin funnels if the attacker only brought one. Note: this only works if the attacker doesn’t use a coco loon.
SAM’s are also useful against Hounds in a Lalo, so you can also place them in the backend near AD’s or in likely Hound pathing. 2 SAM’s together kill 1 Hound very quickly, so you can use 2 of them together on the first AD to kill a hound very early.
Small Bombs
SB’s are a great way to kill WB’s, which can help to mess up a QC or other strats that rely on WB’s.
The small gaps between the buildings funnel the WB’s into the SB. The SB’s should be 2 tiles away from the walls.


Skeleton Traps
A powerful trap against many strategies:
- Never have ground skellies near other ground skellies/heroes , because you want to limit the poi value. Air skellies can be near ground skellies/heroes, but not next to other air skellies.
- Air skellies should never be near AD’s/in Hound pathing, since they should attack Loons instead of Hounds.
- Ground skellies are good to stop Miners in high dps/splash areas; they slow miners down and give the high dps extra time. Basic spots are X bow farms/It’s/Tf.
Trash Layer usage in a TH10 Base
Good trap + trash placement makes a base 50% better. A bad trash layer allows a lot of cheap funnel opportunities. The following chapters will teach you how to make a good trash ring.
Bowler bounces at TH10
A bowlerbounce can take down 2 defenses in a trash layer, if the outside trash has more/same Hp as the inside trash. The first picture is a bad example for trash placement, because the attacker can bounce both buildings:

Here is a good trash placement:
Normally you should be fine if the inside building has more hp, but sometimes buildings can take the same number of bounces, which makes it confusing. Here’s a list.
Dark elixir storage: 3200
———————————— 2156 (14 boulders)
Gold/ elixir storage: 2100
———————————— 1694 (11 boulders)
Wizard tower: 1680
———————————— 1386 (9 boulders)
DE drill: 1280
———————————— 1232 (8 boulders)
Air defense: 1200
Gold/elixir collectors: 1080
———————————— 1078 (7 boulders)
Archer tower: 1050
Lab: 950
———————————— 924 (6 boulders)
Regular barracks: 900
Dark spell factory: 840
Dark barracks: 800
———————————— 770 (5 boulders)
Mortar: 750
Spell factory: 720
———————————— 616 (4 boulders)
Army camp: 500
———————————— 308 (2 boulders)
Builder hut: 250
Aslong as the building on the outside is in a lower category (not the same) than the one behind, it will never be bounceable.
Valkfunnel
Valkyries can be used as a funnel possibility if you have 2 or more touching trash buildings. It is difficult to avoid it all the time, but keep this funnel concept in mind. Bad example:

Good example:

It’s okay to have some touching trash if the area has:
- high hp trash so it will take a while to get through
and
- high dps in the area to kill the valkyrie (single teslas can be good to help with this)
Using this, you can make a small area where the funnel is really hard.
Free Trash
One of the most important things in your trash layer is that you want to avoid large areas that can be picked off by a couple troops. Try to protect your trash with AT’s/cannons/tesla. Cannons cannot attack any air troops, you need an air targeting defense near it, or Minions or Babies will profit from it. It is very difficult to have a perfect trash ring without any free trash, but it is important that you avoid large areas of free trash.
Low hp trash (camps, huts, spell factories) can also be funneled easily with a baby dragon if there is only low air dps covering it. This depends on the shape of the base/trash, so don’t worry about it too much
Army Camps
Marco from the Base Building Server did a great job to summarize the important usage of a army camp:

I like the army camp in front of a mortar, because it makes it not bounceable. But I would still try to use it in good entries like Marco already explained.

Townhall
The Th can help you to get a lot of defenses, if you use it the right way. It is completely different from the siege meta, since it is not important to create a good WW/BB angle anymore.
It has the highest amount of HP in this game, so it can be super useful in slowing the enemies down. You can protect the Th inside the walls, which make it more likely to slow down Qc, Dragon and Miner. Here are a few example of Th usage inside the base:

It is very good near IT’s, but you can use it anywhere in the base. Just consider where it would be most effective in slowing troops down.
Here is an offset Th concept:

This Th is placed inside the trash layer and well protected by a few point defenses. Place it on the opposite of the best possible entry, so the attacker has to decide between a safe 2 Star or a risky attack. The teslas aren’t necessary, 1-2 AT can help defend the Th. But it is not so helpful against Miners and Dragons, because the trash ring will be most likely cleared by the funnel troops.
Attack Strategies at TH10
I will explain in the next chapters how to defend a specific strategy like Qc Baby or Falcon. Highly suggest you learn these strategies, so you will find more mistakes in your own bases. Will focus mostly on common strategies, which I have seen a lot in siegeless wars. There may be some strategies for siegeless meta that don’t mention, but I will list as many as possible.
Qc Hogs at TH10
Qc Hogs is one of the easier strategies for BB’s , since good Springs and value spread can already make it super hard to Hog it.
Place your ground Traps away from the Queen area, because a Qc Hog will usually try to get her and the value around her. Have a lot of heal areas in the backend, you can force a heal with GB’s, TF, BT’s, IT’s etc.
Ground Skellys are a good way to hurt hogs, place them away from the King / Queen / other ground skellies, but still in Hog pathing, so close to defenses.
You can place sams against good qc entries, to prevent huge value from the qc. That is pretty easy, because you always know that the QC tries to get the Queen and as much value as possible.
Do not have the King and Queen together, because it gives the QC huge value, unless you are an experienced BB and want to bait a QC Hog with good trap placement in the backend.
High Dps areas like a TF or X Bow farm are good ways to force a heal or kill Hogs fast. TF combined with springs is especially deadly for Hogs.
Falcon or Pekkasmash at TH10

A Falcon attack attack profits from a cheap funnel and a compact base, so the troops can get more value with the spells. Pekkasmash uses general jumps to get through the base. It’s important that the healers stay alive in both attacks, so the troops don’t die in the backend.
How to defend Falcon/Pekkasmash:
Avoid huge free trash areas for babies, bowlerbounces or valkfunnel opportunities, so the funnel is more expensive. (Trash Layer)
People usually use falcon or pekka smash against compact bases, because it allows more value from a spell. Building more open bases scares people from using these strategies. But keep in mind, less compact bases are more weak to QC strategies. Channels leading into the trash rings are working very well against falcon, since the valks will go around the base and die out.
I also explained this in my first Th10 Video: https://youtu.be/82hj_KNrMl4
Another way to defend a Falcon or Pekkasmash is to place the SAM’s in good Falcon/Pekkasmash entries, so the healers will die early. But you still need a backend, that will kill the valks/pekka…like a few X-bows/ats/tesla.
Important: The SAM’s should work against other strategies too, it isn’t good to place them solely against falcon. Try to place them against good qc+falcon spots. Pekkasmash is strong if the attacker can get both IT’s with 2 jumps, so I recommend avoiding such an entry for new builders. Experienced BB’s can use this entry as a bait, and use SAM’s to throw off the attack. You can also use bowler bombs to kill bowlers early.
Qc Baby at TH10
Qc goals: 3 or more AD’s+Xbows+IT.
How to defend Qc Baby:
A qc baby has, usually 3 rages for the Qc. Try to have constant Dps on the queen, so the attacker won’t have any rages left for the backend. You can do this with defenses that are unreachable from the most common qc entry.
Heroes and X-bows are good ways to kill the queen, or force a rage/ability. Spread the AD’s, so a Qc can’t get more than 2 AD’s with a Qc. Bait a Qc that gives the attacker good Qc value. Having a lot of storages inside the base also helps against Qc Baby, since it will slow the Qc down and make the strategy more time expensive. Eventually it could lead to a time fail or the attacker might avoid this strategy.
You can bait it with SAM’s against the qc, or you place them against the backend babies. I recommend testing out what SAM’s placement is better for your base. (I prefer sams against the qc)
GAT / Tesla / X Bows are great ways to kill babydragons in the backend, since it’s such high dps. Combine this feature with storages and the babydragons will die out fast.
Qc/Qw Miner/Hybrid at TH10
Qc Miner/Hybrid is an adaptable strategy, which can be used for a lot of bases. The Qc/Qw just need to create good pathing for the Miner/Hogs, so that they will stay inside the base.
How to defend Qc Miner/Hybrid:
Ground skellies are wonderful to lure+stop miner in high Dps / splash areas, so that the miners take a lot of damage while fighting the skellies. I recommend placing skellies in tesla farm / X bow farm / near It’s. Keep in mind that they are usually not good near the other heroes or ground skelly traps, because that’s extra poison value.
Good springs are important to defend every Miner/Hog attack. Test Miner attacks and try to place the springs directly in the common path. FC’s with a friend will help you a lot. Many heal zones are important against these strategies, keep in mind that traps near the Queen can work against Miner/Hybrid.
Heroes are good for 2 things:
- To force a rage/ability for the qc/qw. You can also use them to bait a Qc/Qw with SAM’s.
- Use them just like ground skellies in the Miner/Hog part. The king can be great for tanking, while the queen is killing Miner/Hogs.
You can make a Qw super hard by having unreachable Ads / Dps inside the base, so the Healers will be sniped or the Dps forces more spells for the Qw, which means that the queen will rather die out or you the attacker won’t have enough spells inside the core. Use a lot of high HP buildings inside the base, because it slows the Miner / Qc down, this can force a spell with the support of high Dps ( or splash for Miners ) .
Mass Miner at TH10
Mass Miner is a spam strategy, which profits from a bad trash placement, compact bases with a straight path through all the key values.
How to defend Mass Miner:
Have a unlurable CC, inasmuch as the attacker will be afraid of a “anti Miner” CC in a fresh hit. That is usually enough for a 1hit war, so the attacker will use at least Qc Miner.
Protect your trash ring as best as possible, so the attacker will have to use a lot of troops for a good pathing, which leads into less troop power in the core.
Use tesla or usually trash to lead miners in the trash ring.
Ground skellies and heroes should be used as I suggested in Qc/Qw Miner/Hybrid .
You can use dz to let Miner path around smt, but you have to pay attention that the dz doesn’t make the pathing for other attacks easier.
Spread your healzones, so the attacker won’t have enough heals for the base. Use a high Dps area to force heals, otherwise the Miners die out.
Don’t build too skinny bases, they make it way too easy for Miner.
One very easy way to slow Miner down is to have a lot of high HP inside the base, which can be combined with splash / Dps a very deadly trap.
Zapdrag at TH10
Dragons are one of the easiest strategies to defend in the siegeless meta (my opinion). Zapdrag profits from zapable/suiable Ads and a cheap funnel.
How to defend Zapdrag:
Don’t have 2 suiable AD’s next to each other. Single IT’s are the easiest way to defend dragon storm, but it can make your base weak to Witches/ Drag bat, so I suggest to use max. one single IT. The sweeper can help you to protect good Dragon entries or he can help you to bait the attacker in a specific area, this area should not be covered by the sweeper.
Have in general a lot of high HP buildings inside the base, because this gives the defenses more time to kill the Dragons.
Zaps at TH10
Don’t have too much value around AD’s, so sweeper, other AD’s and AT’s can be huge value for zaps. Try to not have them zapable together (1AT zapable with an AD is not too bad).

Zaps and quake needed for:
X-Bow = 5 Zaps + 1 Quake
Queen = 5 Zaps
IT = 4 Zaps + 1 Quake
WT = 4 Zaps + 1 Quake
AD = 4 Zaps
Cannon = 4 Zaps
Sweeper = 3 Zaps
BT = 3 Zaps
AT = 3 Zaps
Zapable AD’s are generally weak to zapdrag, since an attacker can get 2 AD’s with less spells as usual.
But you can use zapable AD’s to bait the attacker. You can do it with these concepts:
- Place SAM’s away from zapable+suiable AD’s, so the dragons will fly into it and get huge damage.
- Have a Xbow farm in your base. This high Dps area works great with storages to slow them, so the dragons will get huge dmg while they are stuck on the high HP buildings. I like to have SAM’s against dragons in my high Dps areas, mostly so the SAM’s are still in the Hound pathing.
- Have an archertowerkillzone (ATKZ) in your base, this is a Th7-Th8 concept against dragons.
ATKZ in a TH10 Base
It is an area with 4+ AT’s, which can kill dragons very well in the backend. Especially when the dragons split a bit. SAM’s should always protect the atkz, because a Dragon can destroy it fast, so you have to protect this area with 1-2 SAM’s. You can combine the X bow farm and ATKZ for a huge high dps area or place them on the other side. So the Dragons will always fly in a high Dps area. Use sweeper to force the attacker into a specific entry, which is exactly what you wanted.
All the traps can be perfect + ATKZ / X bow farm are in the annoying backend.
Important: This concept doesn’t work as good as a NFZ against Lalo, so I suggest you to use ATKZ for a Dragon bait base. Otherwise use a NFZ.
Examples for a ATKZ:


Dragbat at TH10
Dragbat is a strategy, which will profit from bad air splash spread+single It’s. It uses batwaves/batbombs to take out AD’s/IT’s or any kind of important defenses against dragons.
How to defend Dragbat:
You should never have freezable IT’s. Protect them with 1 or 2 WT’s. Don’t have too many kingtradeable / suiable / tankable (for a Golem/Giant) WT’s, because they could make a Dragbat very strong. You should never have any areas with 2+ AD’s and low splash defenses, because a batbomb/batwave will profit from it. You can use high dps areas to kill dragons/bats, but you have to pay attention: Atkz probably needs at least a Wt/Multi IT as support. X Bow farms usually don’t need a WT near it.
Again high HP works super to slow dragons down, so use them inside the base to make a Dragon attack very unlikely.
Use SAM’s in a common drag path, so that the drags will be killed early.
Skelly Dragons at TH10
It is not very common, but cool + easy to defend, so I wanted this strategy to be in my guide. If you are not interested in rare attacks, skip this chapter and move to the Sui Lalo chapter. The skelly dragon attack uses skelly spells to take down AD’s, which are not protected by any splash buildings or high dps areas. A skelly spell is a cheap way to take out air defenses, so the dragons can have more spell support.
How to defend skelly drags:
Protect your AD’s with something like a Xbow farm or use multi IT’s to have splash damage on the AD. BT’s can be used as well, to secure an AD. The main problem for mortars is that they could be distracted by troops like giants. The heroes are good to distract skellies from AD’s, so the defenses can take the skellies out. But keep in mind that the heroes need time to reach the skellies.
Sui Lalo at TH10

Sui Lalo is one of the best strategies in the Th10 siegeless meta, and of course it is very hard to defend, because it is very flexible.
How to defend Sui Lalo at Th10:
Avoid a walkable Queen, so a sui is more difficult + expensive.
IT’s which are reachable with a 1 layer WB can make a sui worth it, so avoid this or make it more expensive to funnel.
The King / CC / both can be used to slow a sui down / get good dmg on the enemy heroes.
Try to have enough dps near IT’s / AD’s etc., a sui needs a Golem / won’t get huge value. Have a good AD shape, so the Lalo is more difficult. Place your SAM / RAB away from the sui areas, so the Lalo will have problems with your heavily trapped backend.
Use mortars/cannons etc. to make the Lalo pathing harder. Try to create Hound-Loon splits with these defenses, so the Hound can not tank for the Loons, while they are flying into a NFZ or just regular anti Loon defenses like WT’s or the GAT.
Air skellies can kill Loons very quickly, so you have to place them away from AD’s or Hound pathing. Use “No fly zones” (NFZ) to stop the Lalo part very effectively:
NFZ in a TH10 Base
Essentially NFZ is a Th9 concept which focuses on separating hounds and loons and then shredding down loons since hounds fly over them and provides not as efficient tanking as they would without a NFZ. As we are using NFZ’s at Th10 we should also remember that bats can take advantage of this and so we don’t encourage vast NFZ’s as much.
At th10 these work more like an anti loon zone. Rule of thumb is to have GB’s near AD’S and springs near splash.This makes it harder for hogs and miners.Since NFZ already has splash defences so if u have an appreciable amount of dps nearby so it can force an heal without needing a GB. Hence we recommend trapping NFZ’s with springs. While creating an NFZ in your bases you must keep note of these points.
i) Try to have NFZ away from the queen so that people can not destroy it with a Qc .And if they choose to destroy it they won’t get your queen.
ii) NFZ should be out of hound pathing in general and away from AD’S . So hounds give a minimum amount of tanking for loons while flying over a NFZ.
iii) People like to fly hounds over NFZ’s so you as a builder should keep note of it and make sure to spread air traps like RAB’s and air skellies so that a single hound can’t trigger all of them.
But always consider having RAB’s or air skellies in a NFZ, since that makes a NFZ more deadly.
v) As already mentioned don’t have very large nfz’s.
Here are examples of two working NFZ’s:


Both of these are a bit thick but you can also opt for using smaller NFZ’s. Both of these examples have BK in them which isn’t necessary and while using BK in a nfz you also must be vary of Qc hogs. Also if you have geared AT then consider using it in a NFZ since its deadly to loons and can’t be tanked for long by hounds due to its short range.
By Astrit
Qc Lalo at TH10
Another strong and common strategy at Th10 is the classic Qc Lalo. People are playing it with a lot of different concepts: with WB’s, jump, qq or less spell support for the Qc, so the Lalo part will be stronger.
How to defend Qc Lalo:
Sams are as always a very strong way to stop a Qc. A common usage of SAM’s is against Qc’s so the Healers will die and the attacker needs more spells to support the Queen. Otherwise she just dies out.
But don’t use all of them against a Qc because you also need a few SAM’s in the backend to kill the Hounds.
Constant dmg on the Queen + high dps areas / hero support can help to force a rage for the Qc. Use RAB’s/Air skellies away from good Qc spots, thus will make the Lalo part more tough, and remember that you should not have them in the Hound pathing, so they hit Loons instead of 1 tanky target.
Avoid huge WB/jump/qq value: Queen+ 1 IT+ 2 AD’s is for example too much value for one jump. Make the Lalo pathing as hard as possible, mortars/cannons/ats/tesla can be used for an awkward pathing through the base. The usage of NFZ and Hound-Loon splits is again very helpful against Lalo, so try to implement them.
Old Live Build
This live build was made in april 2020, so it is not up to date anymore. It can still show you my thought process, but some parts may be old meta.
Welcome to my siegeless live build, I hope it can help you to understand the base building steps better. This build is not the best build I have ever made, but it should be enough for good explanations.
This won’t tell you anything new about siegeless base building, so you don’t have to read it, when you understand the chapters before.
I usually start with the Inferno/Queen comp, if I found a good Idea for my base. The idea can be one simple It comp or a whole base concept.
-I wanted a walkable single IT in my base, that has to be hard to reach for a Qw/Qc, because of a moat.

I expanded my base in the 6-9oc area, because I wanted the IT to be walkable from the 12-3oc side. The X bows are unreachable dps for a possible Qc in the King+Queen comp. I prefer both of them in one comp, because they lead into a Qc Hog attack, which is in my opinion easier to defend than Qc/Sui Lalo.
Next, placed the moat to make a sui for my heros more difficult, since that seems very vulnerable for my base prototype. Tried to go with a more classic IT comp for this live build, so I chose the IT island. The 9×9 comps protect my core + king/queen from being easy to reach.

I didn’t want to have both IT’s accessible from one comp, Dz were needed to protect them. I still have a few walls left, which will be used for a moat later, to make a specific entry more difficult.

The CC will protect my Queen, but is still central for a harder way to lure. (Mass Miner should be risky in a fresh hit.) The last X bow protects the IT. The attacker can’t reach all of them from 1 comp and none from the queen comp, so a Qc Hog cant get value easily. The BT makes logically a skelly on the queen more difficult. I had to make my Queen comp 1 tile bigger, because I made a 9×8 comp.

I wanted a classic Y shape for the AD’s.The WT’s have 2 purposes
- Protect my IT’s from being freezable, so a batbomb won’t work. A single makes bat attacks easier, the base needs a good splash protection.
- Not overlapping with AD’s, which makes the Lalo harder.
The sweeper points in directions to slow Loons down, which gives the WT’s/IT’s more time to kill the Loons + to make a possible batbomb more expensive. I dislike that 1 sweeper is accessible from the Queen comp, but there was no better place. The CC had to be moved into the IT comp to do a similar Job, but give my Sweeper the needed space. The single IT will be protected from the CC too, so a Sui or Qc for the IT is more difficult and risky.

I created a defense ring round my multi IT, because the troops should fly around it, thus will make more dmg on the troops. The single IT has direct pathing into it, because I plan to put a SGB in there. Every from the outside reachable WT/AD should be protected by at least one cannon/at.

Mortars are used to protect my AD’s/WT’s from being direct targetable. The remaining at are used to have constant dps near the Queen.

I placed the SGB early, which helps me to pay more attention for the pathing, so I can adjust possible mistakes.

The 10-2oc side looks very vulnerable for possible Qc/Ks, the th 6oc makes these entries more risky. The AT should protect this Th.

The next step is to make sure that the defenses are not bounceable.

Storages inside the base makes a miner attack more difficult. I filled the trash ring and switched the Th, because it should be better protected by AT’s. (Tesla)
The Traps are placed away from the Queen, so the attacker will probably have a hard backend. The Tesla is used to make “easy” funnel spots more expensive.
A 8oc charge would get good value and a safe Th, this leads into my decision to have 3 SAM’s against this charge.

The RAB’s are placed away from AD’s, which allows them to hit more likely Loons.The SB’sare against good Qc, which should be very popular.

I asked a few people for a review and I have made a few mistakes:
- The SBnear the Queen comp wont work.
- The AD 12oc should not be walkable from the IT channel, to avoid a freeze Qw into it.

I use a 13 goblin 1 witch 1 baby CC to make a Qc more difficult, the witch can be annoying for drags too, so it is a good way to defend many weaknesses.
The base is finally ready for the tests in friendly challenges: Dragbat, Qc Lalo, Qc Hog and Sui Lalo are important for this base, but in general is every test against this base helpful.
I have made a few YouTube Video for Th10 Siegeless, you can take look if you want more explanation from me: https://www.youtube.com/playlist?list=PLHa7jL-uKDE6k8pz039exi89z1oUyBZDC
Final words

Thank you for reading this guide, I hoped you learned the basics of Th10 base building. I recommend you to use the #th10-inspiration concepts on the “Base Building Server” to get new Ideas. I also will do Livebuilds sometimes on this server, so I heavily suggest you join the server.
Special thanks to my friends Kukri, Icefire, Astrit and Beast who helped me a lot with improving this guide, so you can learn as much as possible. And thank you Rose that you gave me moral support.
I hope you have fun with Th10 Base Building!
By EM#2378
and Icefire157#9967
Author

Hello boys and girls I am EM,
A base builder with Th5-11 experience. Th10 siegeless base building is my specialty and this guide will help to greatly improve your base building skills in that regard. I will show you the basics of siegeless building in this guide, but I will also try to explain some more advanced concepts, like baiting an attack.
I recommend you reference #bb-abbreviations from this Server: https://discord.gg/NMXt8kz, if you don’t understand what I mean.
This is a updated version of my Th10 guide, I tried to explain basics in more detail by using a lot of pictures, so do not be afraid of the high number of pages
I also make YouTube Content, so take a look there, if you are interested:
More guides from Clash Champs
Looking to level up your attacking game? Check out these attack guides from Clash Champs.
Super Wall breakers are used in almost every attack. Here’s how YOU can get the BEST value out of them.
Do you use Electro Dragons a lot? Chances are you may not have thought about using them as we do. Electro Dragons are one of the strongest troops in Clash of Clans.
In this blog, we share Five Electro Dragon Tips that you can use. What do you know you might even find a use for one of them in your very next attack?